edddison for tabletop
Getting Started#
edddison for tabletop gives you the possiblity to control your 3D Model with tangible objects on a floor plan. For more information about the edddison hardware options please visit: edddison Hardware Controllers
The set-up of edddison for tabletop is very easy and can be done with just a few hardware tools:
- Webcam or industrial camera
- A4 printer to print the object markers and floor plans
- Tangible objects 3D-printed, laser-cutted or any other object that is available, e.g. toys
- Presentation screen - e.g. a pc monitor, tv or projector
- PC running 3D software and edddison. See Getting Started.
In this tutorial we will cover how to get everything running.
How does it work?#
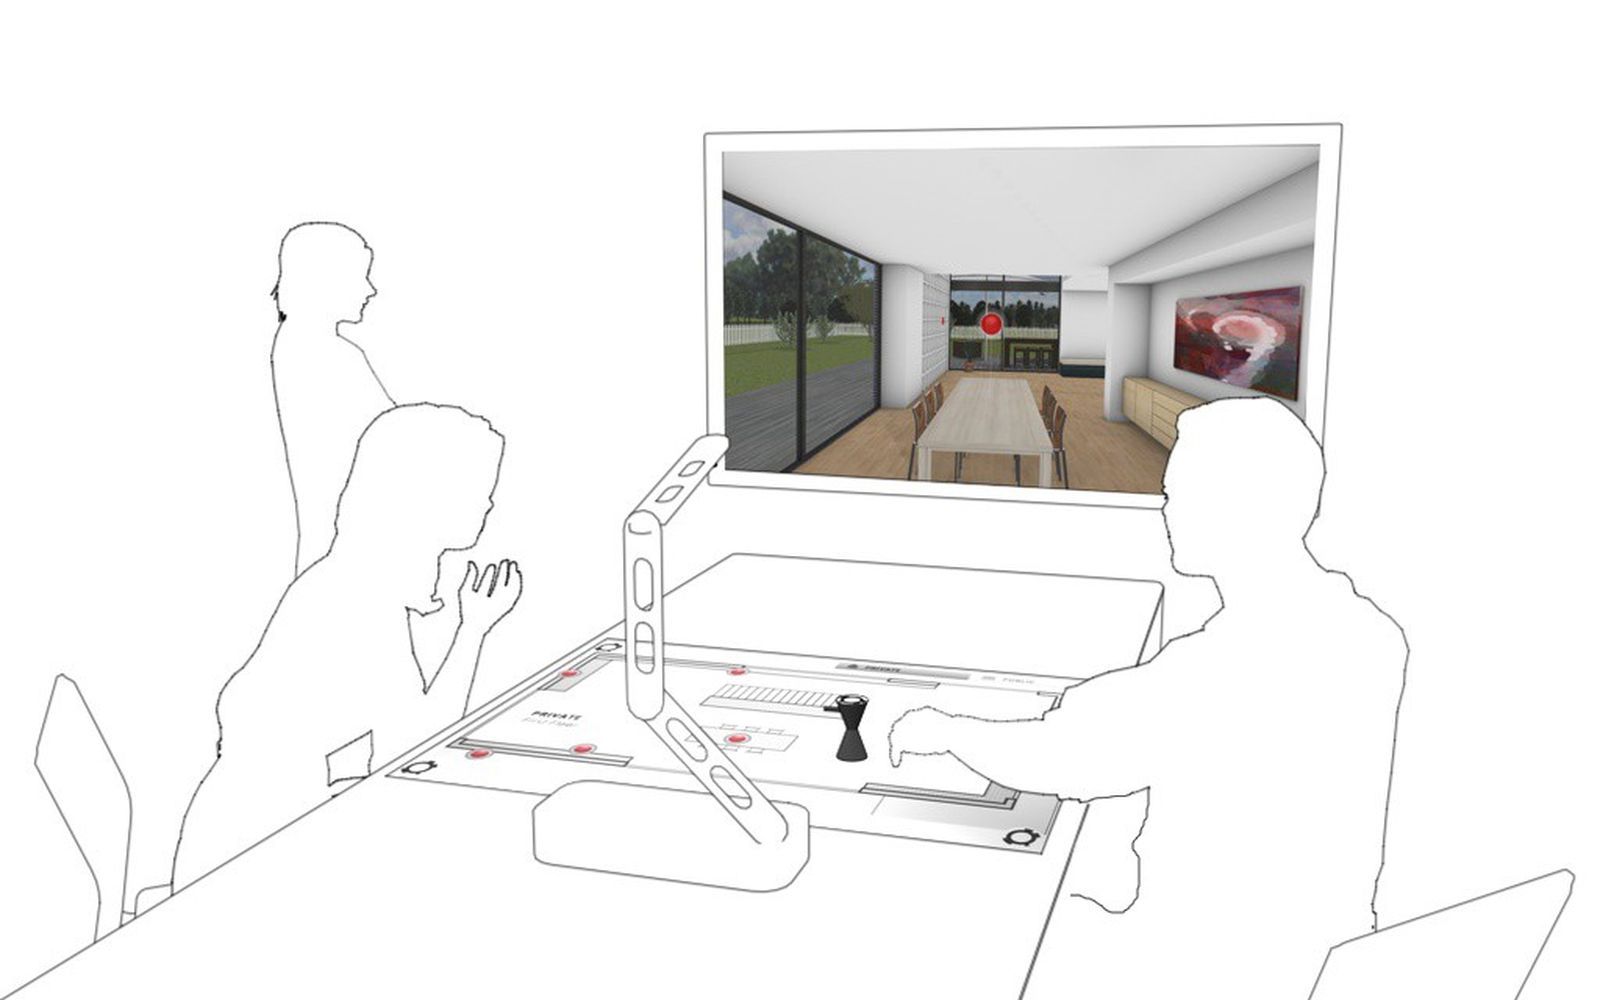
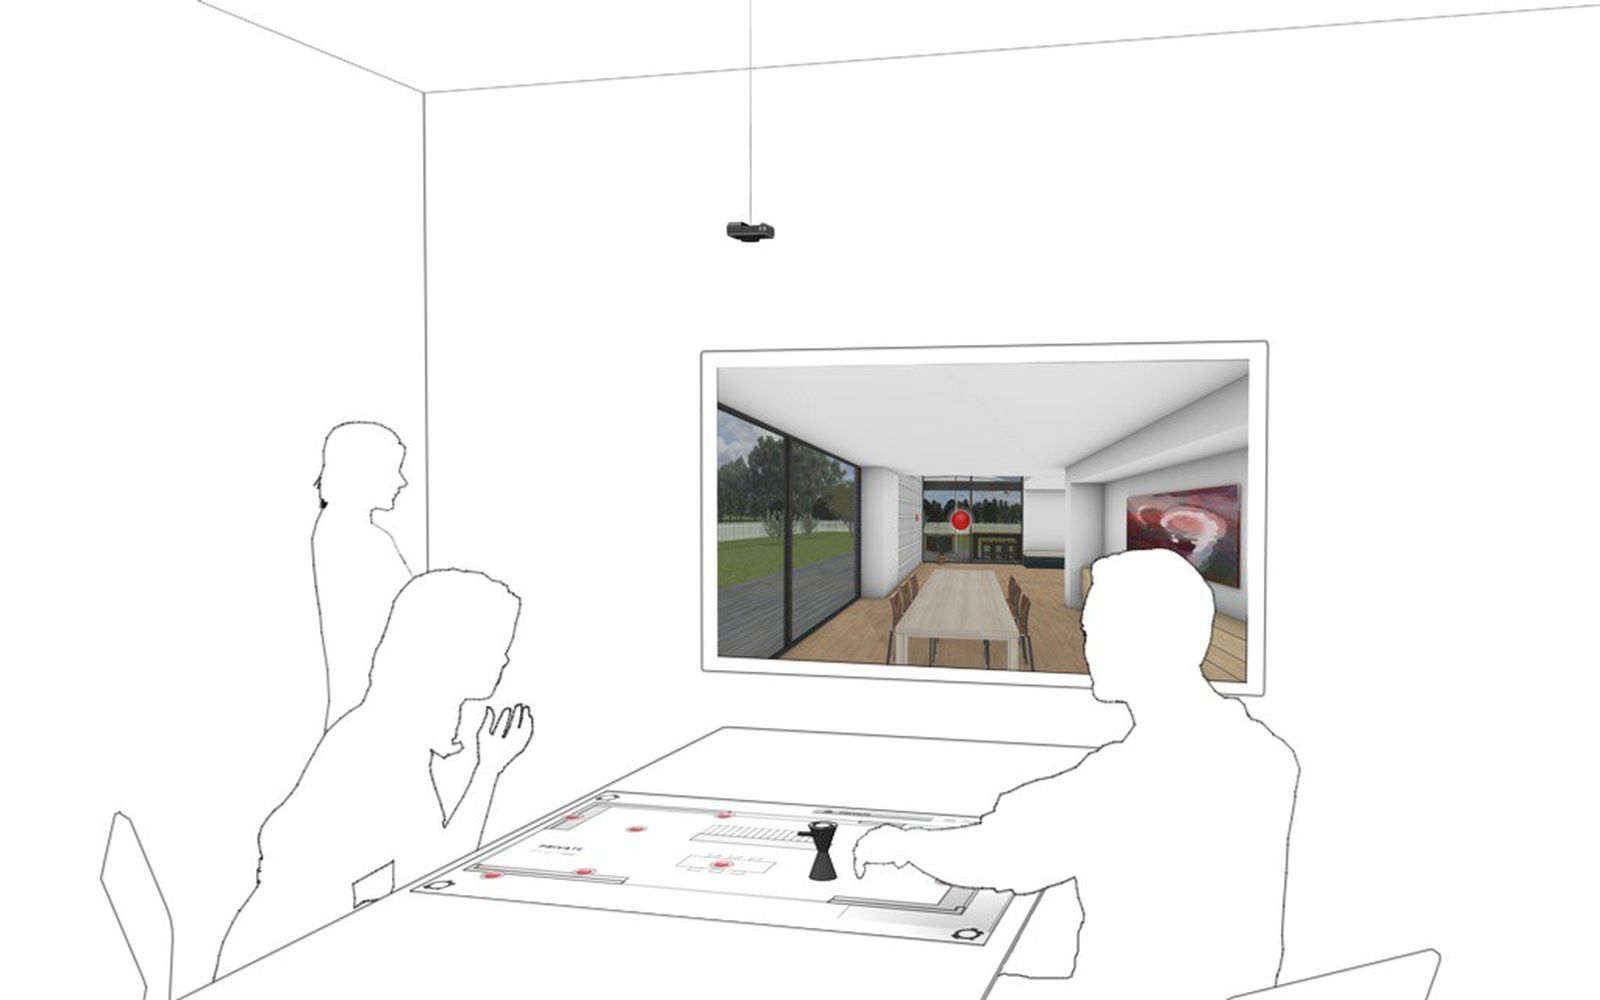
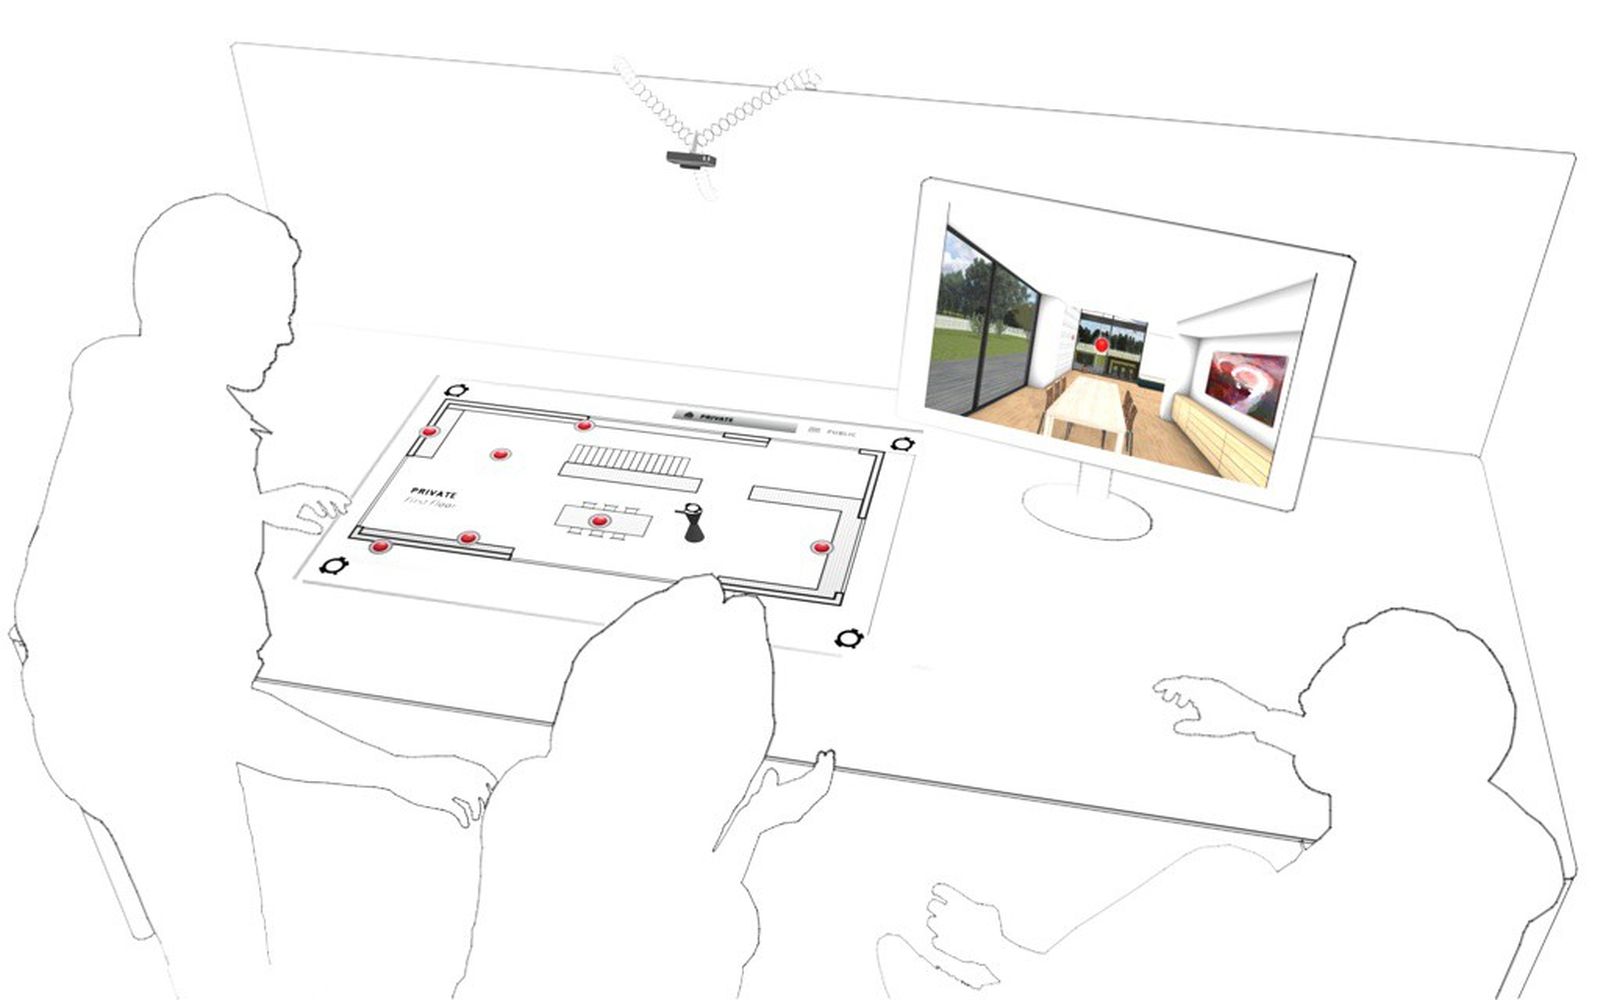
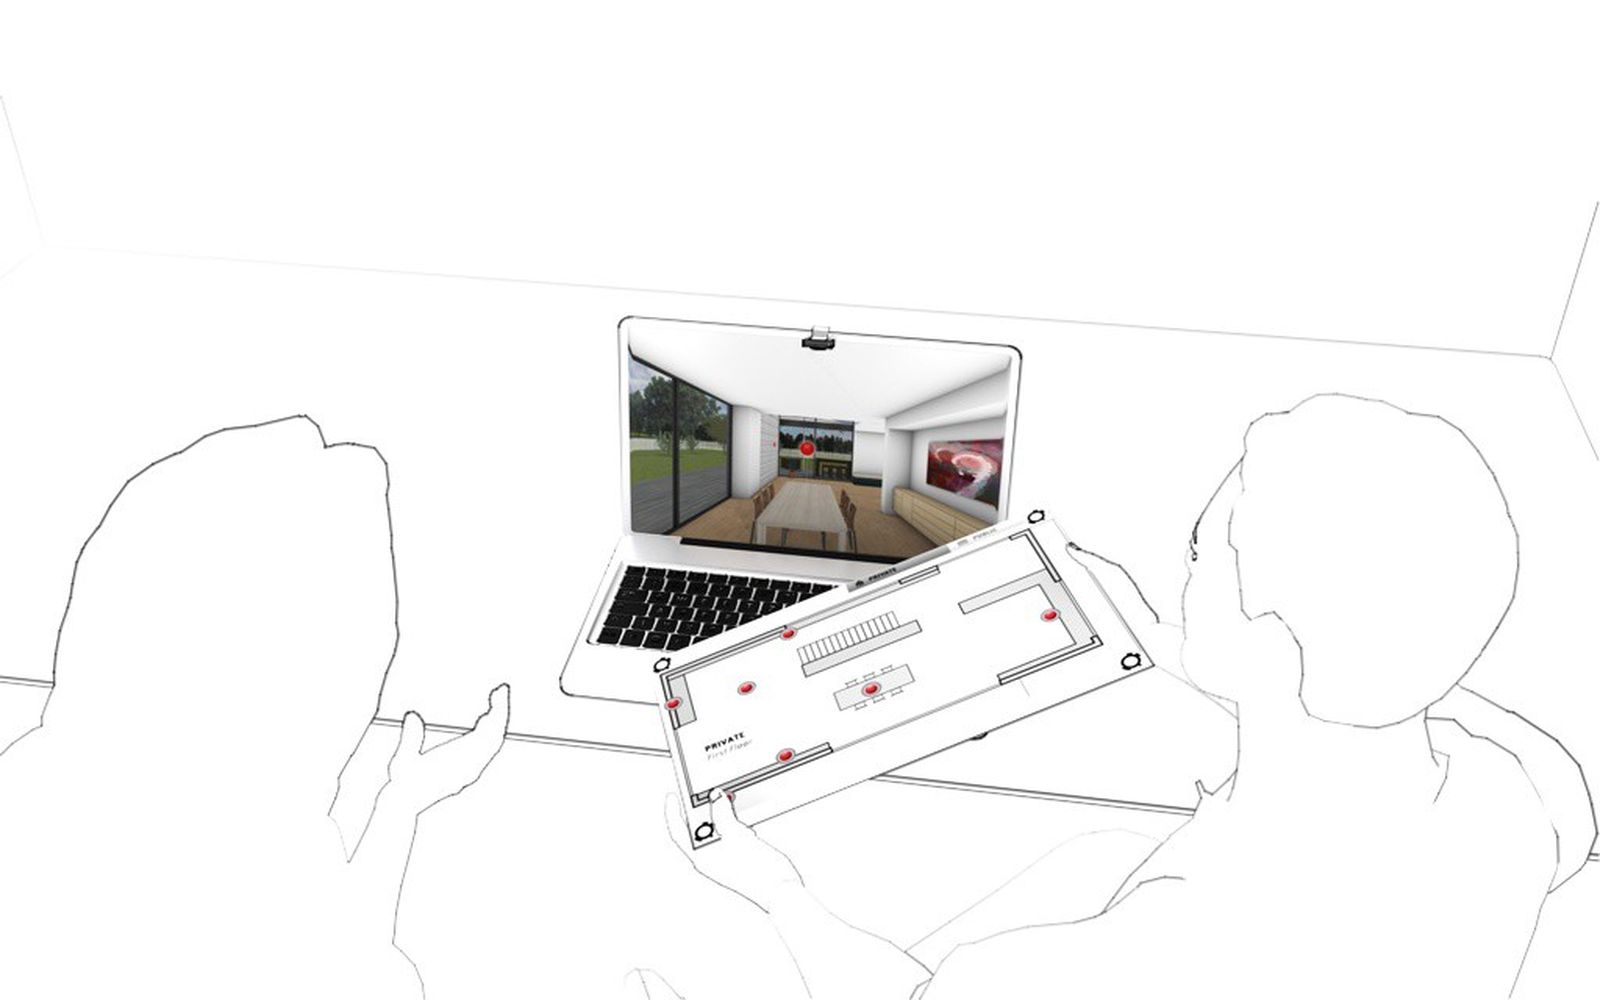
edddison for tabletop is based on specially developed Object Markers (like Barcodes or QR-Codes) and camera-recognition of these markers. Through a simple camera the edddison software can see object markers and will recognise movements. This way, when you move or rotate your marker on the floor plan, the edddison software knows exactly where you want to go and translates your movements to the 3D software.
Possible Set-Ups - Decide yours#
edddison for tabletop can be set up in various ways, depending on your needs and ressources.
The most commonly used ways are with a:
- edddison tabletop-kit
- camera-stand
- ceiling-mounted cam
- wall-mounted cam
- notebook and webcam
It doesnt matter which option you opt for, the software setup remains the same.
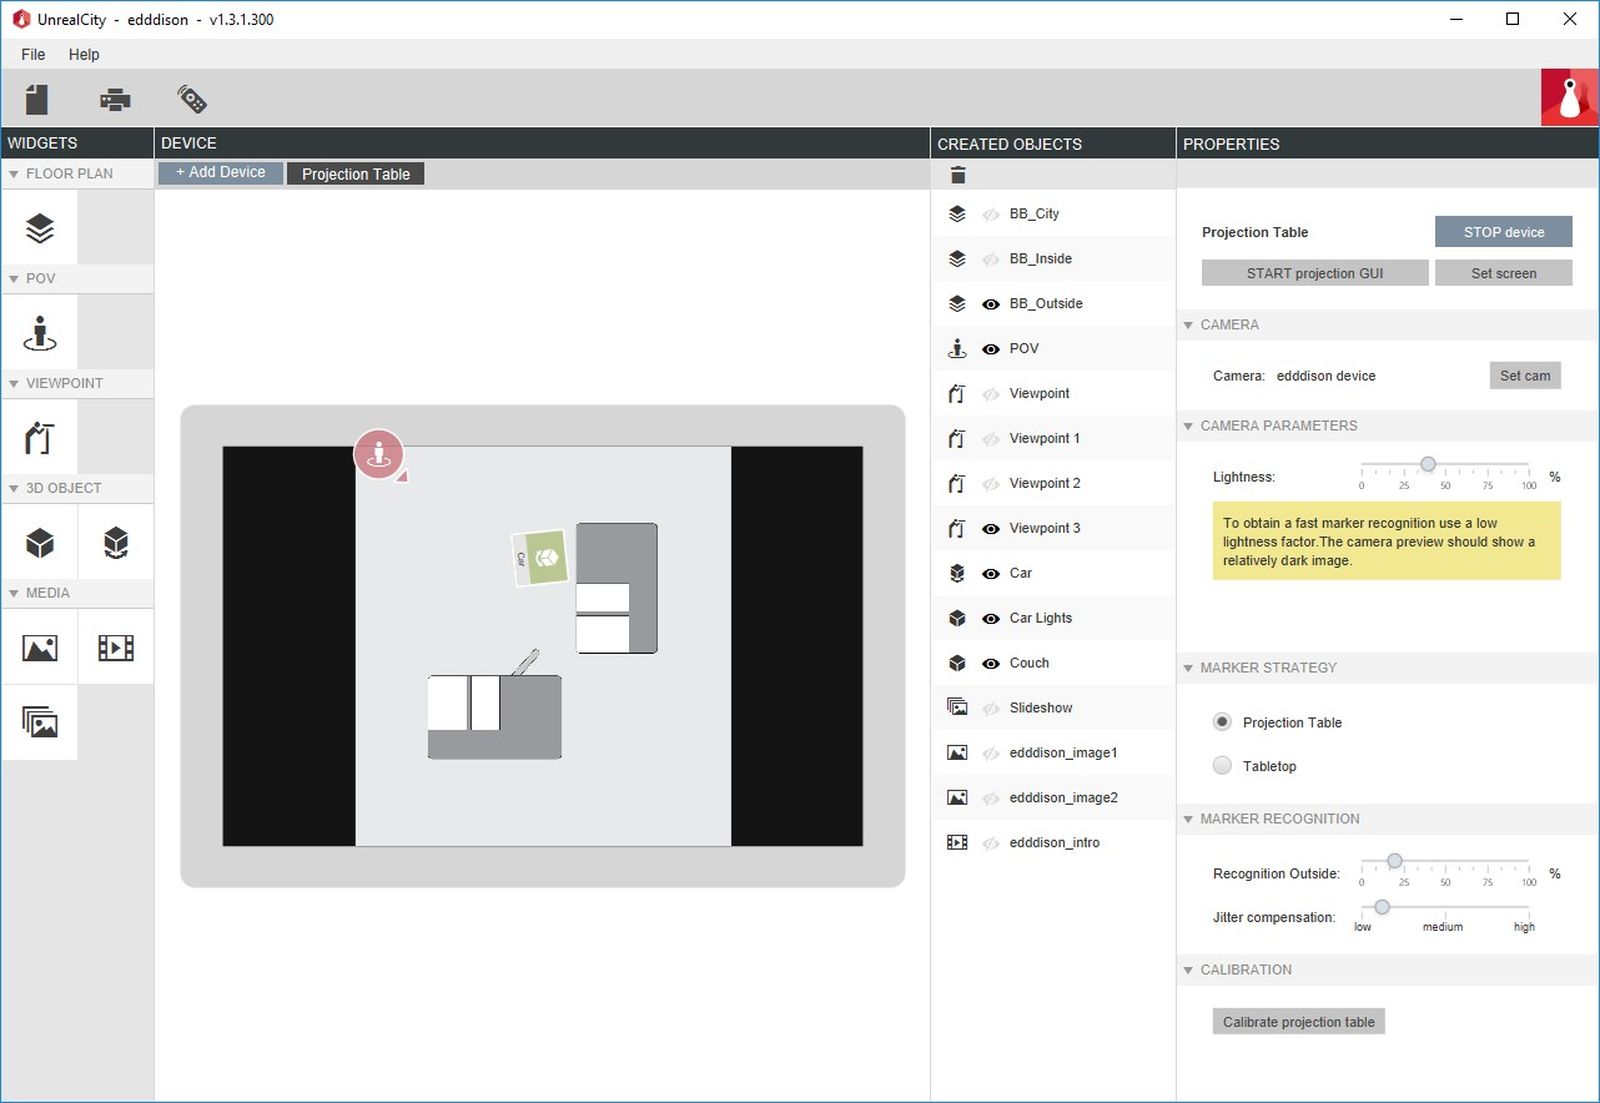
edddison camera-kit#
The edddison camera kit is a special hardware kit, developed to transport and setup the the edddison experience wherever you want and provide a wholesome and professional presentation to your clients.
For more information on the camera kit please contact us at inbox(at)edddison.com
Camera-stand#
If you have a camera stand (tripod) handy, this option will provide with the perfect solution. Just mount your webcam or industrial cam onto the tripod. Perfect for situations, where you have to take the edddison setup to a client or have to stash it away in between meetings.

Ceiling-mounted cam#
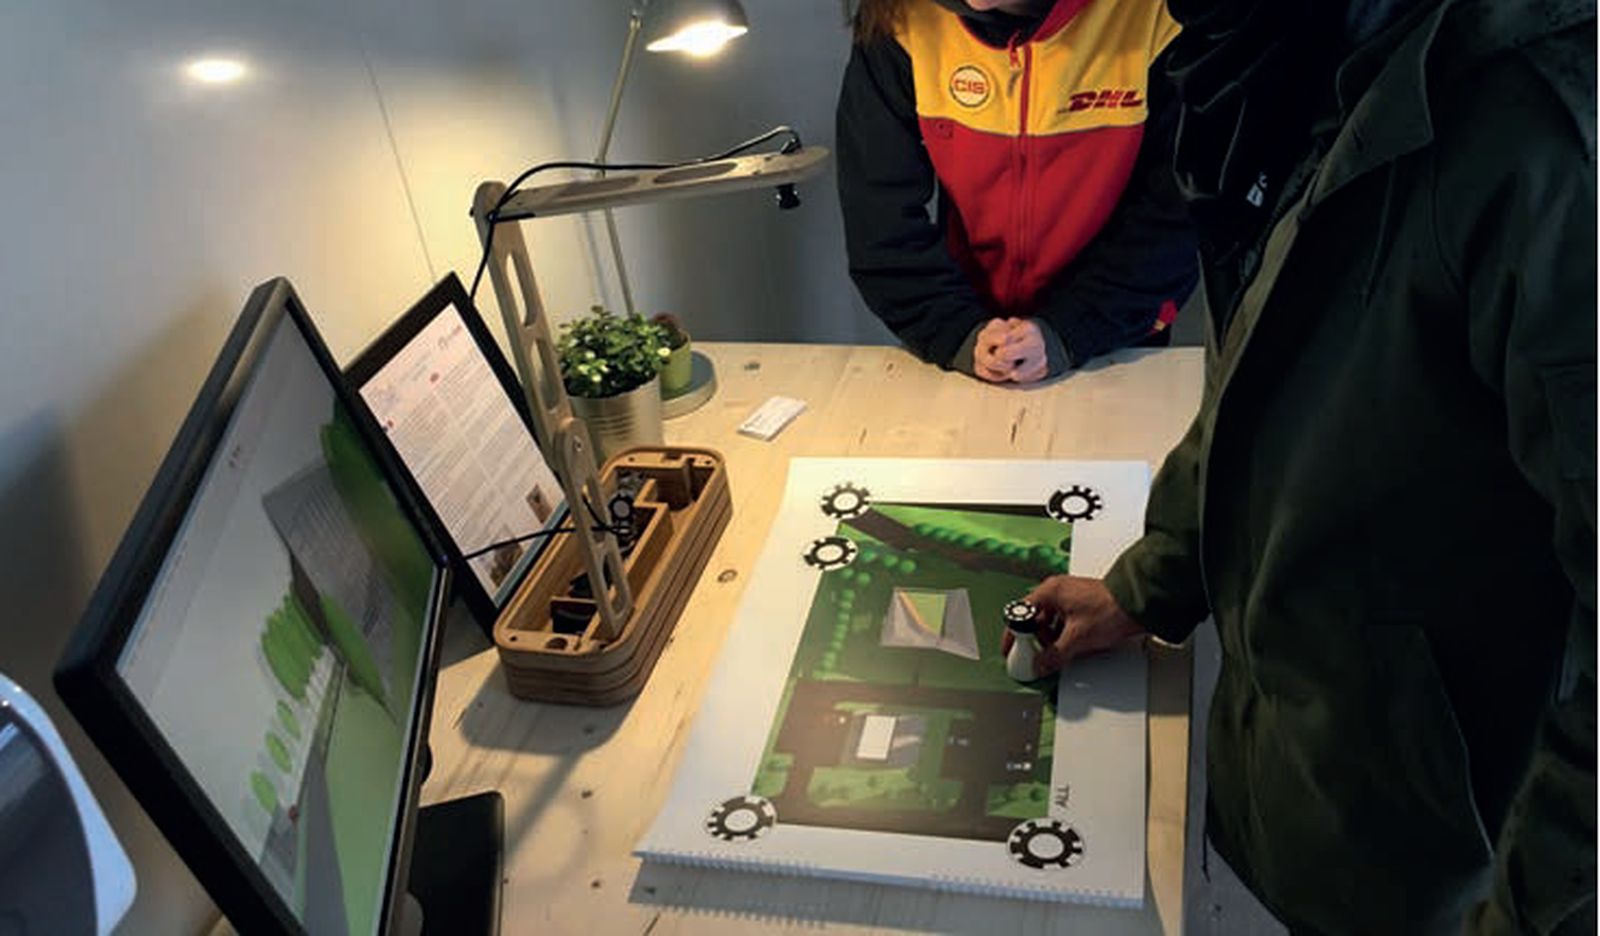
For stationary installations we suggest using a ceiling-mounted high-res camera, which is installed over the floor plans and out of sight of the client. Like this you have no disturbing hardware on the table and can interact freely finding the best solutions with your client or team.
Wall-mounted cam#
Perfect for presentations at fairs and stands, the Wall-mounted cam provides you with the same freedom as the ceiling-mounted cam, but needs a lot less work in installing it. Just hang your webcam on the wall and point it to the floor plans. The perfect hybrid between a camera-stand and a ceiling-mounted camera.
Floor plan book with Camera#
Addditonally to all tabletop solutions you can make your presentation even more fluid and wholesome by showing your floor plans in a floor plan book. Dont hassle with exchaning floor plans and positioning them, just flip over the page and jump from floor to floor. The floor plan book can be printed with most photo online services in a matter of hours/days

For more information on how to make a photobook please refer to edddison floor plan book for tabletop
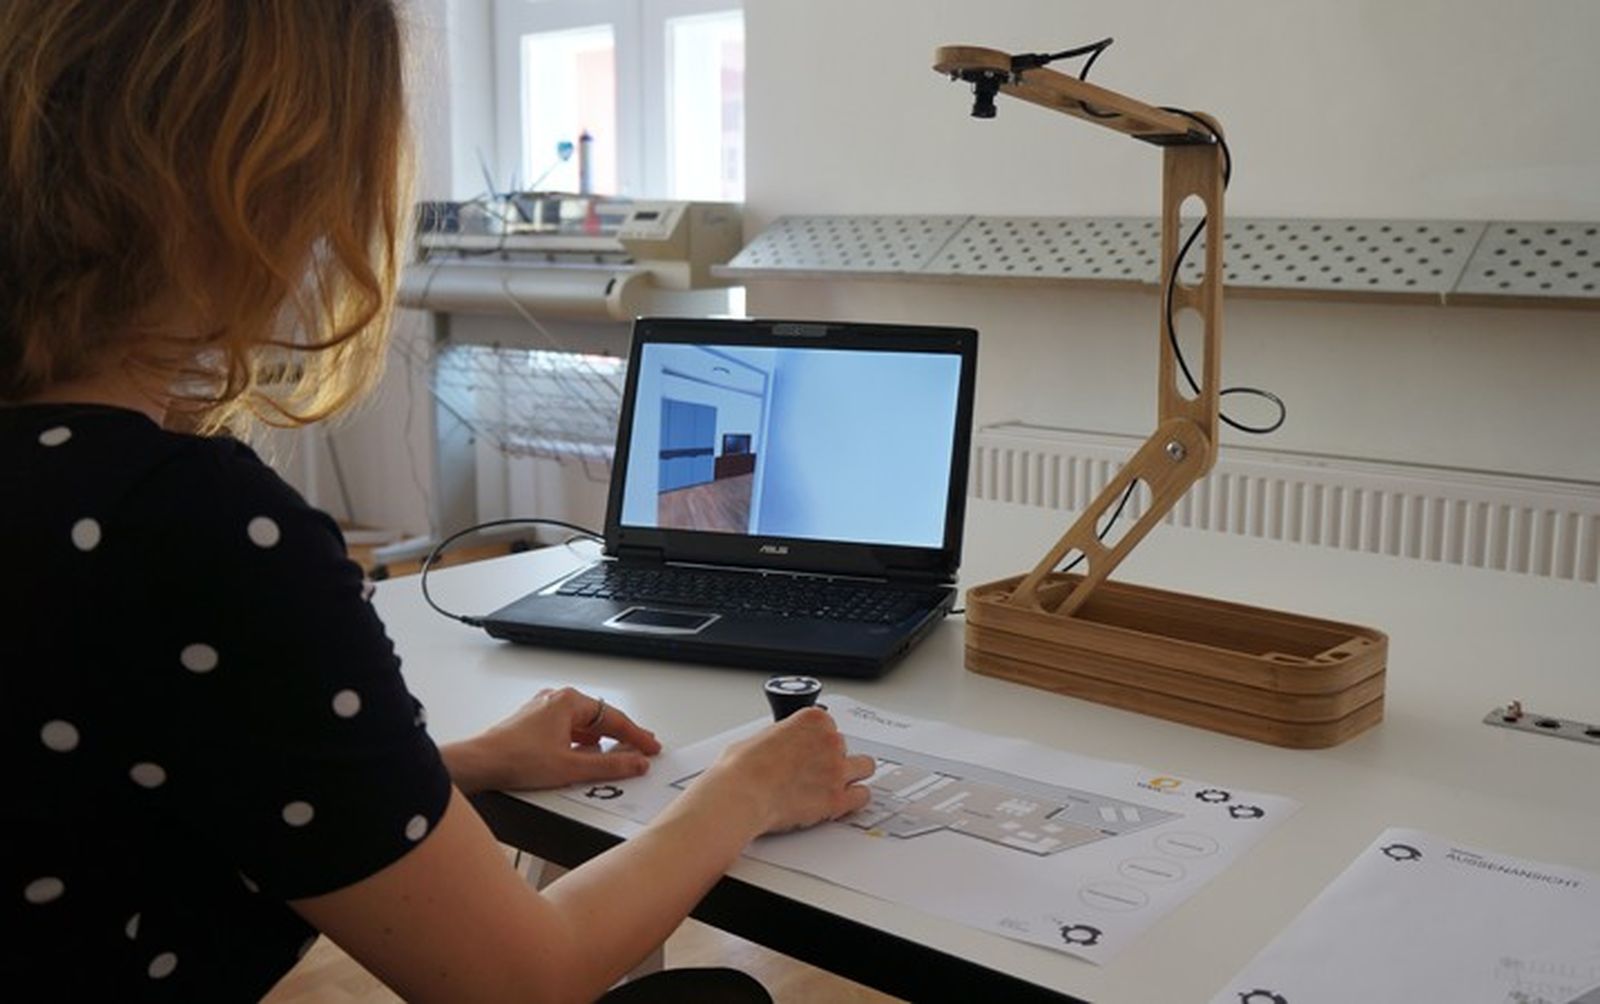
Floor plan on keyboard (Notebook)#
If you want to be even more flexible and dont want to carry large amounts of hardware with you, maybe the notebook-solution is for you! Print your floor plans on a cardboard and put them on top of your notebook keyboard! With an addditional webcam on top of the screen you are ready to go! Super compact!
For more information on how to make the floor plan-cardboard please refer this Tutorial.
Software Configuration#
First make sure the edddison editor and the 3D Model are correctly started, as if you would use with a Software Controller.
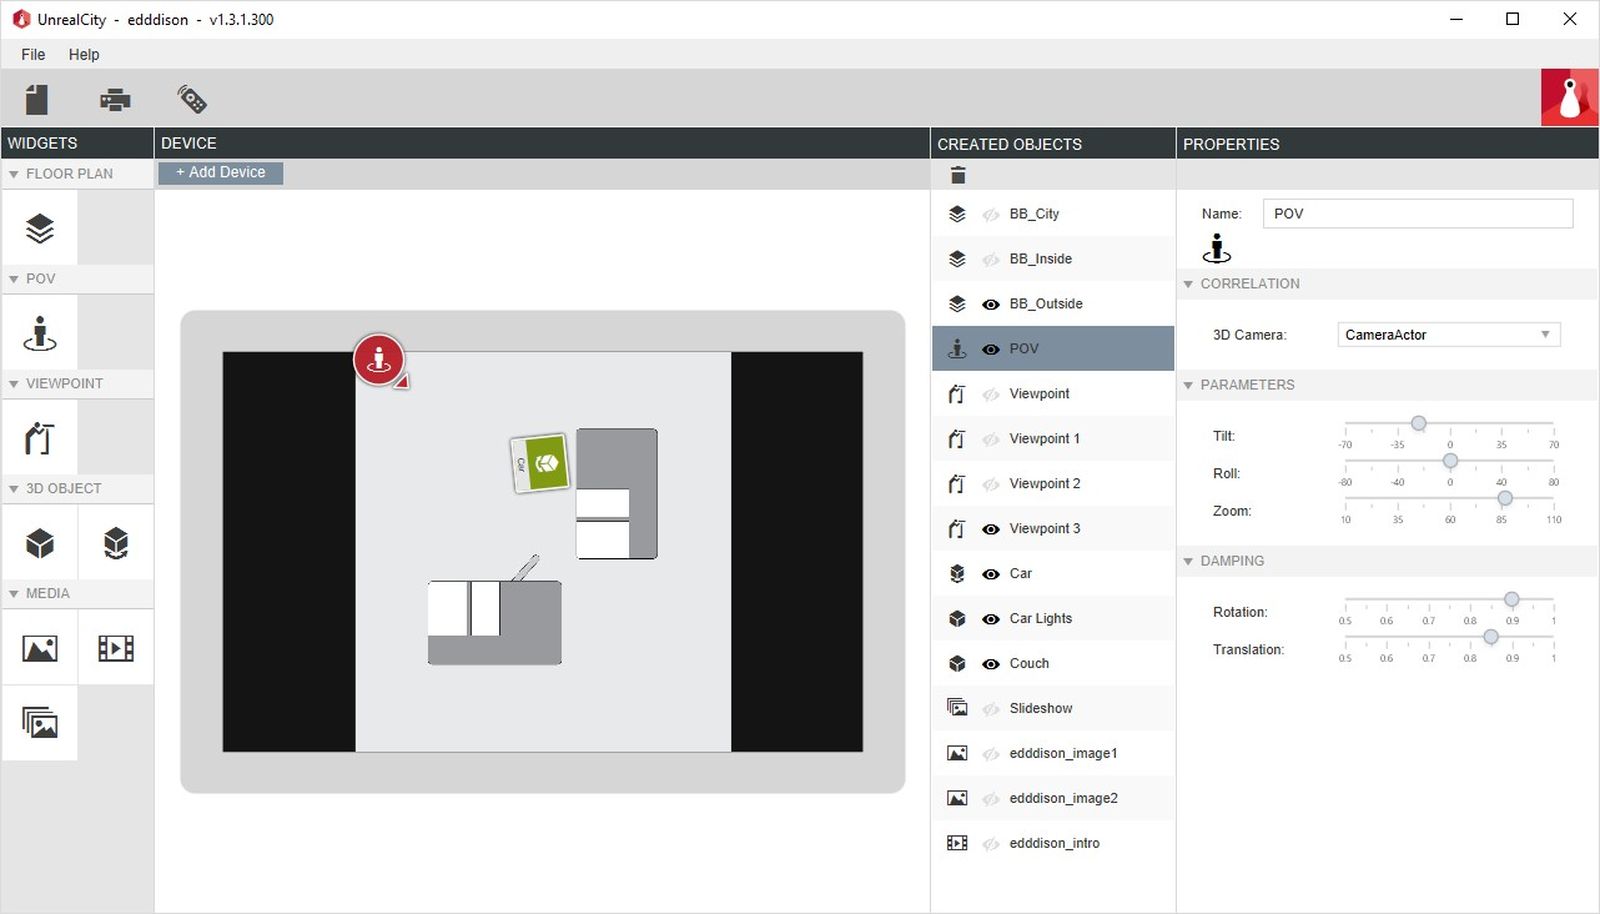
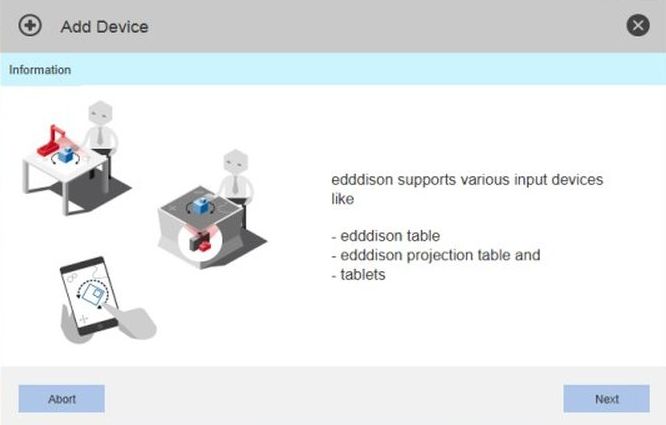
Add a device#
Note: You can only use one device. If you already added another one delete it first.
- Connect your camera to the PC.
- In edddison click Add Device
- The wizard will guide you through the setup
- Choose Tabletop as Device
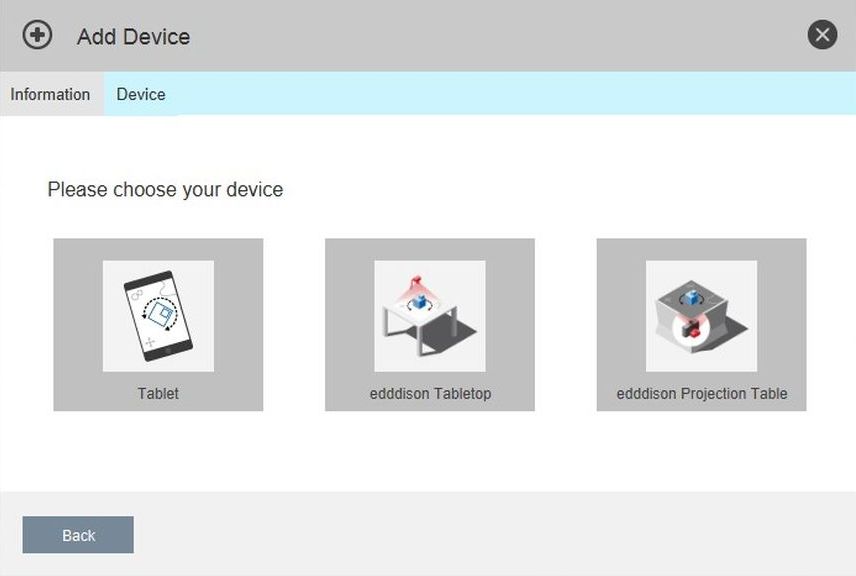
- Choose the correct camera from the dropdown-menu
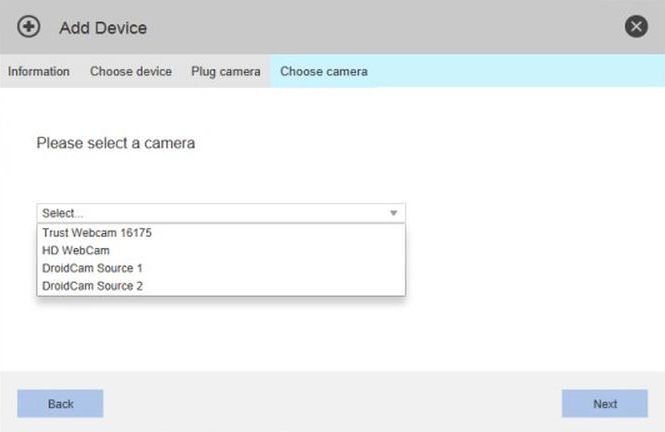
- Finish going through the wizard.
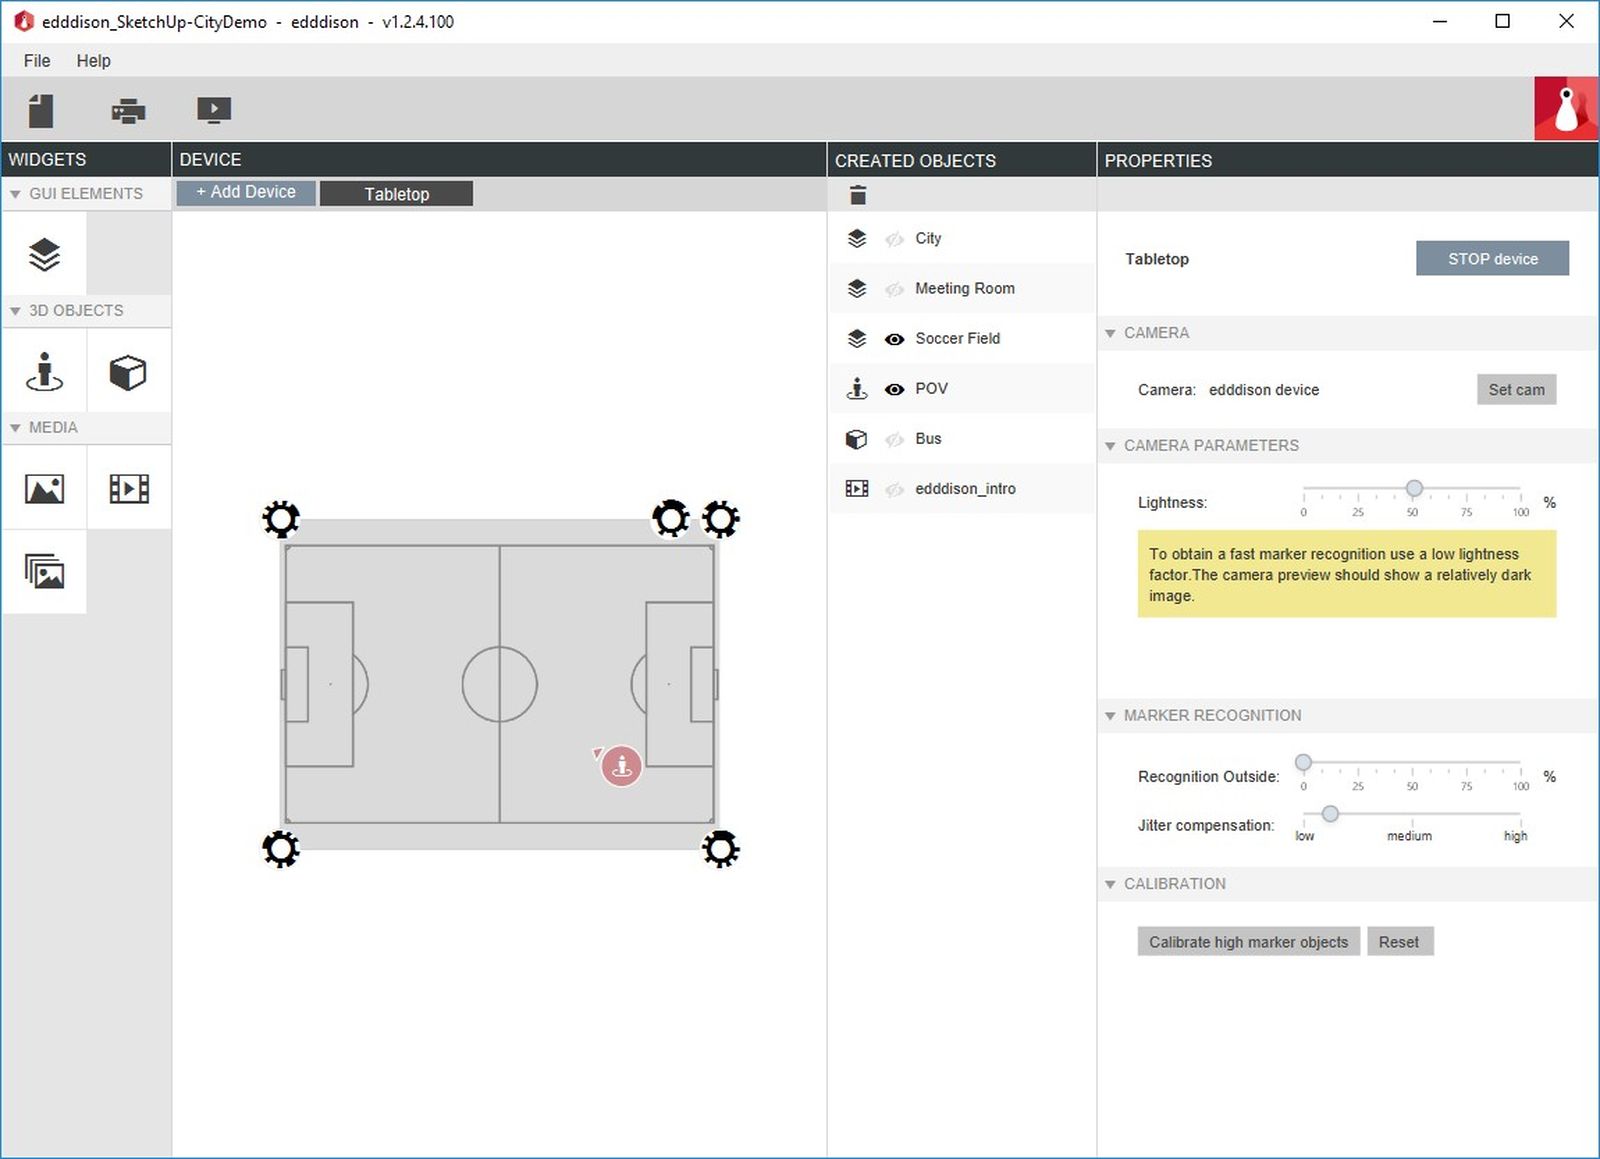
You should now see a button Tabletop next to the Add Device-Button.
- Click on Tabletop
- Click the Start-button if its not already started. A MRI-preview-window should pop up.
Floor plans#
In order to use edddison you need a floor plan.
Floor plans help you to navigate in the 3D scene. Every floor plan has a unique ID, represented by a object marker. This makes it possible to jump between floor plans by exchanging them physically.
When you followed our tutorials to setup your 3D project for edddison you should already have at least one floor plan in your edddison editor. Please refer to Getting Started for more information
Print Floor plans#
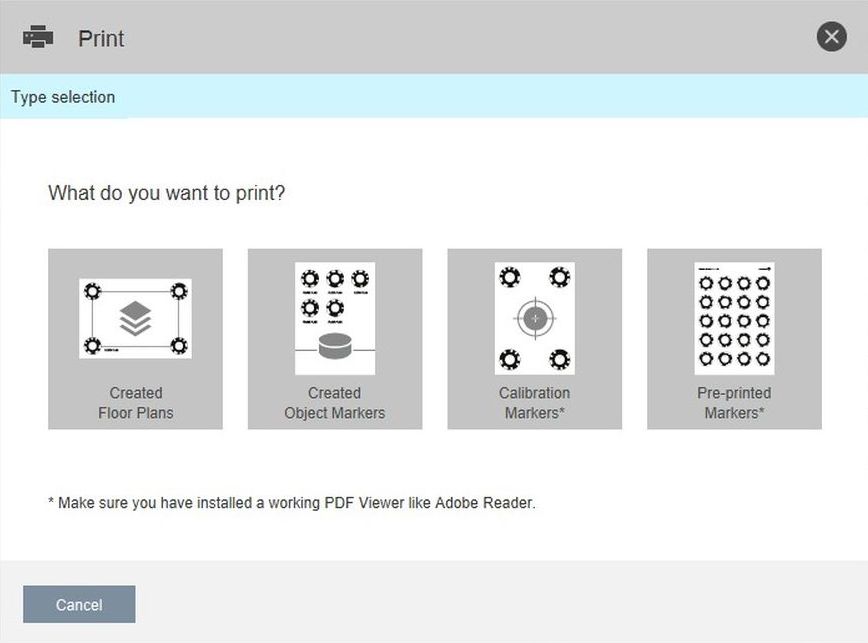
- In the edddison editor select the Print plans and markers icon. (Printer-icon on the top left)
- Select Created Floor Plans
- Choose the floor plans you want to print
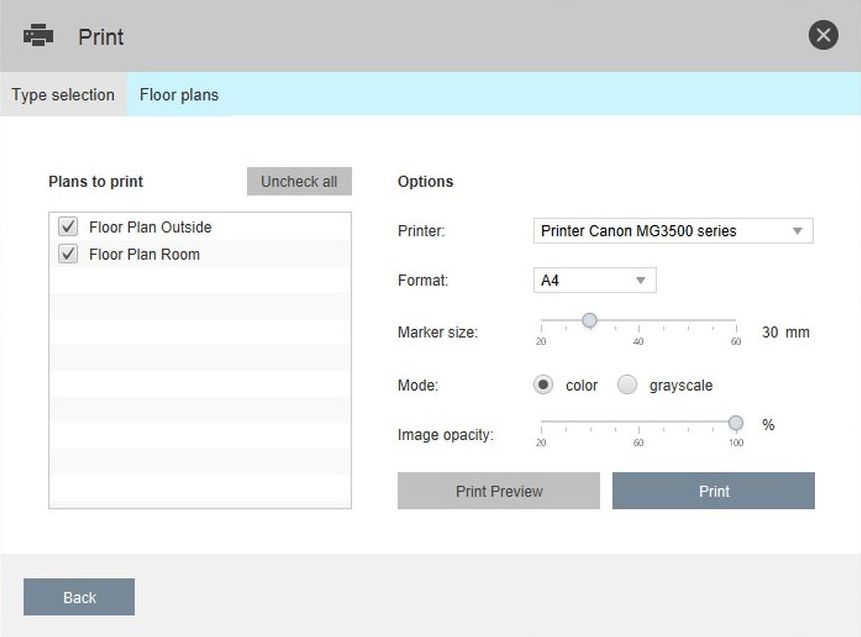
- Select printer and paper format
- Marker-Size: This is a advanced setting, which only needs to be adjusted if your markers are not getting recognised correctly (camera too far away, etc.) Please refer to the chapter "Marker Sizes" further down in this tutorial.
- Mode: Choose if you want to print color or grayscale floor plans
- Image Opacity: To give more focus on your 3D objects or if the colors of your floor plan are too vivid you can change the Image Opacity of the floor plan.
- Select Print Preview to review your settings
- Print Markers
Note: If you want to print your markers from a different PC or at another time you can click. Click "Print Preview" and save as PDF.
Note: When printing use opaque paper or glue the markers to a non-transparent object. If the paper is too thin, the contrast between black and white will be reduced, thus making recognition more difficult. A good choice are (round) self-adhesive stickers.
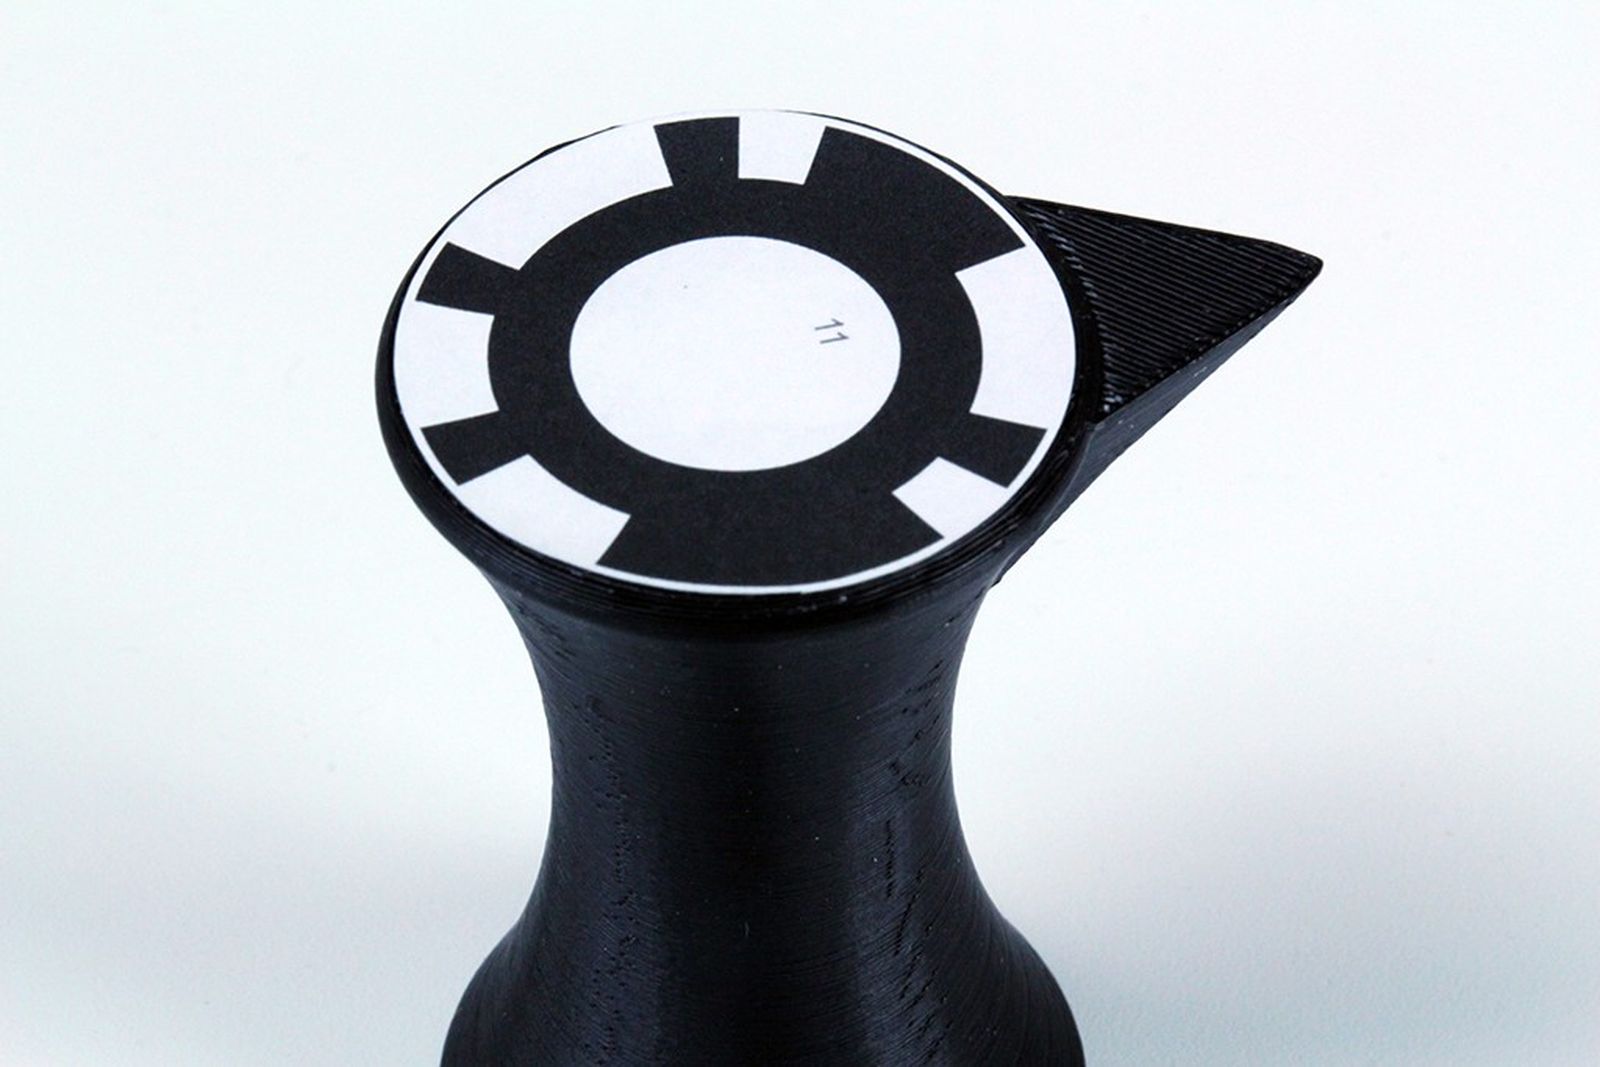
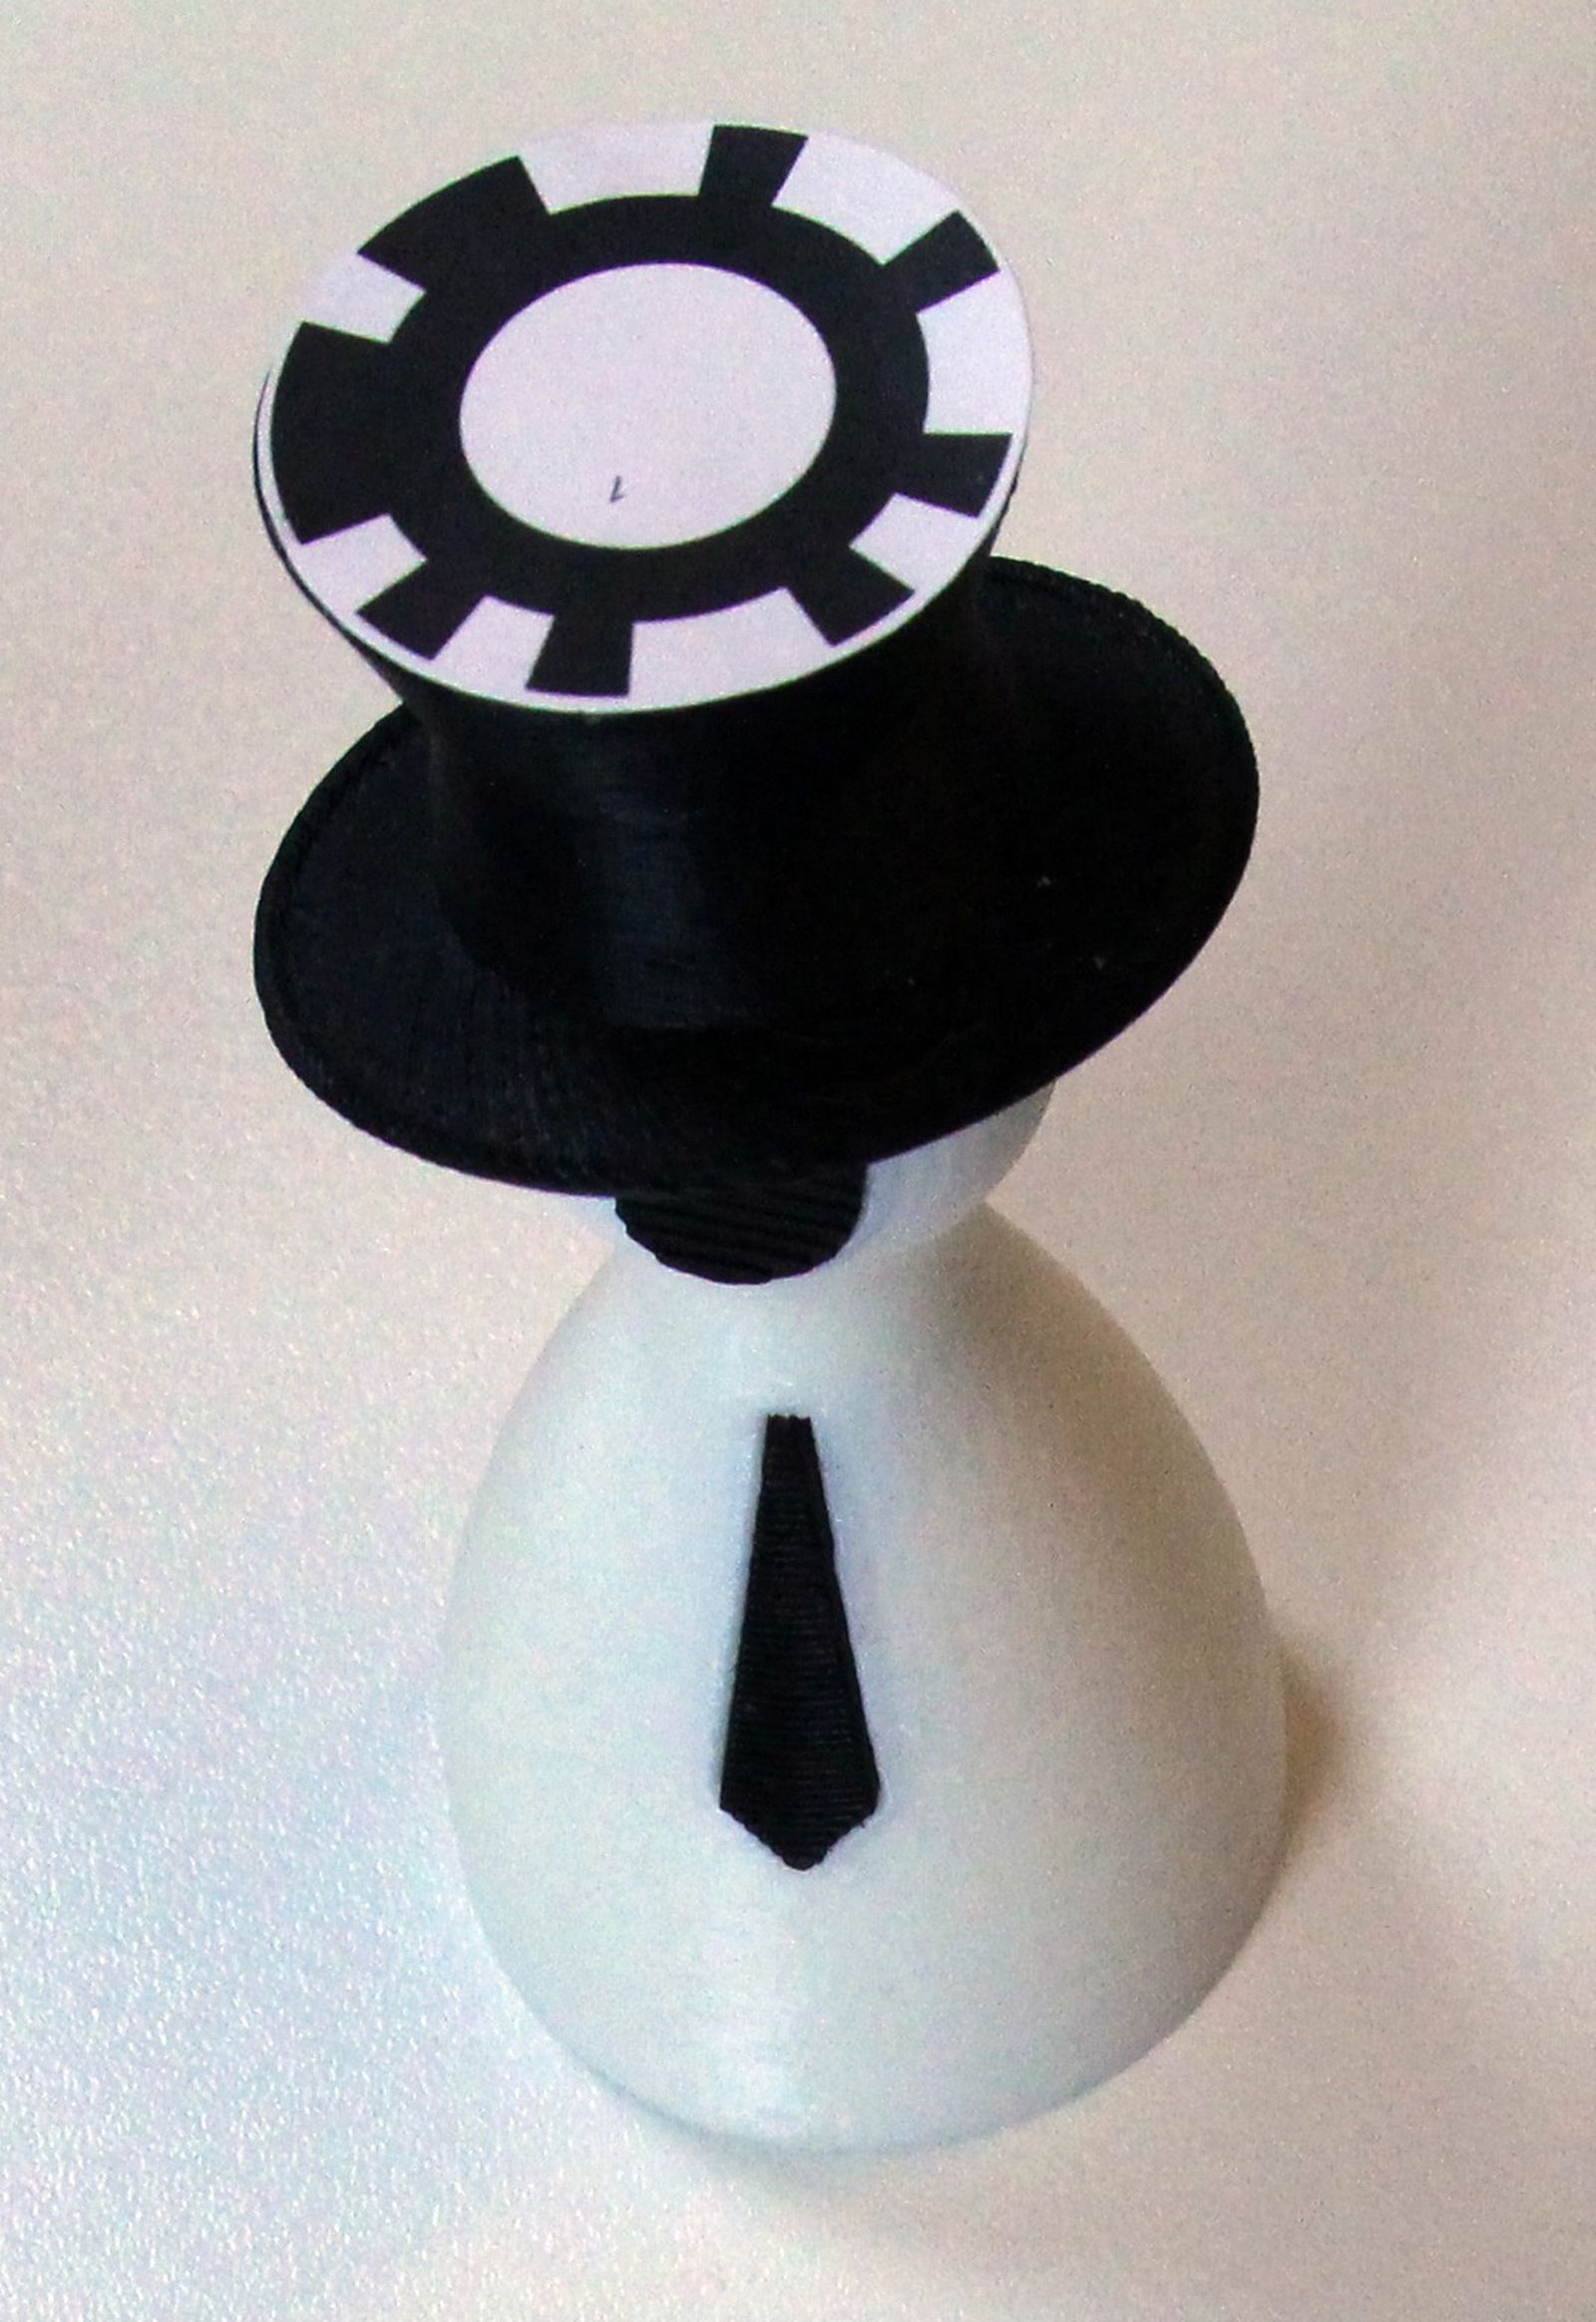
Object Markers#
Every edddison object needs a unique marker. With this marker the edddison software will recognise the movement of your tangible objects.

They can be used to control the point of view to show and move additional 3D objects within the scene or to add pictures and videos to your presentation. They are also used to change between rooms/ floors.
Configure object markers#
Every edddison object needs a unique marker. With this marker the edddison software will recognise the movement of your tangible objects.
In the object settings you will see the Marker ID. This ID is unique to each object. But you have the possibility to change it.
Note: Using existing markers If you want to use already printed markers from other projects, you can change the marker numbers on your own.
Note: Marker numbers are only visible if hardware controller was added before.
Print object markers#
- In the edddison editor select the Print plans and markers icon. (Printer-icon on the top left)
- Select Created object markers
- Choose the 3D objects you want to print
- Select printer and paper format
- Marker-Size: This is a advanced setting, which only needs to be adjusted if your markers are not getting recognised correctly (camera too far away, etc.) Please refer to the chapter "Marker Sizes" further down in this tutorial.
- Select Print Preview to review your settings
- Print Markers
Note: If you want to print your markers from a different PC or at another time you can click. Click "Print Preview" and save as PDF.
Note: When printing use opaque paper or glue the markers to a non-transparent object. If the paper is too thin, the contrast between black and white will be reduced, thus making recognition more difficult. A good choice are (round) self-adhesive stickers.
TEST the marker size for your requirements before you continue and glue them to your tangible objects!
Marker Size (optional)#
Depending on your set-up its possible to change the size of the markers to be bigger and more easiliy recognisable.
How to test#
The best way to test the perfect size for you is to print a set of object markers and one floor plan and give it a try in your setup. If the camera recognises them quickly and correctly you can try to make them smaller.
TEST the marker size before you continue and glue them to your tangible objects!
The necessary marker diameter depends on the quality of your camera and the lighting conditions.
App benchmarks in mm#
- Cheap webcams: navigation area up to 500mm (long side), marker diameter up to 40mm
- Good quality webcams: navigation area up to 900mm (long side), marker diameter up to 45mm
Use industrial professional cameras for bigger floor plans or smaller markers
Attach object markers to tangible objects#
Now we can attach the Markers to our tangile objects. You can do this anyway you want, we recommend glue or double sided tape. Best Pratice is to use (round) self-adhesive stickers.
In edddison for tabletop the markers are recognised from above (where the camera is situated).
Also the markers are direction-sensitive. Make sure you attach the markers to your figures correctly. The little number on the marker has to face the same direction as the object (object front = marker front = 3d model object front).
Done? Wonderful! Lets move on!
Set Up the Hardware#
If you followed the tutorial you should have by now:
- 3D Software + edddison editor with an tabletop-device started
- Floor Plans
- Tangible Objects (with object markers attached)
- Printed calibration sheet (optional)
Depending on which setup you are using please refer to the pictures at the beginnging of the tutorial and set up your hardware accordingly:
- Place a floor plan on the table
- Make sure your camera is connected to the PC
- Make sure edddison editor is running
- Make sure you clicked start tabletop in the device options
- Make sure the presentation screen is on and shows the 3D Model (3D Software)
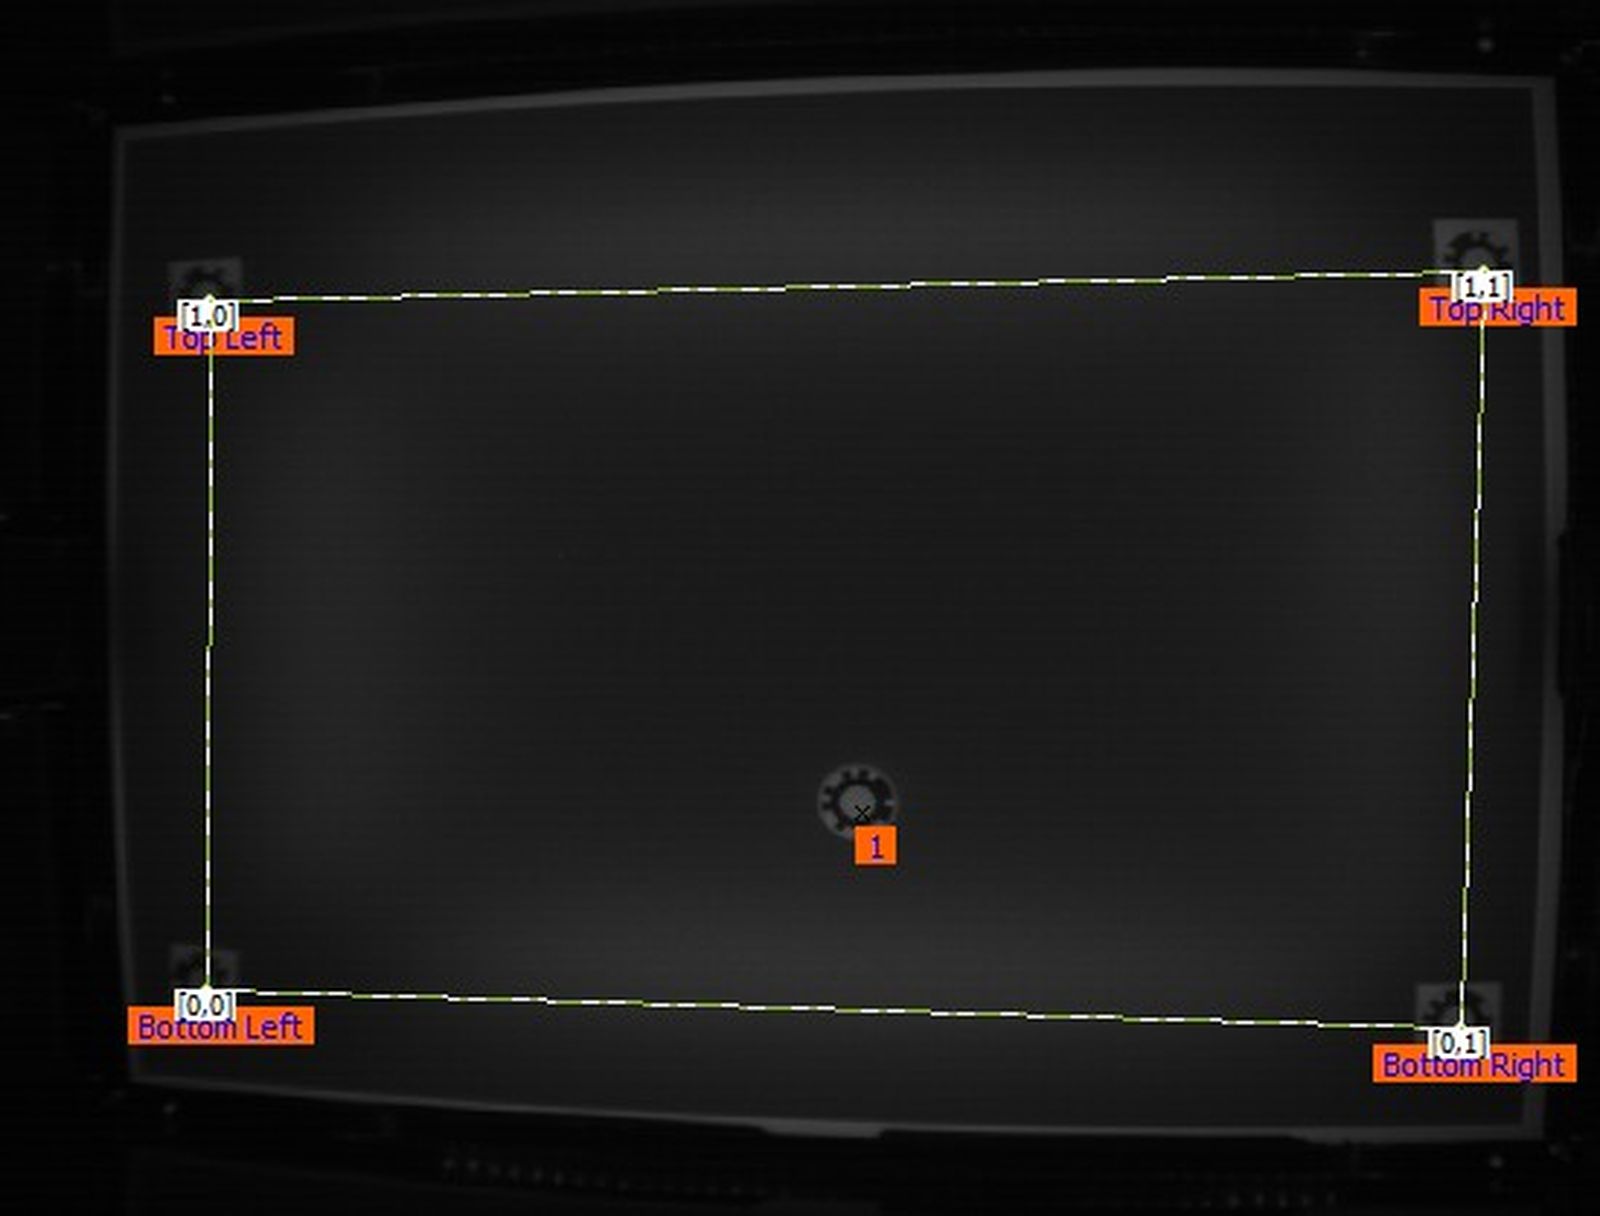
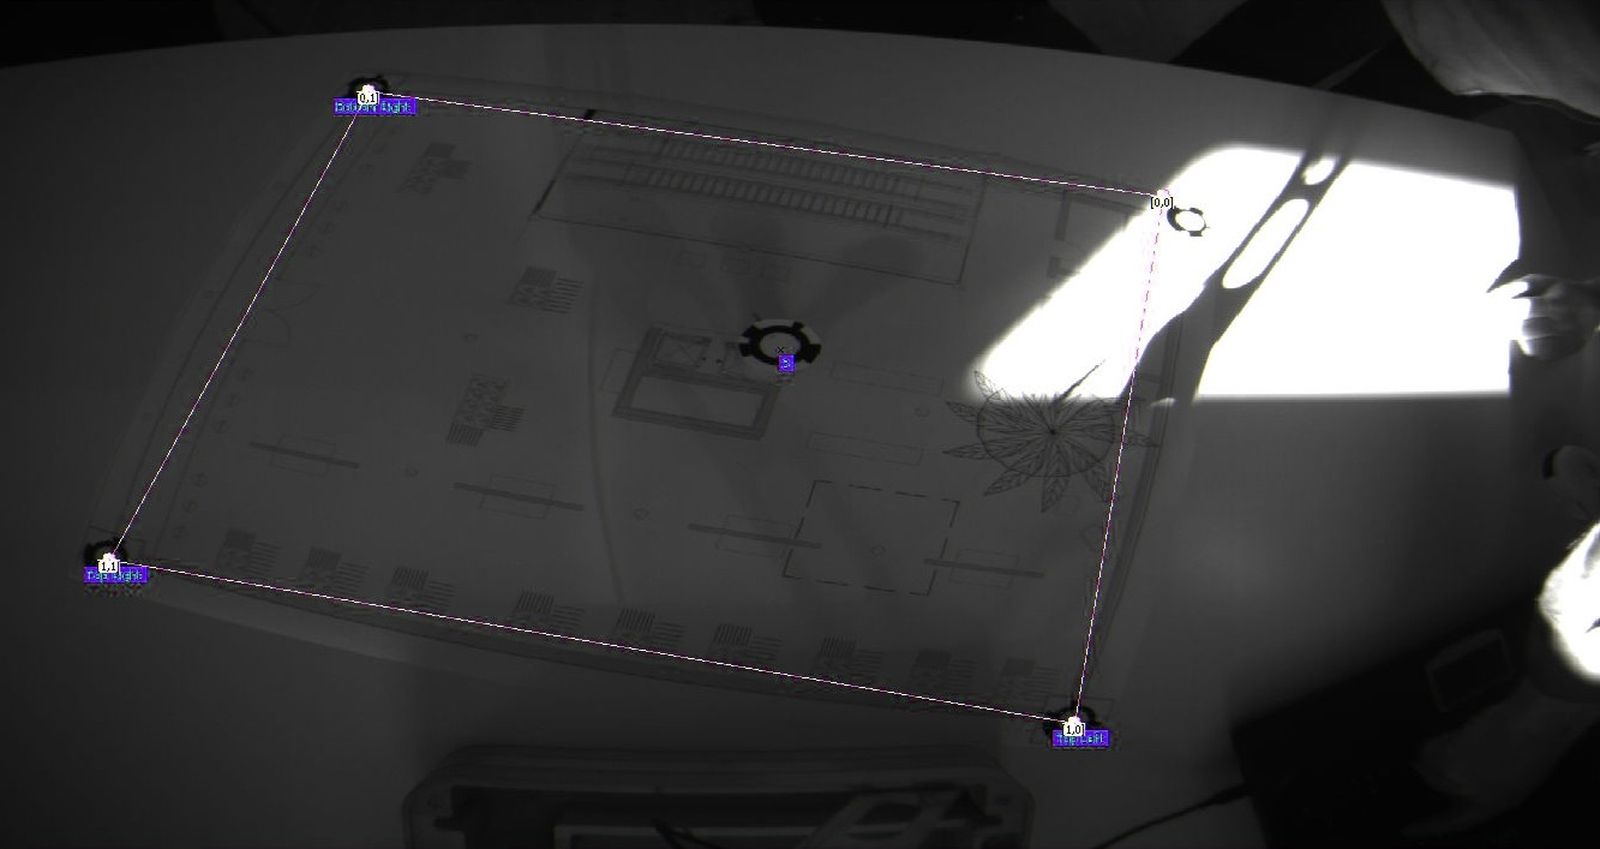
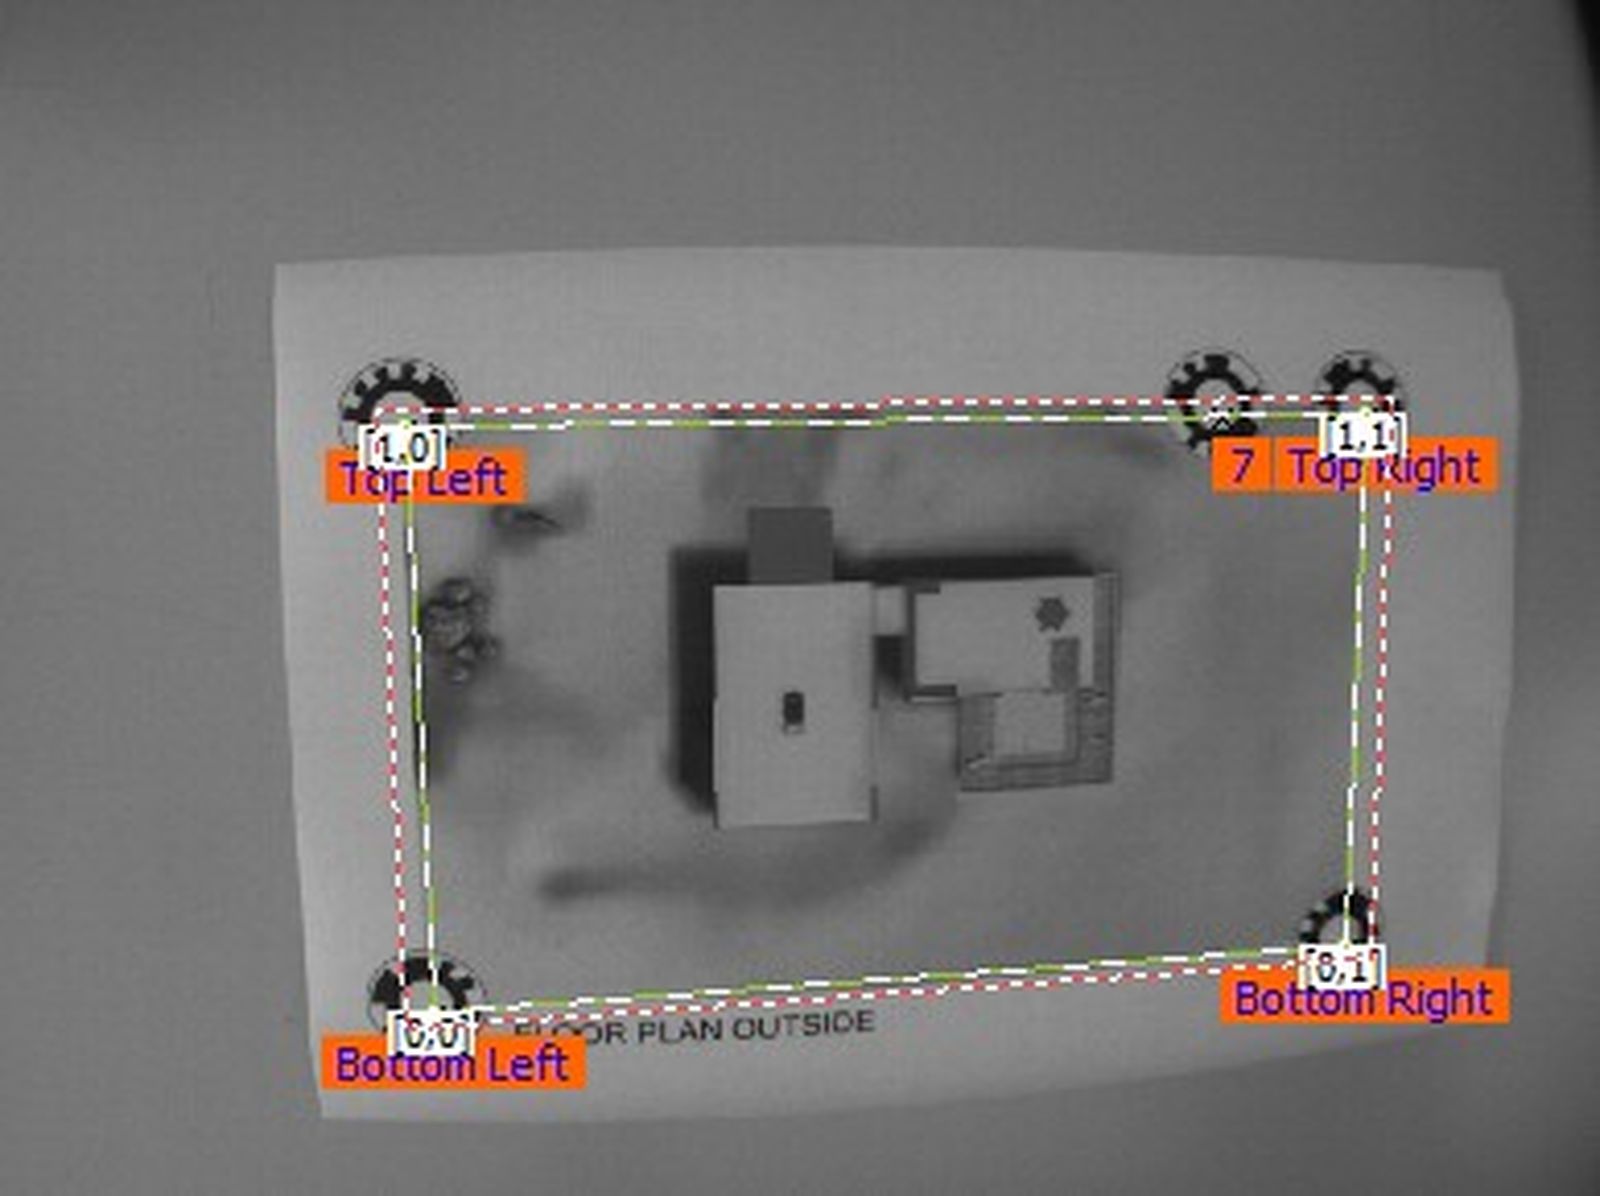
- Fix your camera, so it looks down to the floor plan and captures it entirely. (Check MRI preview window on your PC. All 4 corner markers should be recognised. If you dont see the preview window, make sure you started the device in the edddison device options)
- Position your 3D Objects outside of the floor plan area, so that they are not recognised by the camera.
- Take your POV-tangible object and position it on the floor plan.
- You are now able to move in the 3D Model on the presentation screen by moving your POV or any other 3D object across the floor plan!
Thats it! You are all set up for your edddison tabletop experience!
For in-depth documentation on how to navigate your favorite 3D software, read the corresponding tutorials or have a look at our Youtube Channel!
If in any case something is not working or you want to fine tune your experience, please refer to the next Chapter Troubleshooting
Troubleshooting + Tuning#
Camera calibration (highly recommended)#
Note: Calibration is optional, but highly recommended and just takes a few minutes to finish!
Marker Recognition#
If the markers are not recognised correctly or recognition is too slow, please go to the edddison editor, select the tabletop-device and adjust the following settings:
Lightness: The video image of the camera should not be too dark or bright. Change the Lightness" value to adjust the image.
To see if the brightness is set correctly, place your Point of view (POV) object on the plan and move it around. In the preview window, you should see the ID in orange letters. Your POV should move fluidly in the preview window without lag. If the camera recognition is too slow, the brightness has to be adjusted. Try moving the slider to find the best position, depending on the light conditions. Generally, the preview should be really dark and the plan should be hard to recognize.
Advanced camera settings: Depending on your camera, you will have to adjust this too.
Jitter compensation: to tune the sensibility of camera movement or shaking.
If the markers are recognised too far outside the floor plan or you want to expand the recognition area, adjust the following:
Recognition Outside: Choose if the webcam should track markers outside the navigation area or not in %.
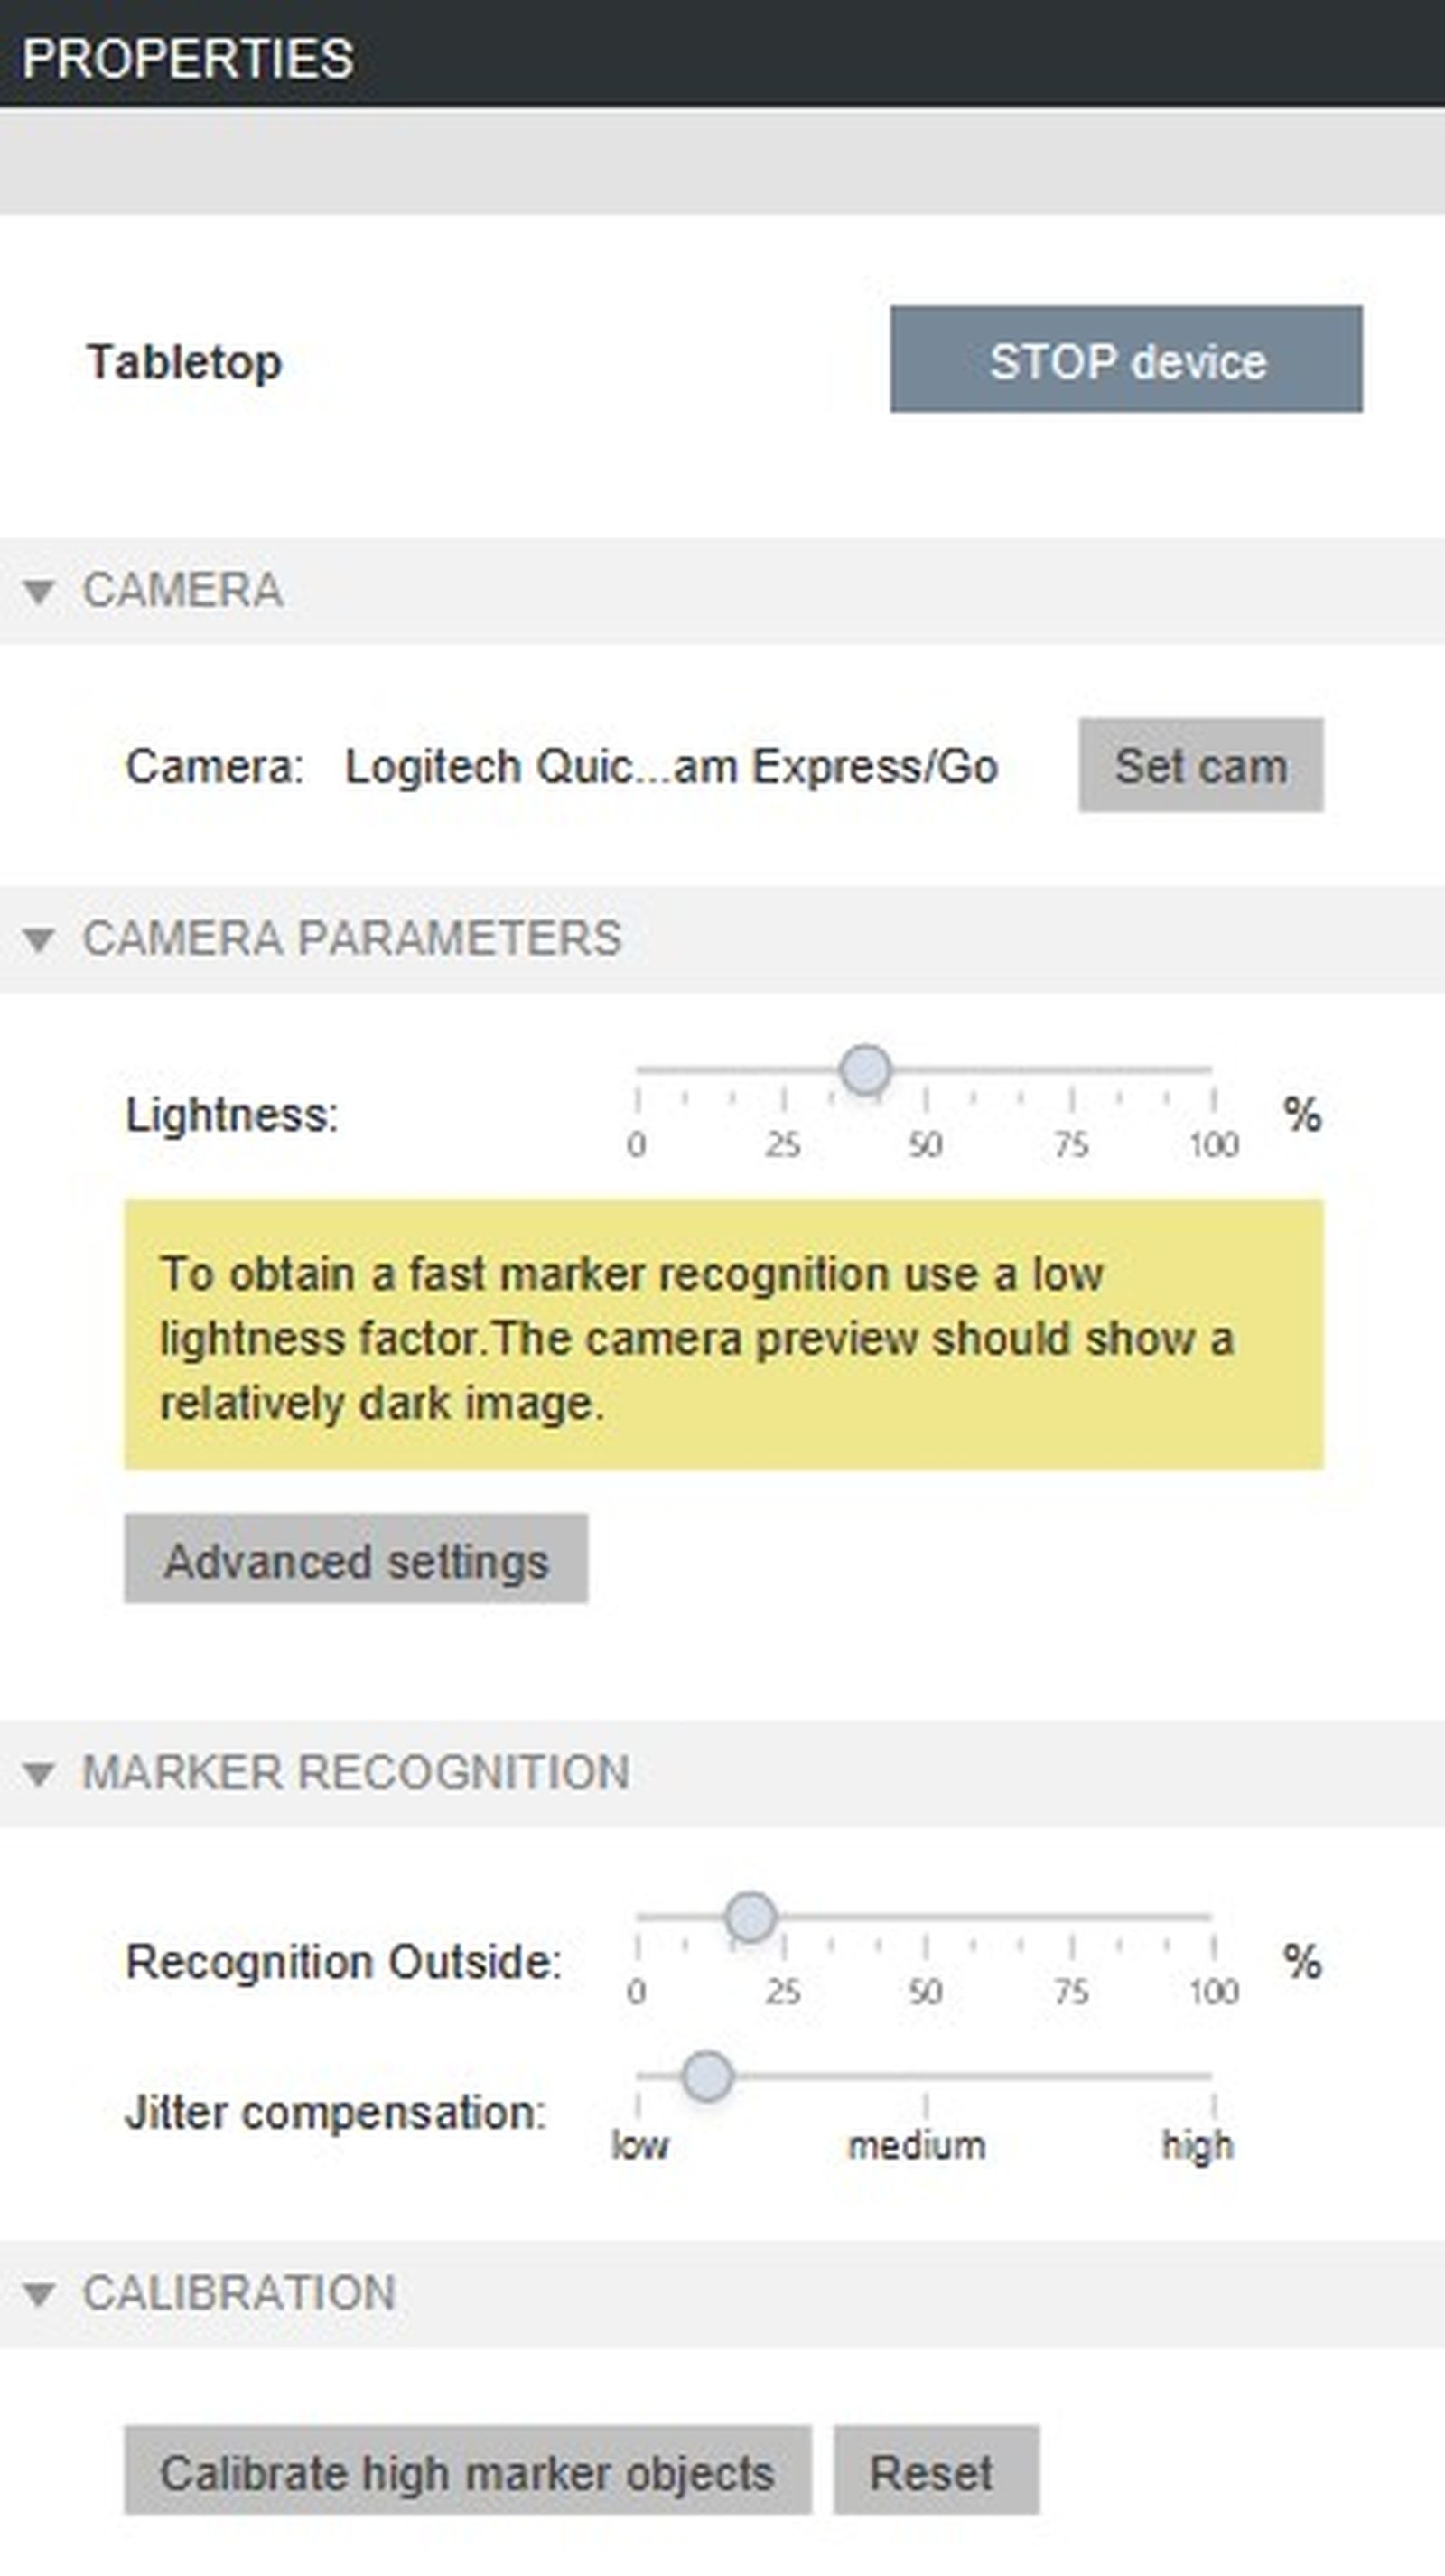
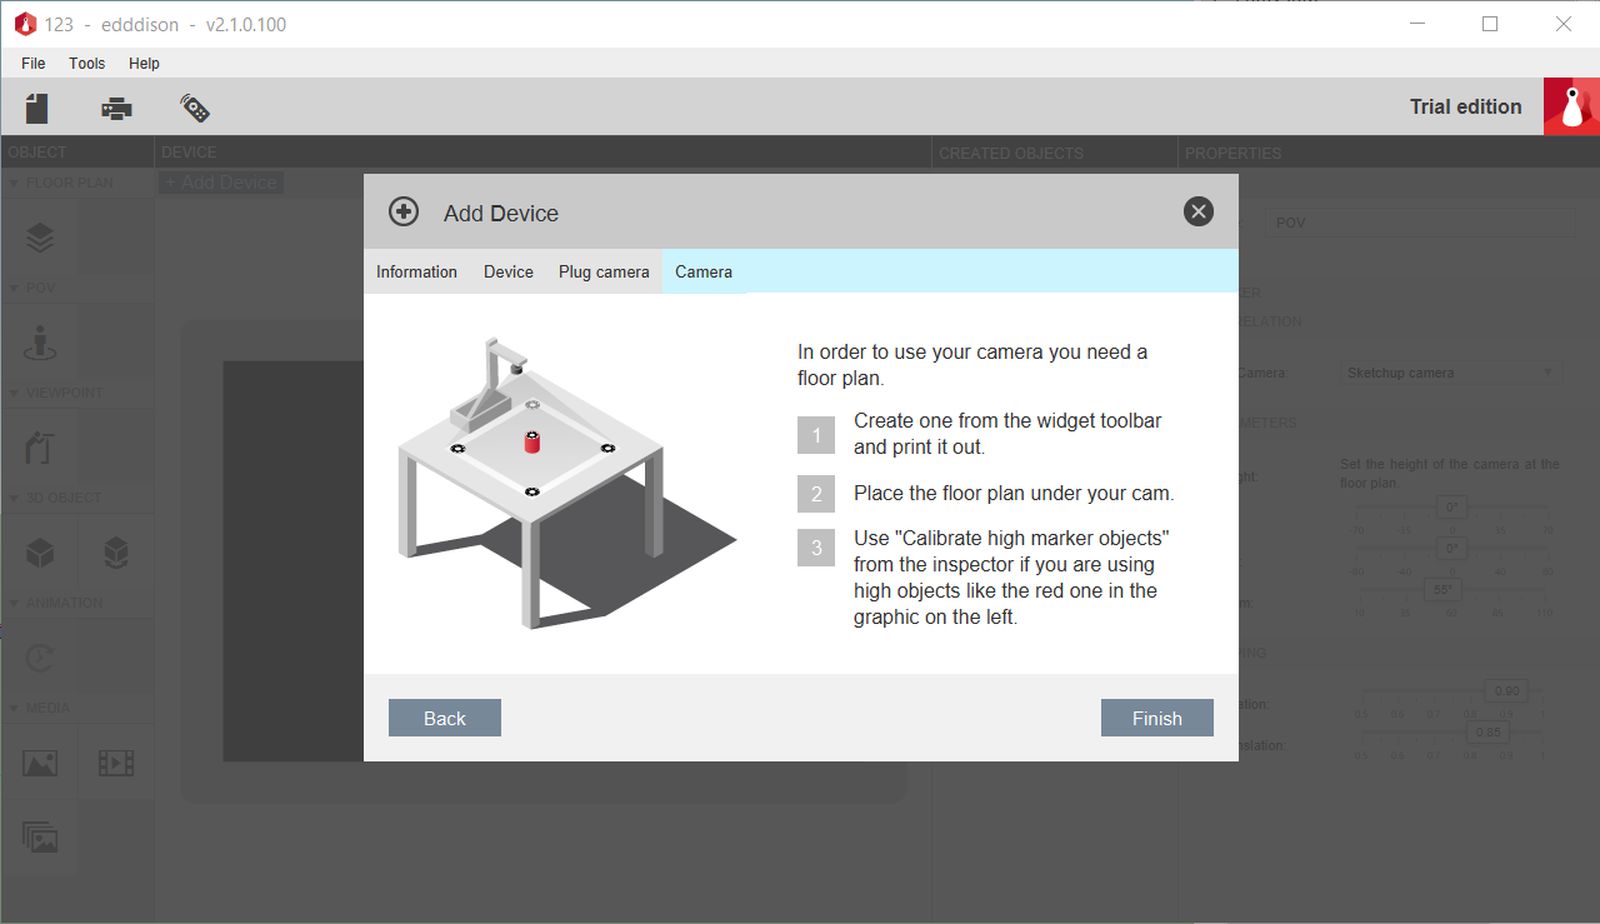
If you are using high tangible objects or objects with different heights, you will have to do a height calibration first. The max. recommended height with theedddison camera kit for tangible objects is 7 cm / 2.75 inch max, but this can vary depending on your setup.
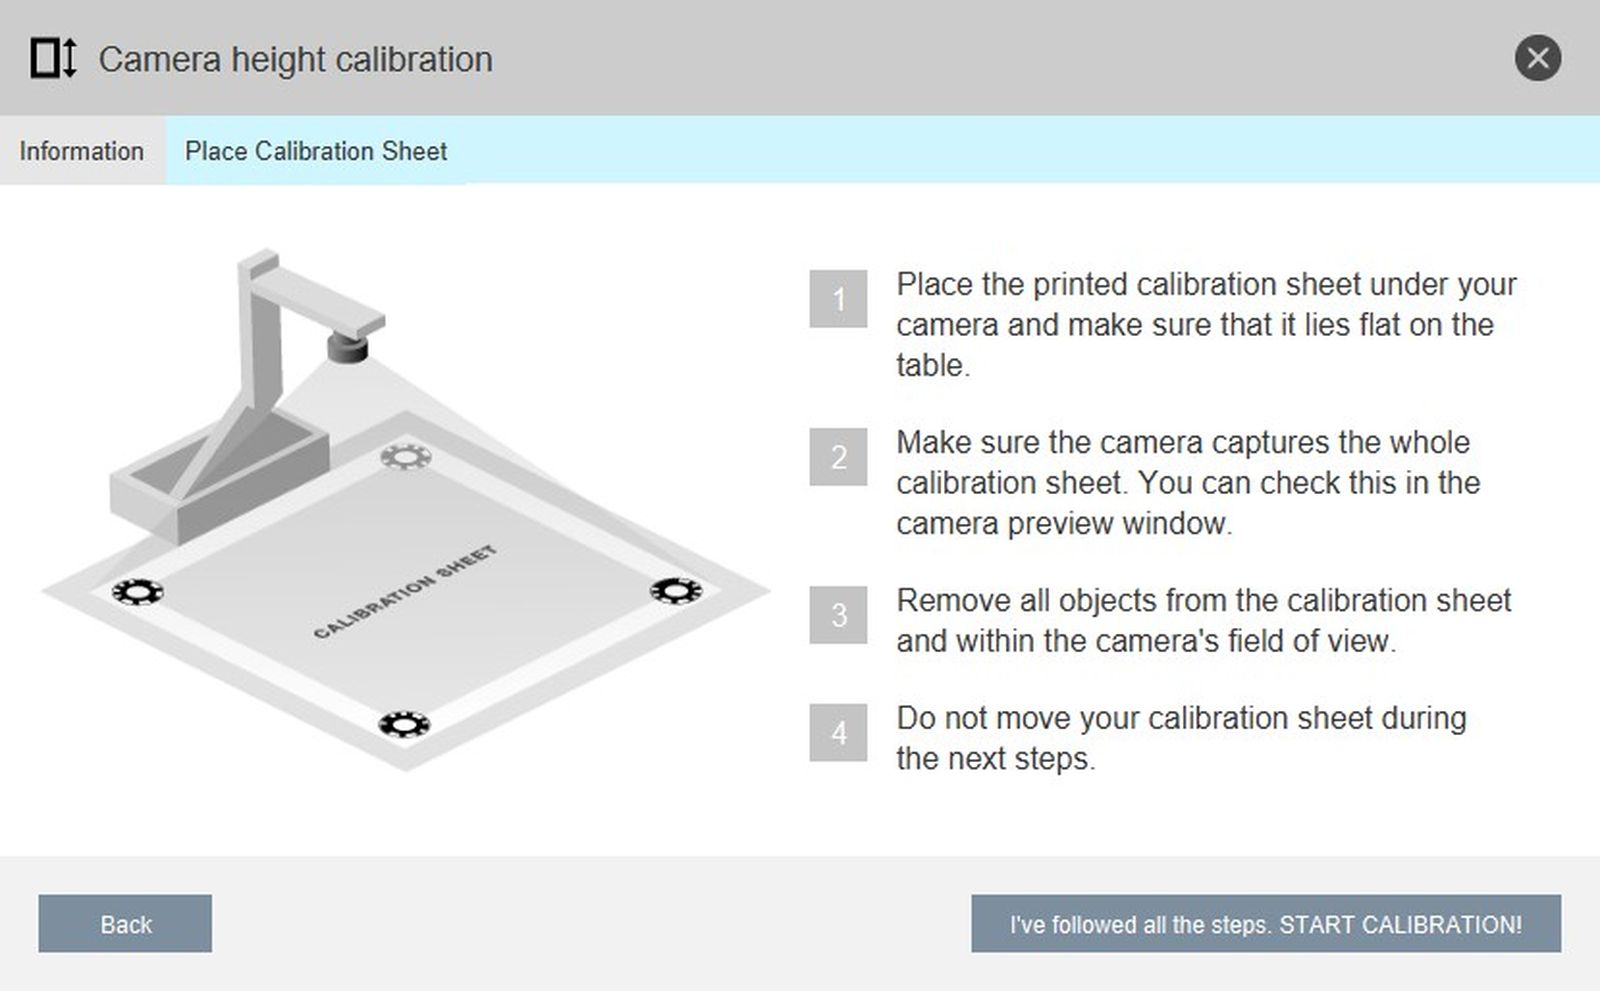
Camera height calibration#
Note: Height calibration is optional, but highly recommended and just takes a few minutes to finish!
To calibrate the height of your tangible objects, go to the edddison editor, select the tabletop-device and a click the button Camera height calibration in the tabletop settings and follow the wizard.
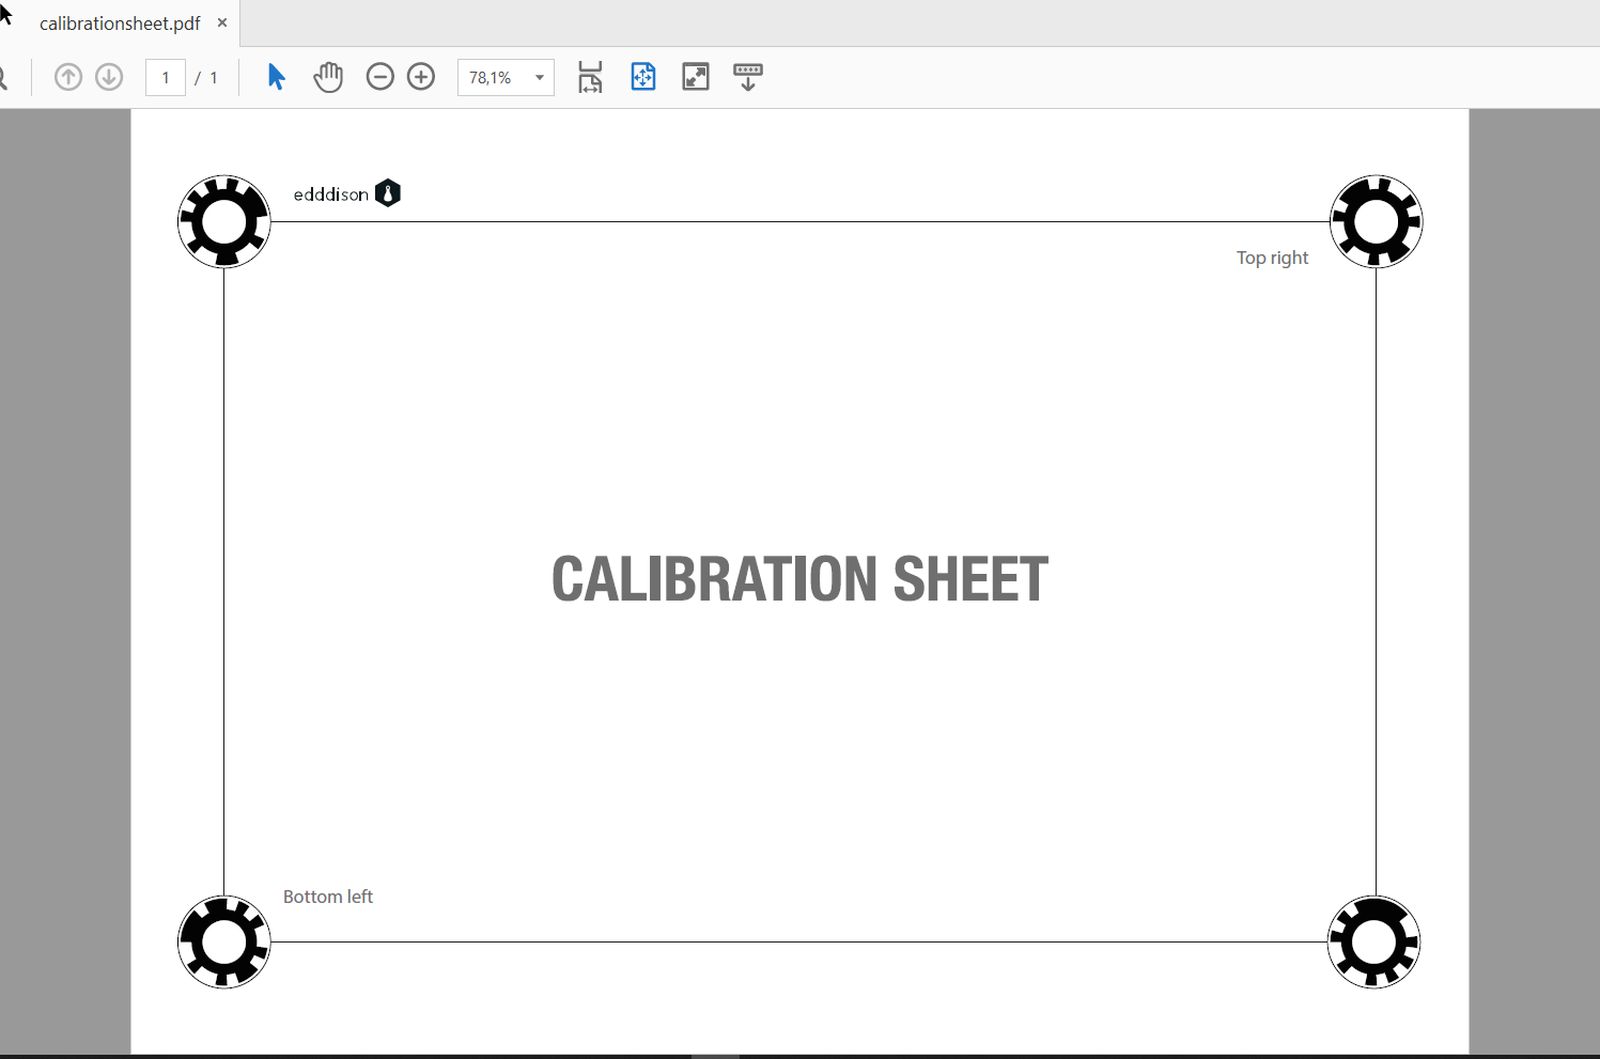
Print calibration sheet#
- On the first page of the wizard click Print calibration sheet
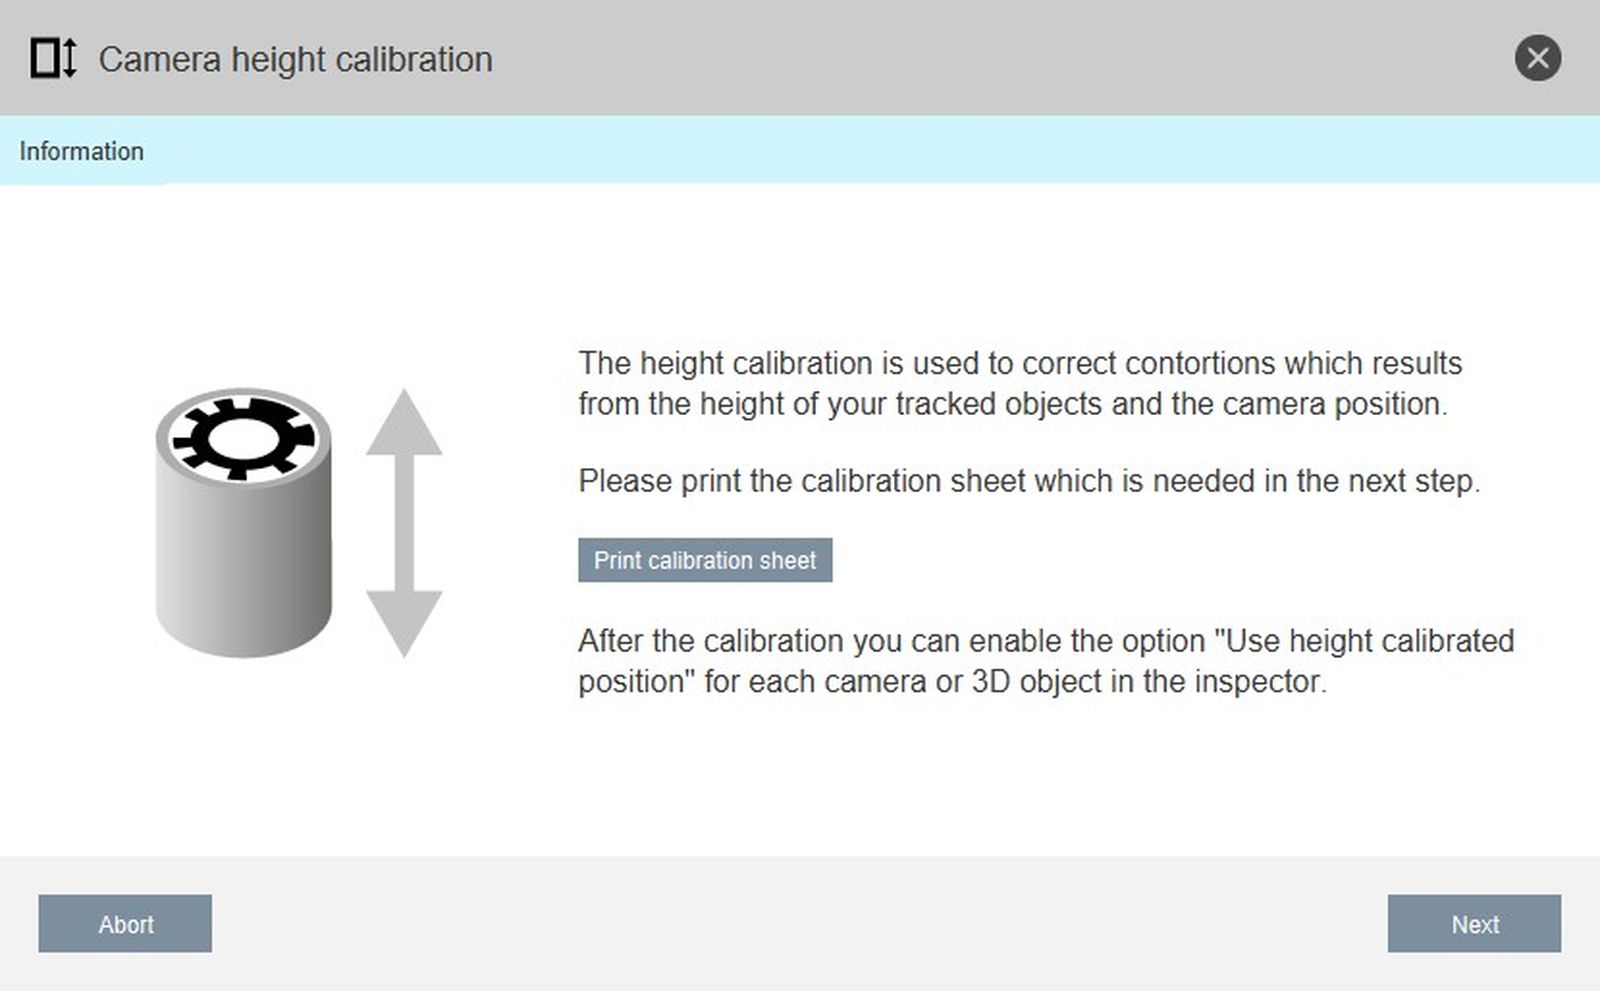
- A PDF will open
- Print the PDF in the same size, your floor plans will have (e.g. A4)
Follow the wizard, the MRI preview window will facilitate the setup.
Place calibration sheet#
Place the printed calibration sheet under your camera and make sure it's captured entirely.
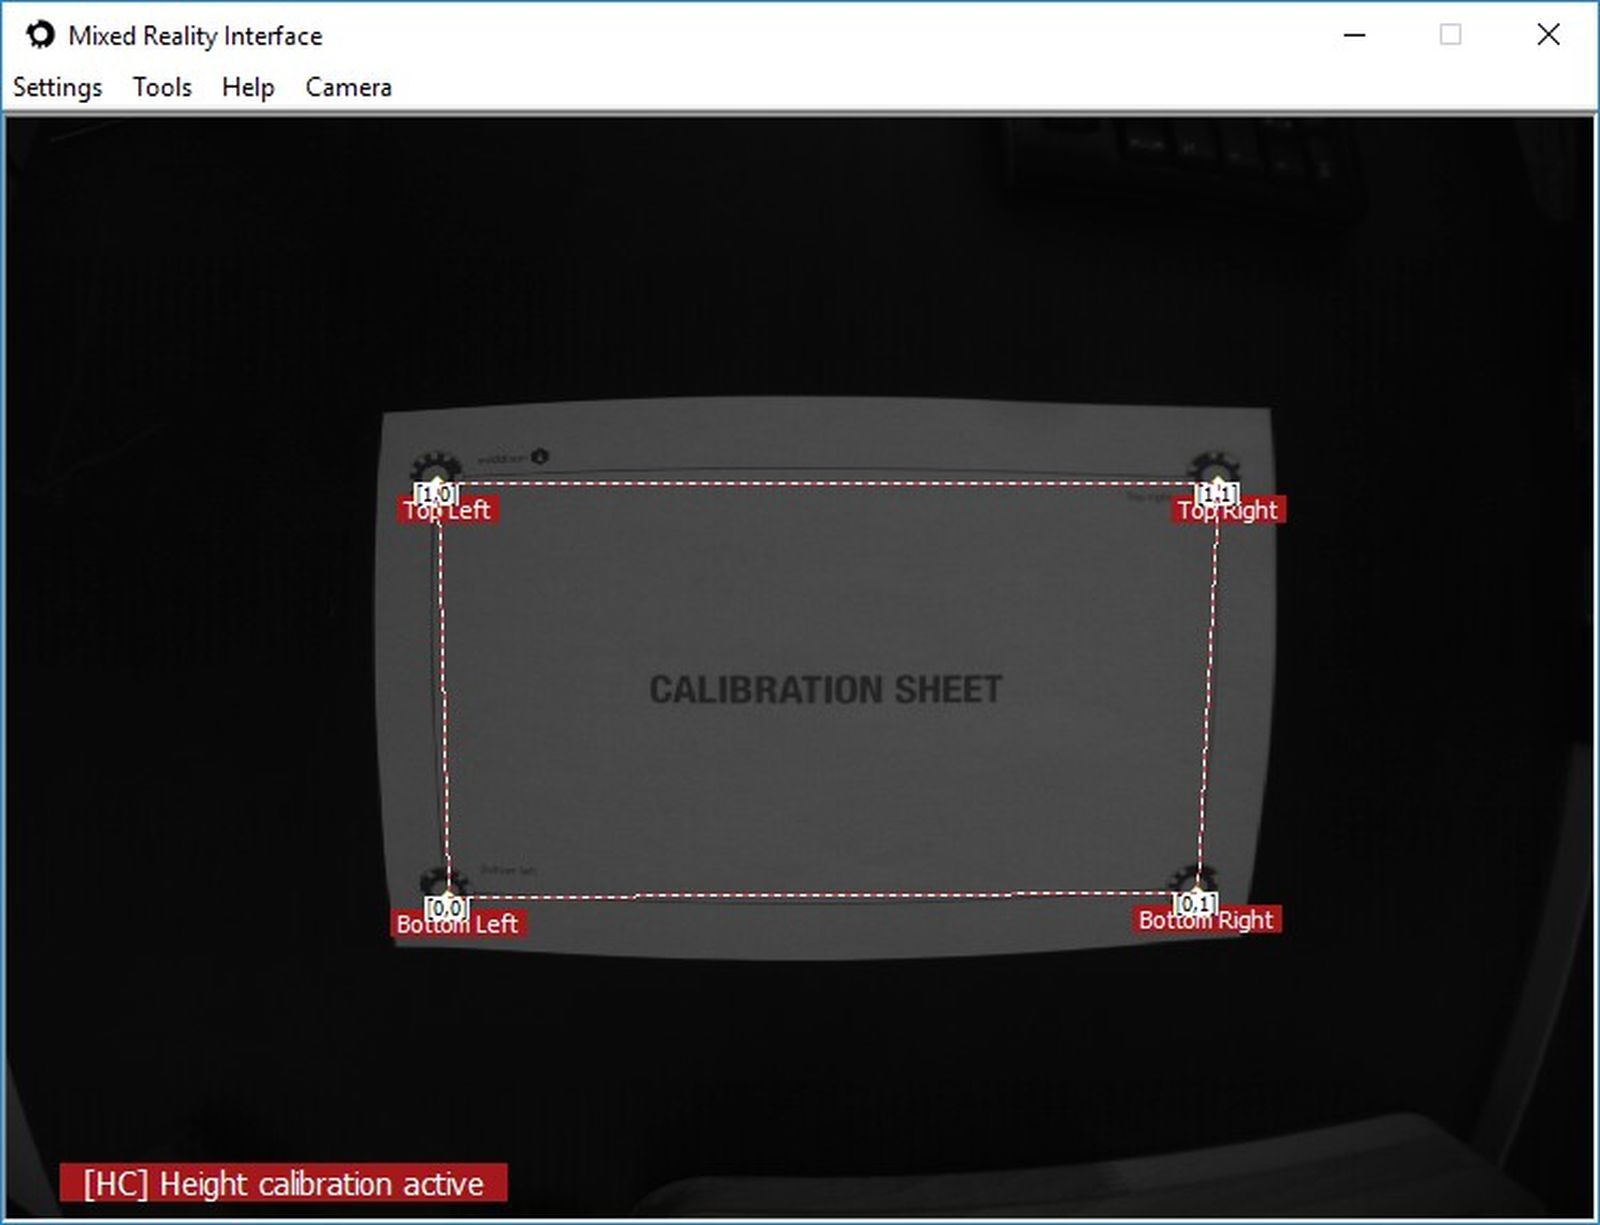
Remove all other objects within the camera\'s field of view and click Start Calibration".
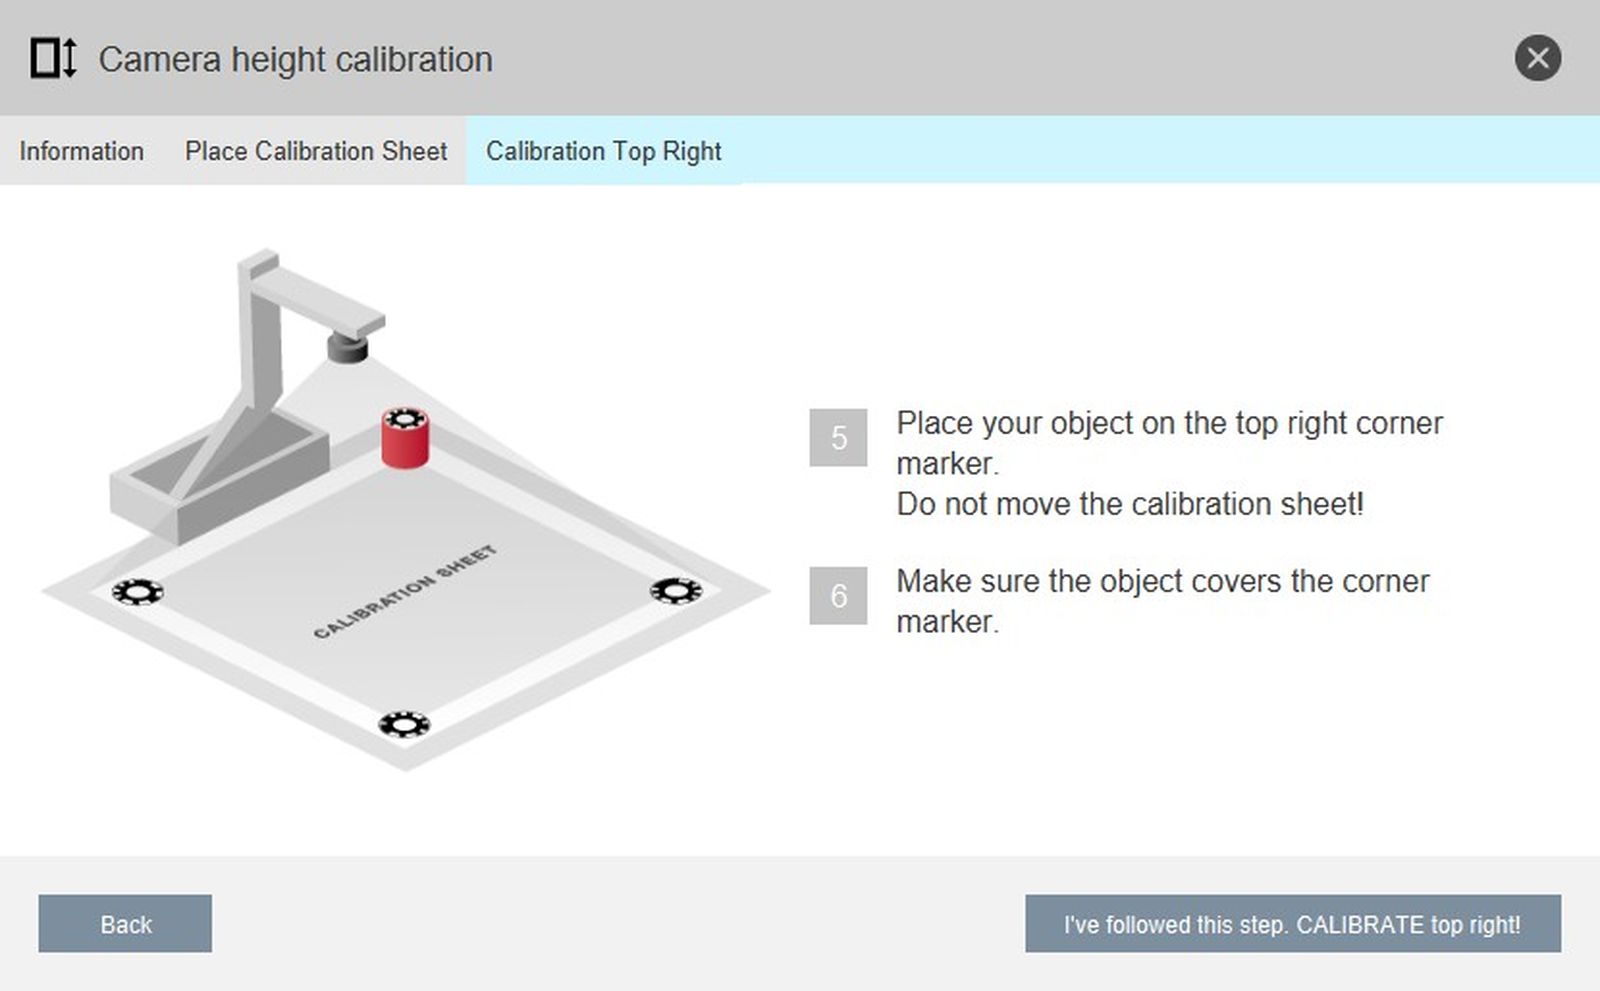
Calibration Top Right#
Place your control object on the top right corner marker so it\'s covering the marker completely.
When done click Calibrate Top Right
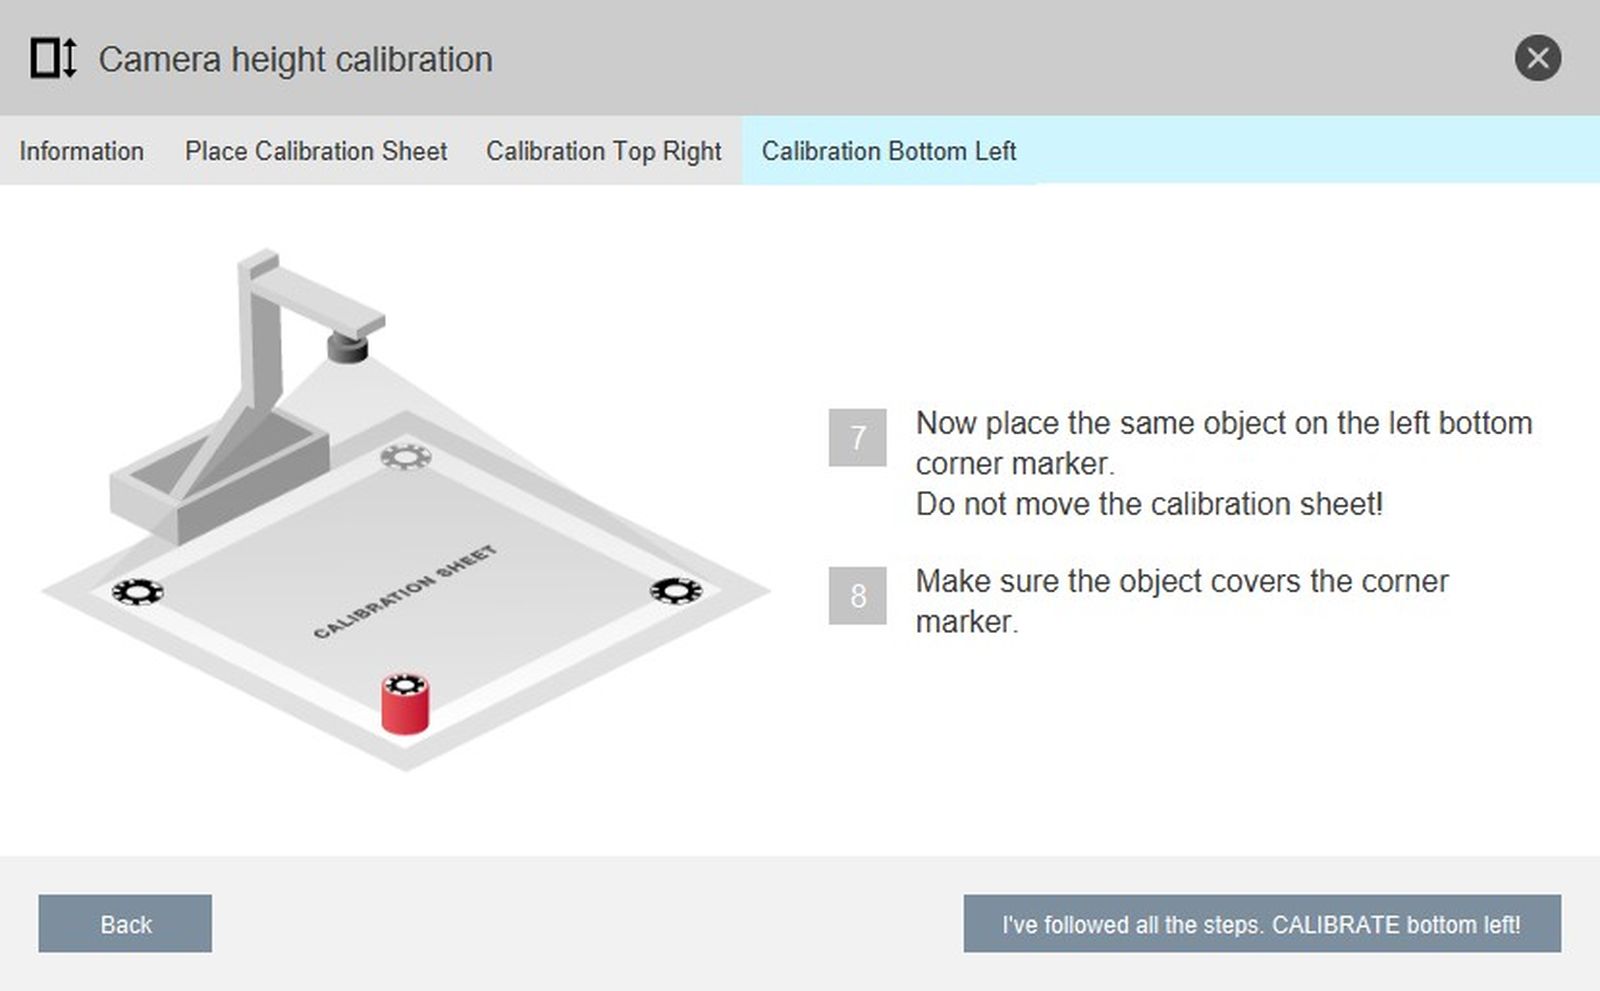
Calibration Bottom Left#
Do the same for the opposite corner.
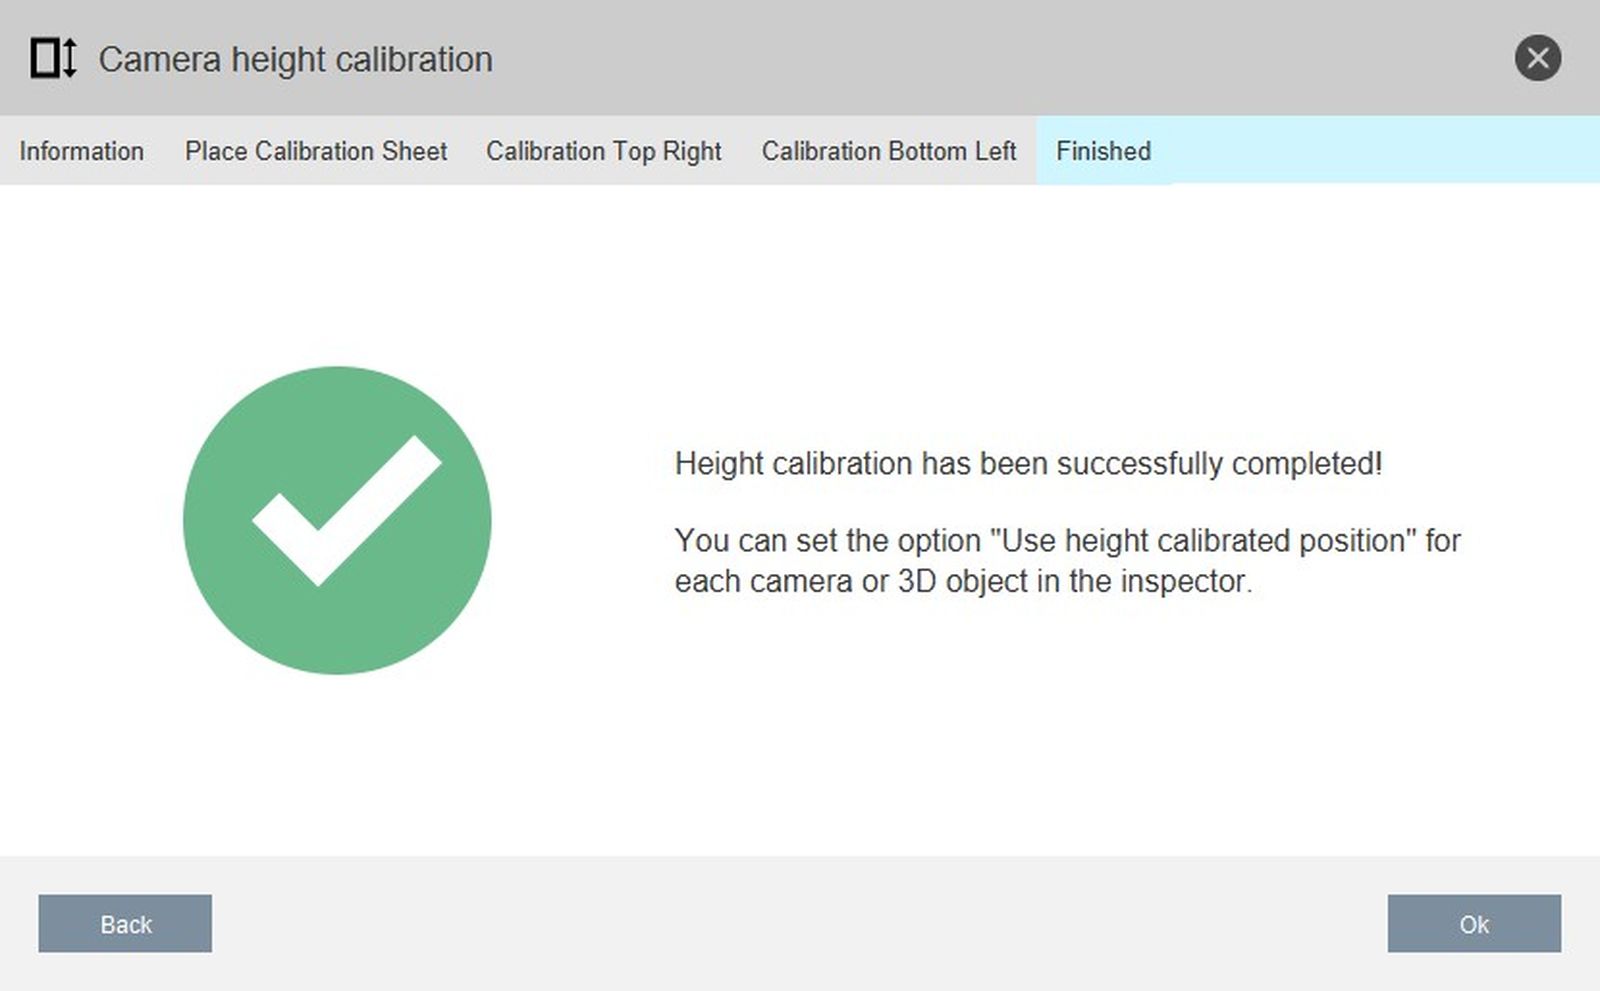
Finish Calibration#
Click „Ok" to finis the calibration.
Tips#
Floor plan Switching#
edddison has two different modes how to switch between floor plans.
Imagine this situation:
- There is a floor plan-marker (1) lying on the surface. (=visible to the camera) Floor plan 1 is active.
- You add a second floor plan-marker (2) on the surface (=two markers visible to the camera) Floor plan 2 will activate.
Now, when you take the second floor-plan-marker (2) away from surface (=invisible to the camera), depending on the chosen mode, the following happens:
- Projection Mode:: Switches back to last active floor plan (1)
- Tabletop Mode: Floor plan (2) stays activated.
Here is a table to explain this:
| Marker | Tabletop Mode | Prrojection Mode |
|---|---|---|
| becomes "visible" to the camera | Bounding Box activated | Bounding Box activated |
| becomes "invisible" to the camera | Floor Plan stays activated | Switches back to last floor plan |
The reason for this is, that in tabletop mode it is easily possible, that the floor plan marker is covered to the camera (e.g. a hand moving objects) and this would, since the camera is positioned above the floor plan (human interaction is happening between floor plan and camera, unlike with the projection table). When this happens in projection mode the floor plan would jump for this brief moment to the last active floor plan. To prevent the floor plan from jumping while this is happening we implemented this different modes. If you have any questions feel free to contact us!
To activate the Tabletop Mode/Projection Mode simple select it in the settings.
Lighting conditions#
If it is too bright, too dark or the light is not equally distributed on the floor plan, the camera will not recognize all the markers and therefore the tabletop will not work correct.
Example: a hot spot on an edddison tabletop caused by the sun. The marker in the bright area will not be recognized.
Camera sharpness#
Check the sharpness of the camera. A sharp focus is important.
Printer#
-
To print plans and markers a laser printer is best. Sometimes the pigments applied by a laser printer have a rich, deeper black than those of an ink jet printer.
-
Dirty markers can result in poor tracking. Change the markers from time to time.
-
Whenever possible, attach the markers to somewhat larger objects, because a white edge around the marker can improve the consistency of recognition.
- Too long USB connections (more than 2 m) are not going to work, use an active USB repeater cable.
Markers dirten too fast#
On heavy use or use of a less quality printer and paper it can happen, that the printed marker shows signs of use/dirtens.
Use self adhesive films#
Self-adhesive films are very cheap and easy to print on them with any printer. The quality stays better for a longer period of time, because they dont dirten that fast and can be cleaned with light use of water.