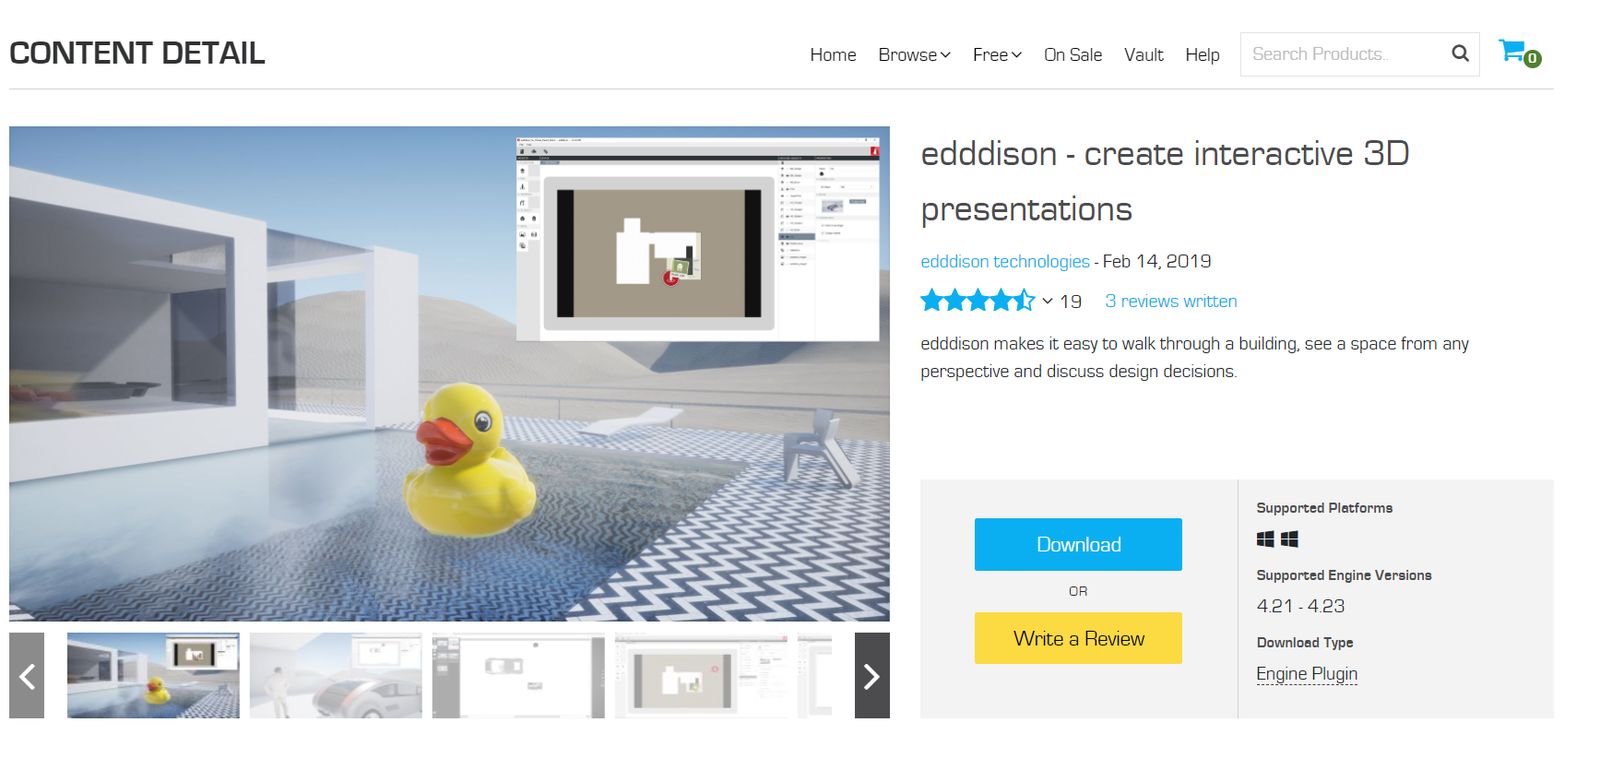
edddison plugin for Unreal Engine 4
Getting Started#
What you need
- Unreal Engine Installation
- Unreal 3D Project Demo Project
- The edddison software - Please login on edddison.com to access this link
- edddison unreal plugin - UE Marketplace
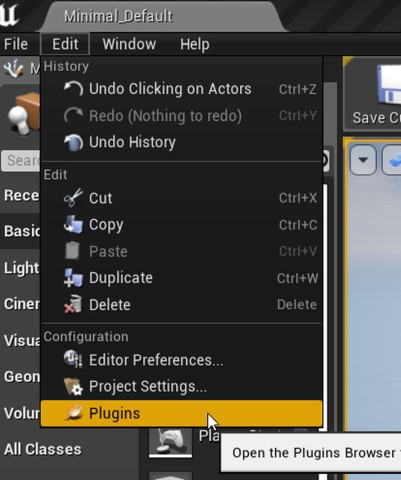
Install edddison plugin#
You can install the edddison plugin from the UE Marketplace UE Marketplace
Create a project in Unreal Editor#
Open a new blank or an existing Unreal project, in which you would like to use edddison.
Note: If you don´t want to follow the Tutorial and dive directly into the demo project you can download it on our website
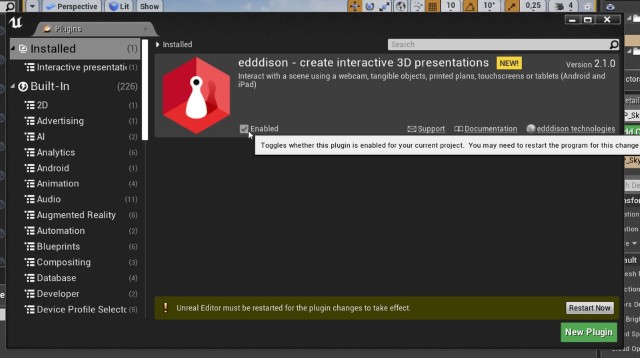
Activate and configure edddison plugin#
Activate the edddison plugin#
Enable the edddison plugin in the Plugins window of the Unreal Engine.
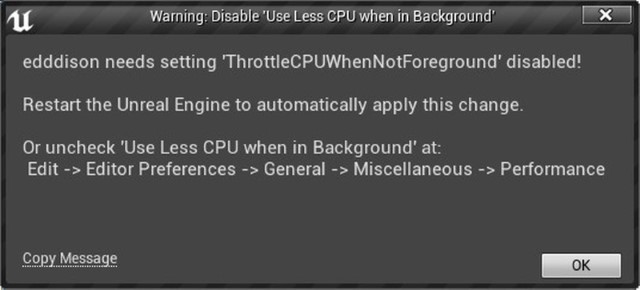
Note: You will maybe asked to restart the Unreal Engine to enable the plugin. Do this by clicking "Restart now".
Troubleshoot: If at the restart of Unreal a message pops up saying "Disable ThrottleCPUWhenNotInForeground", just restart Unreal one time again manually or change to displayed option in the Unreal Settings. Refer to this Chapter
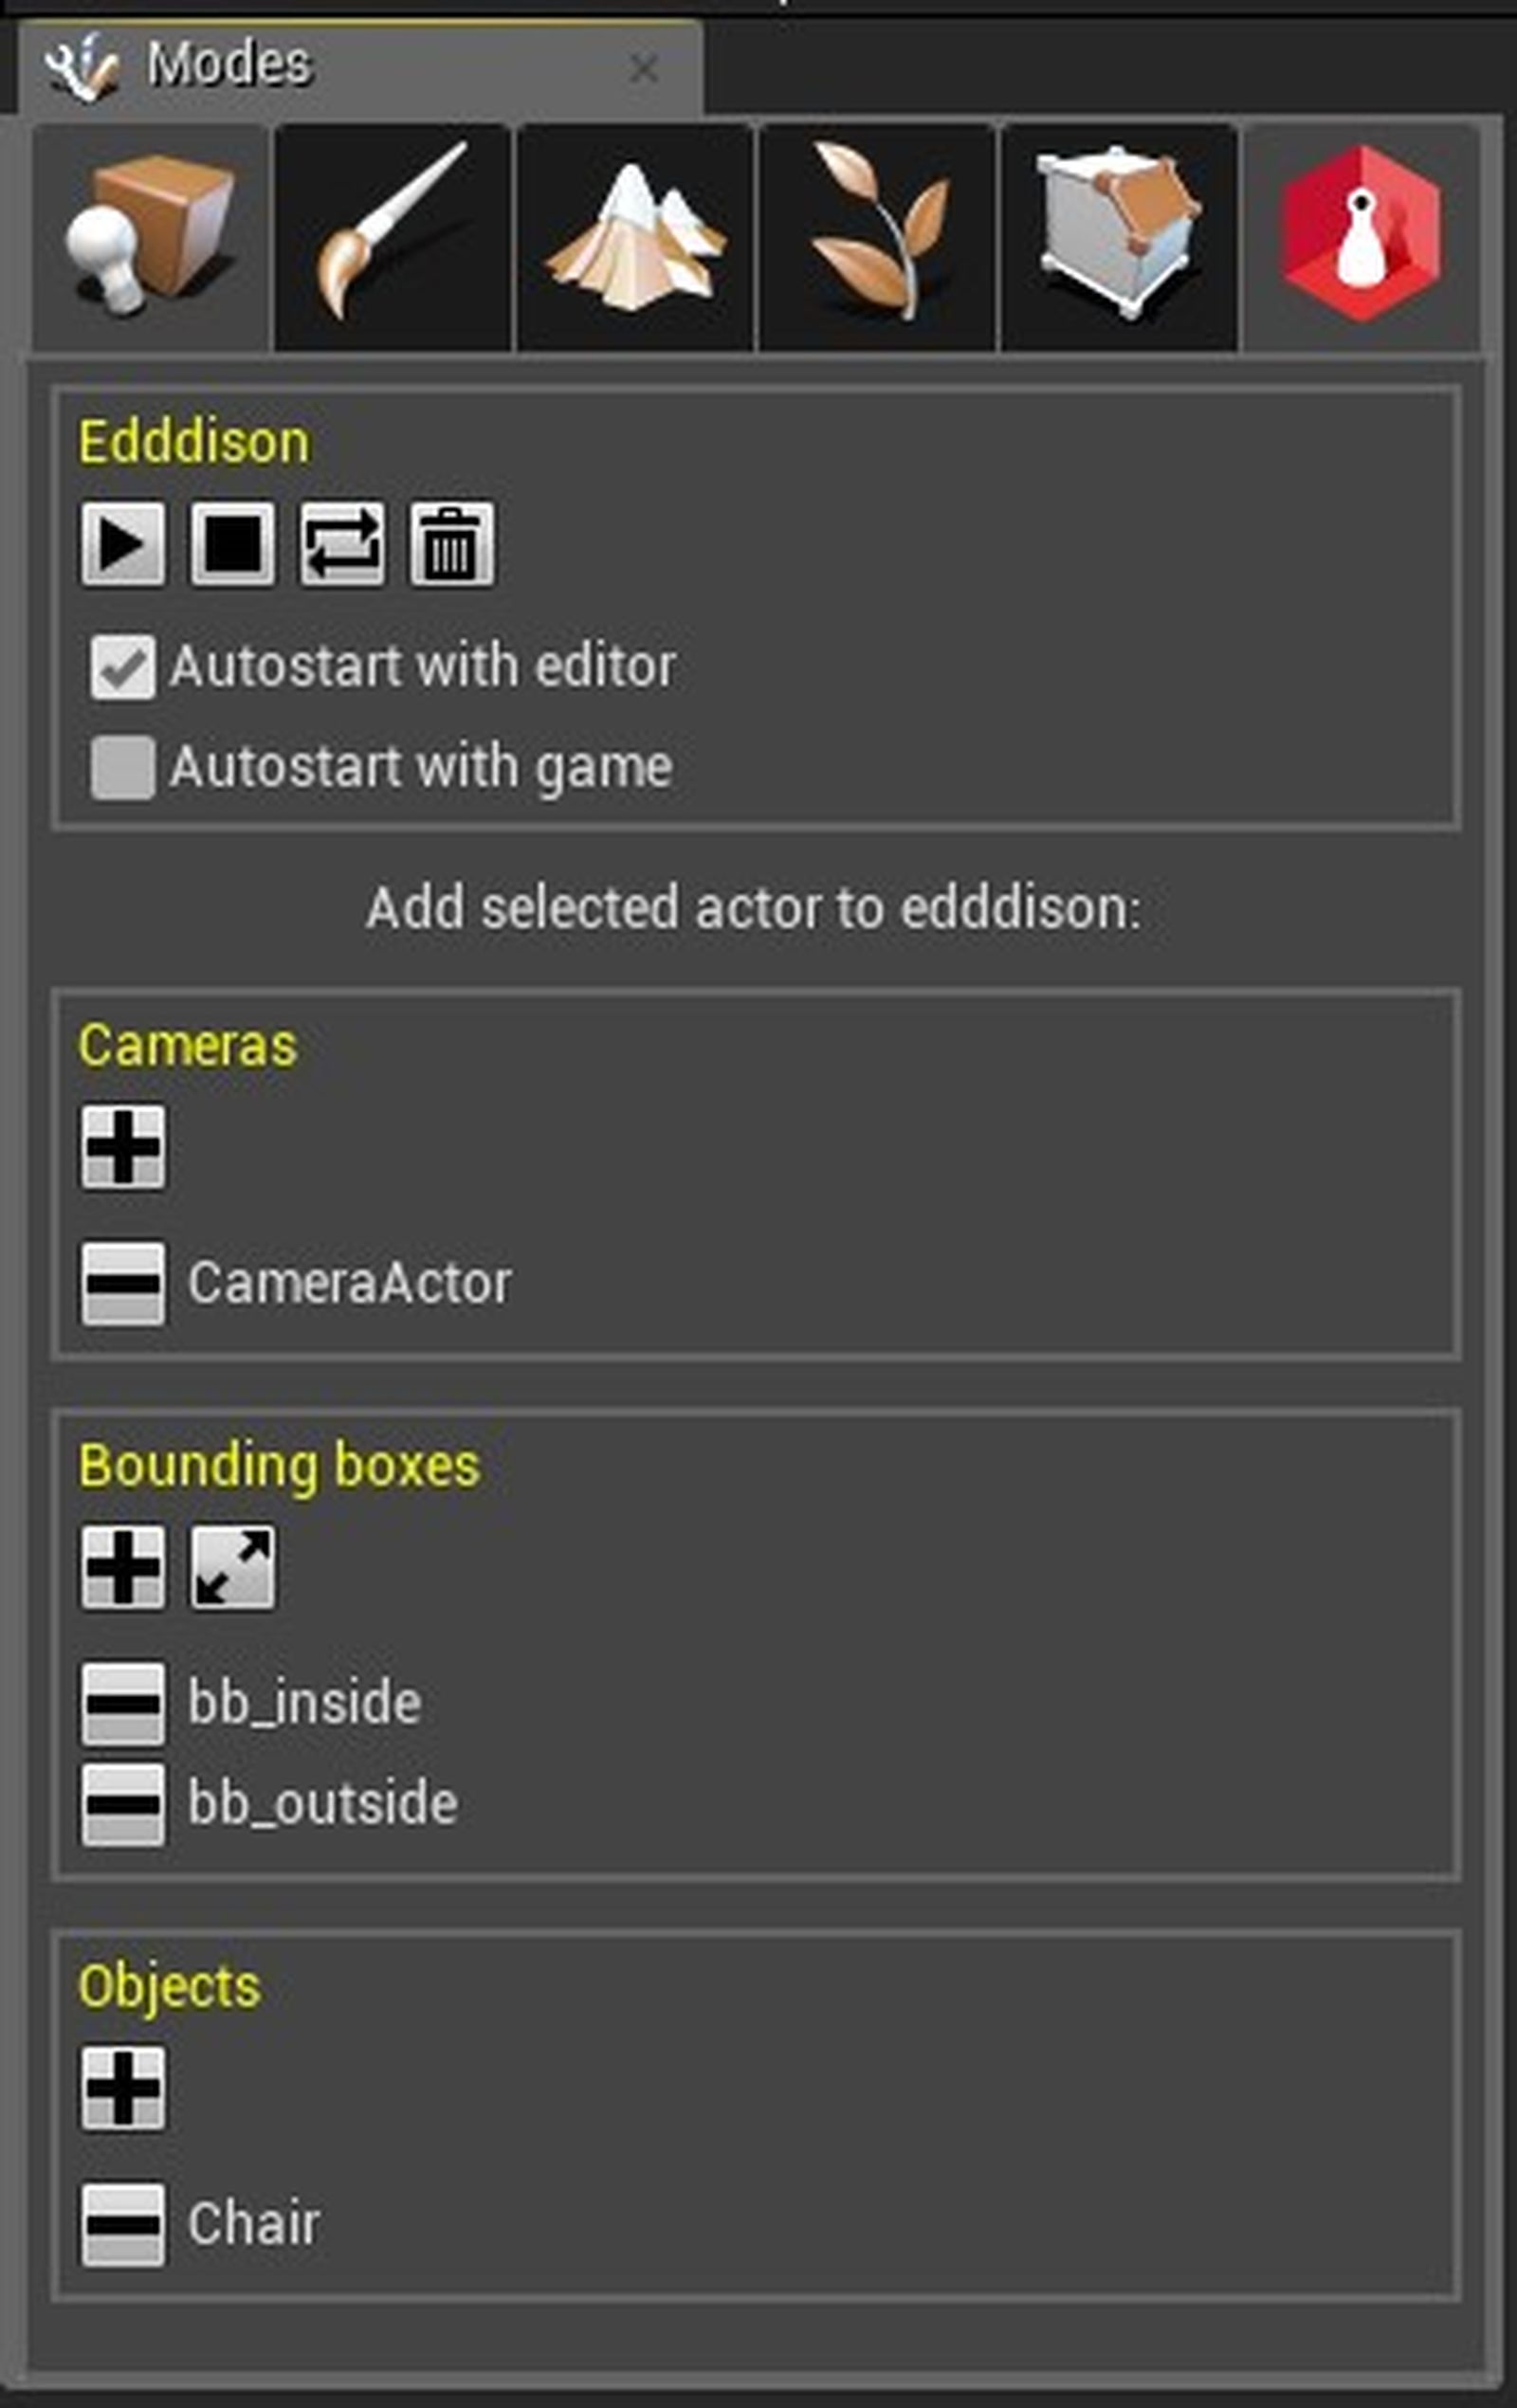
Switch to the edddison tab in the Modes window.
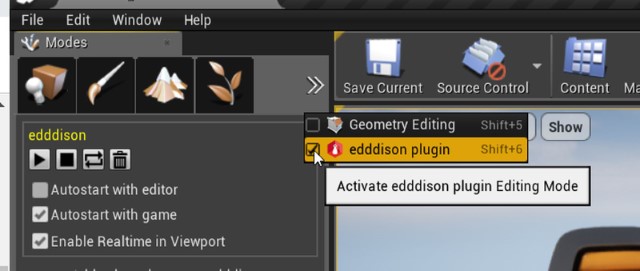
Configure the edddison plug-in#
This plugin-page works as a retainer for all edddison functions. From here you can add cameras, bounding boxes and 3D objects which will be used by edddison.
The first section consists of the following general options:
Autostart with editor: Start edddison when Unreal editor starts. (If plugin is activated)
Autostart with game: Start edddison when Unreal game starts.
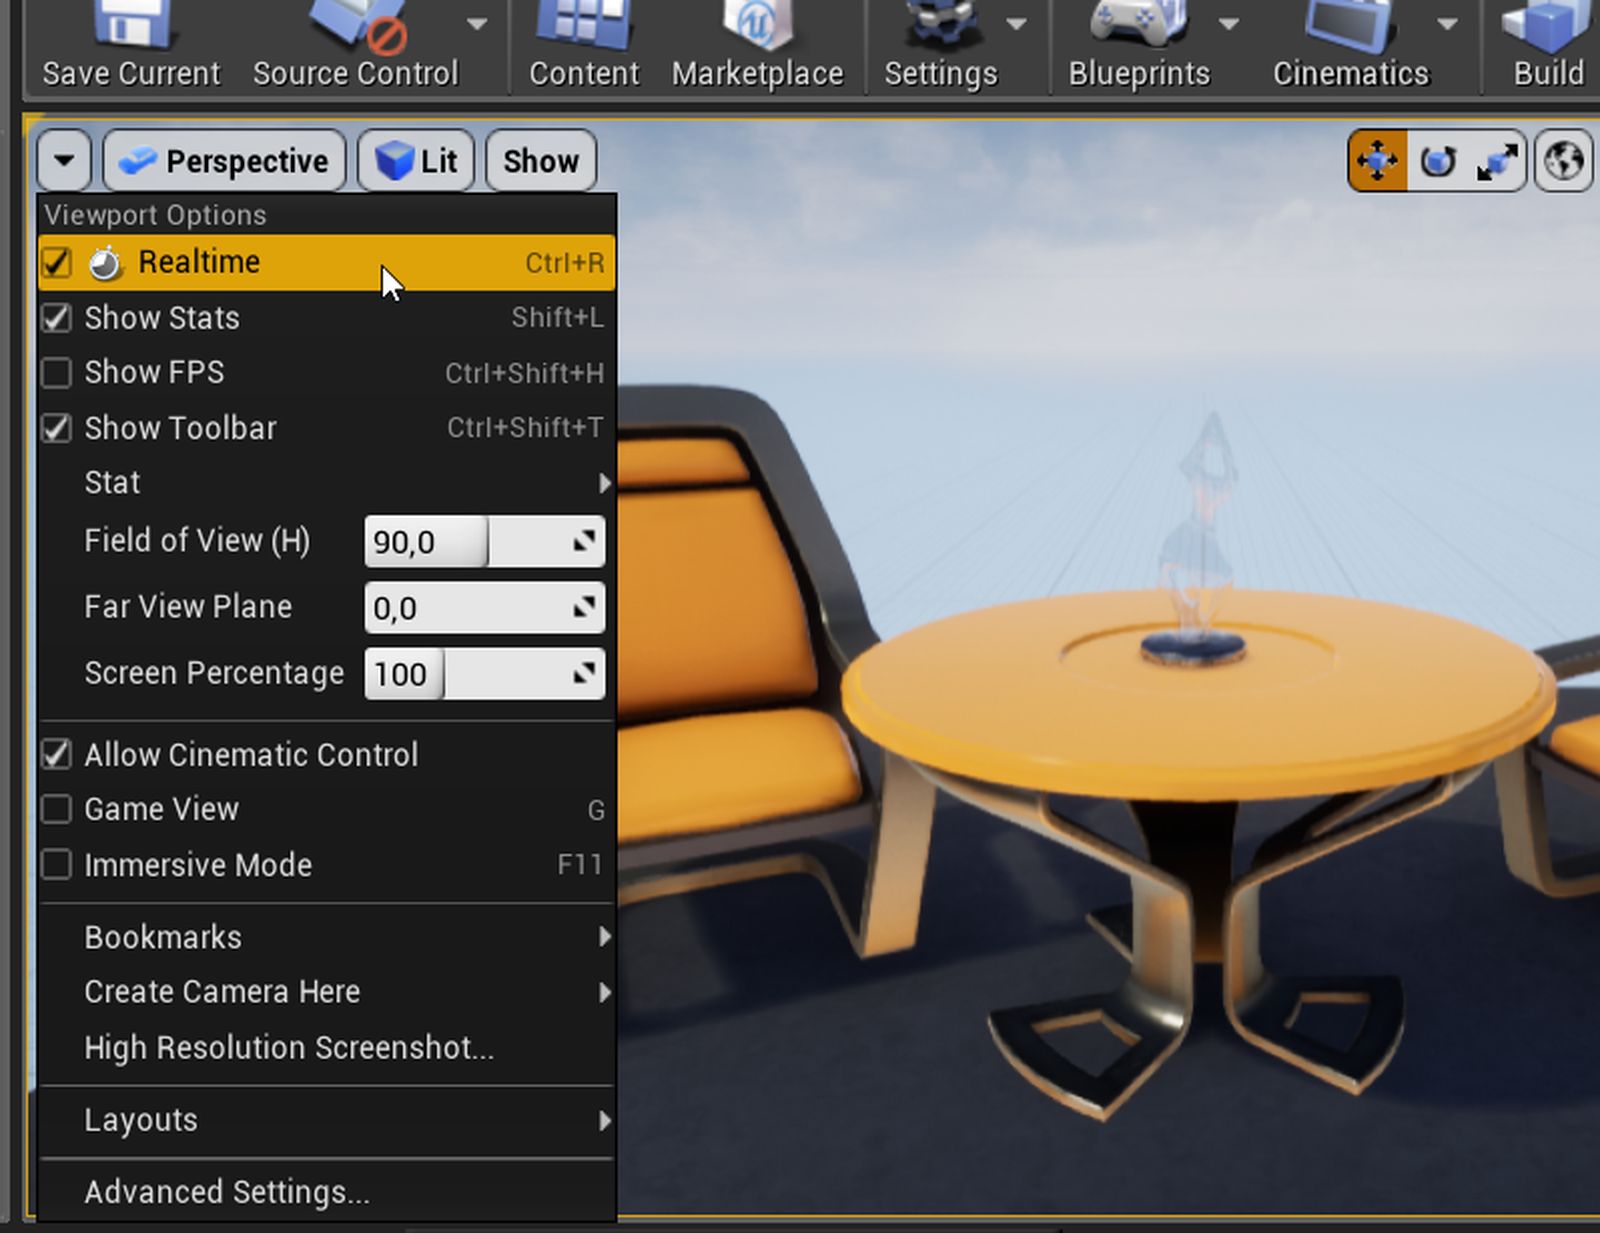
Enable Realtime in Viewport: Equivalent to activating "Realtime"-View in Viewport Options.
Start edddison, Stop edddison, Update edddison, Clear edddison settings (These options are covered in the chapter Run edddison)

Configure Unreal Engine to interact with edddison in real-time#
Important: In the Unreal Editor Top Menu: Edit > Editor Preferences > Performance > uncheck "Use Less CPU when in Background".
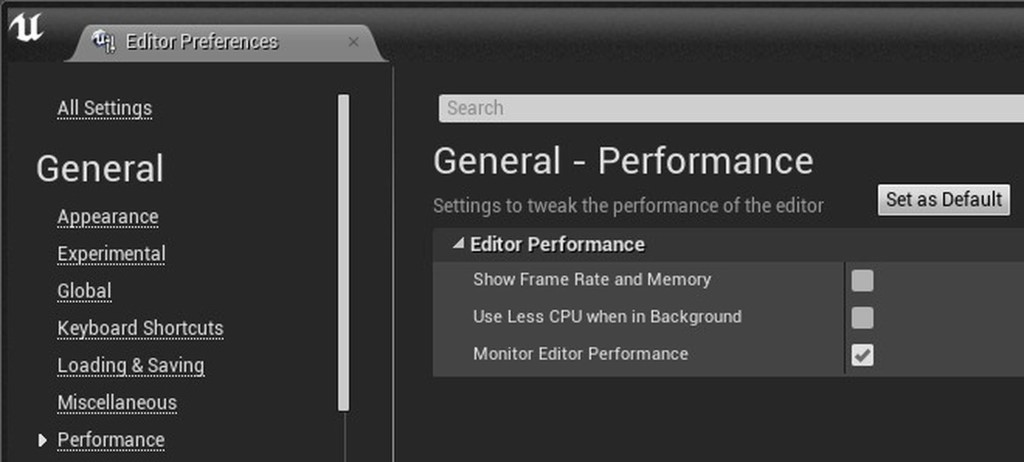
Afterwards click Set as Default to keep the setting for all your future projects.
Note: If you do not uncheck this, a fluent camera control with edddison in editor mode is blocked by the Unreal Engine. This setting does not affect the game mode.
The last option you should check is the Realtime Viewport. In the Viewport click the arrow on the top left corner and check 'Realtime' This allows you to use the edddison camera to interact in the editor viewport.
Perfect! Now lets create our first floor plan!
Configuring your scene#
For edddison to work you need the following:
- Define the walk-able areas in your project with bounding boxes and floor plan images.
- Define a camera
- Optional: Define 3D objects
Manage floor plans - (walk-able areas)#
To define the walk-able areas in your project, we will create bounding boxes and floor plans.
Set up the bounding box#
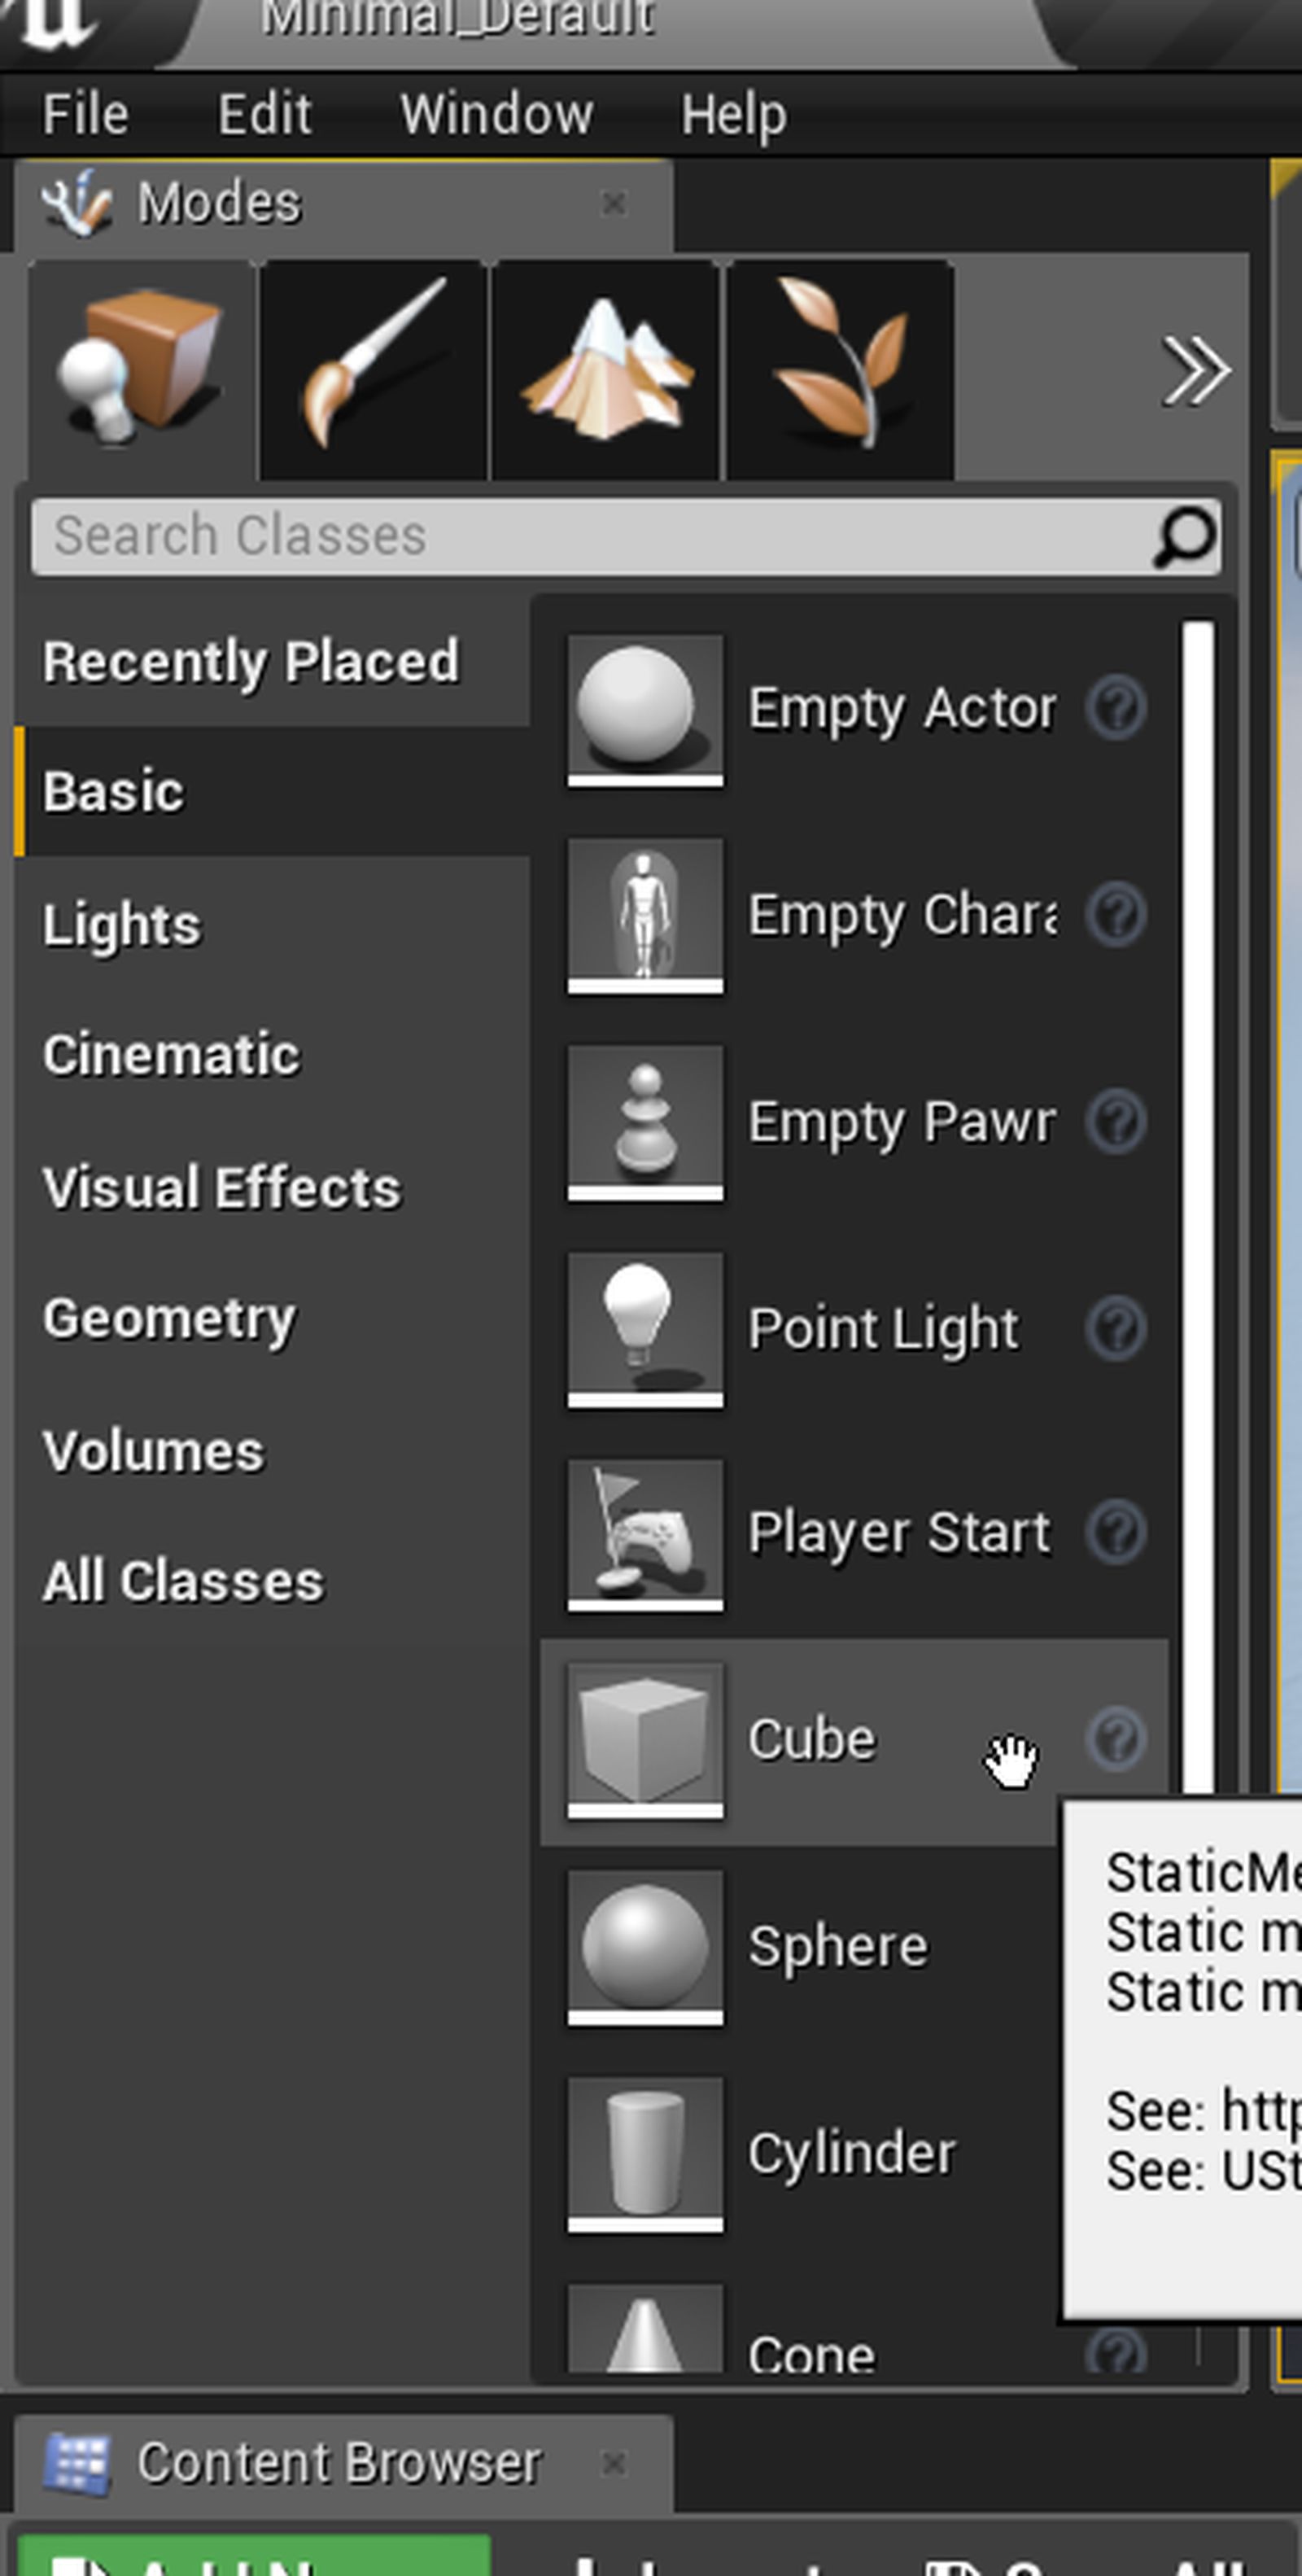
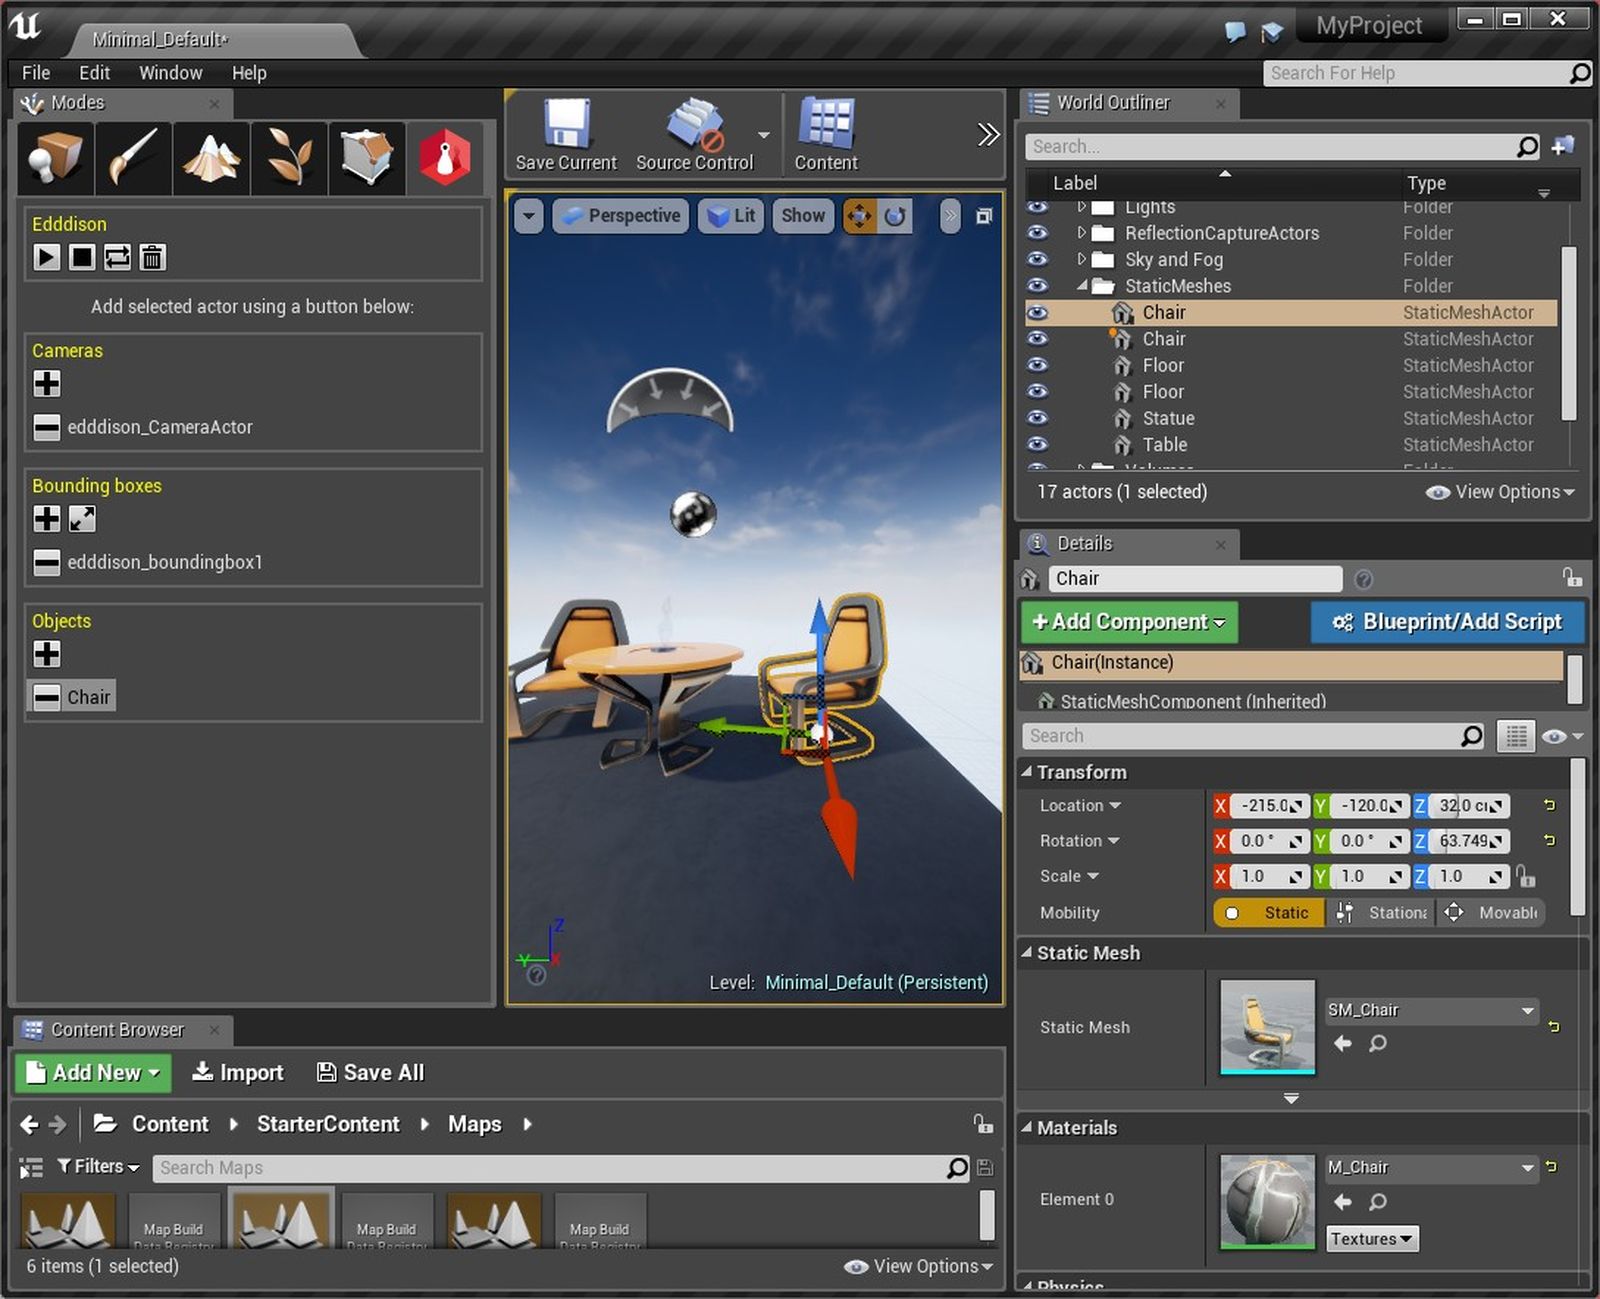
- Place a Cube (Modes > Place > Basic > Cube -> Drag to scene) to create a bounding box (See Image). Rename if needed
-
Define its size and orientation.
-
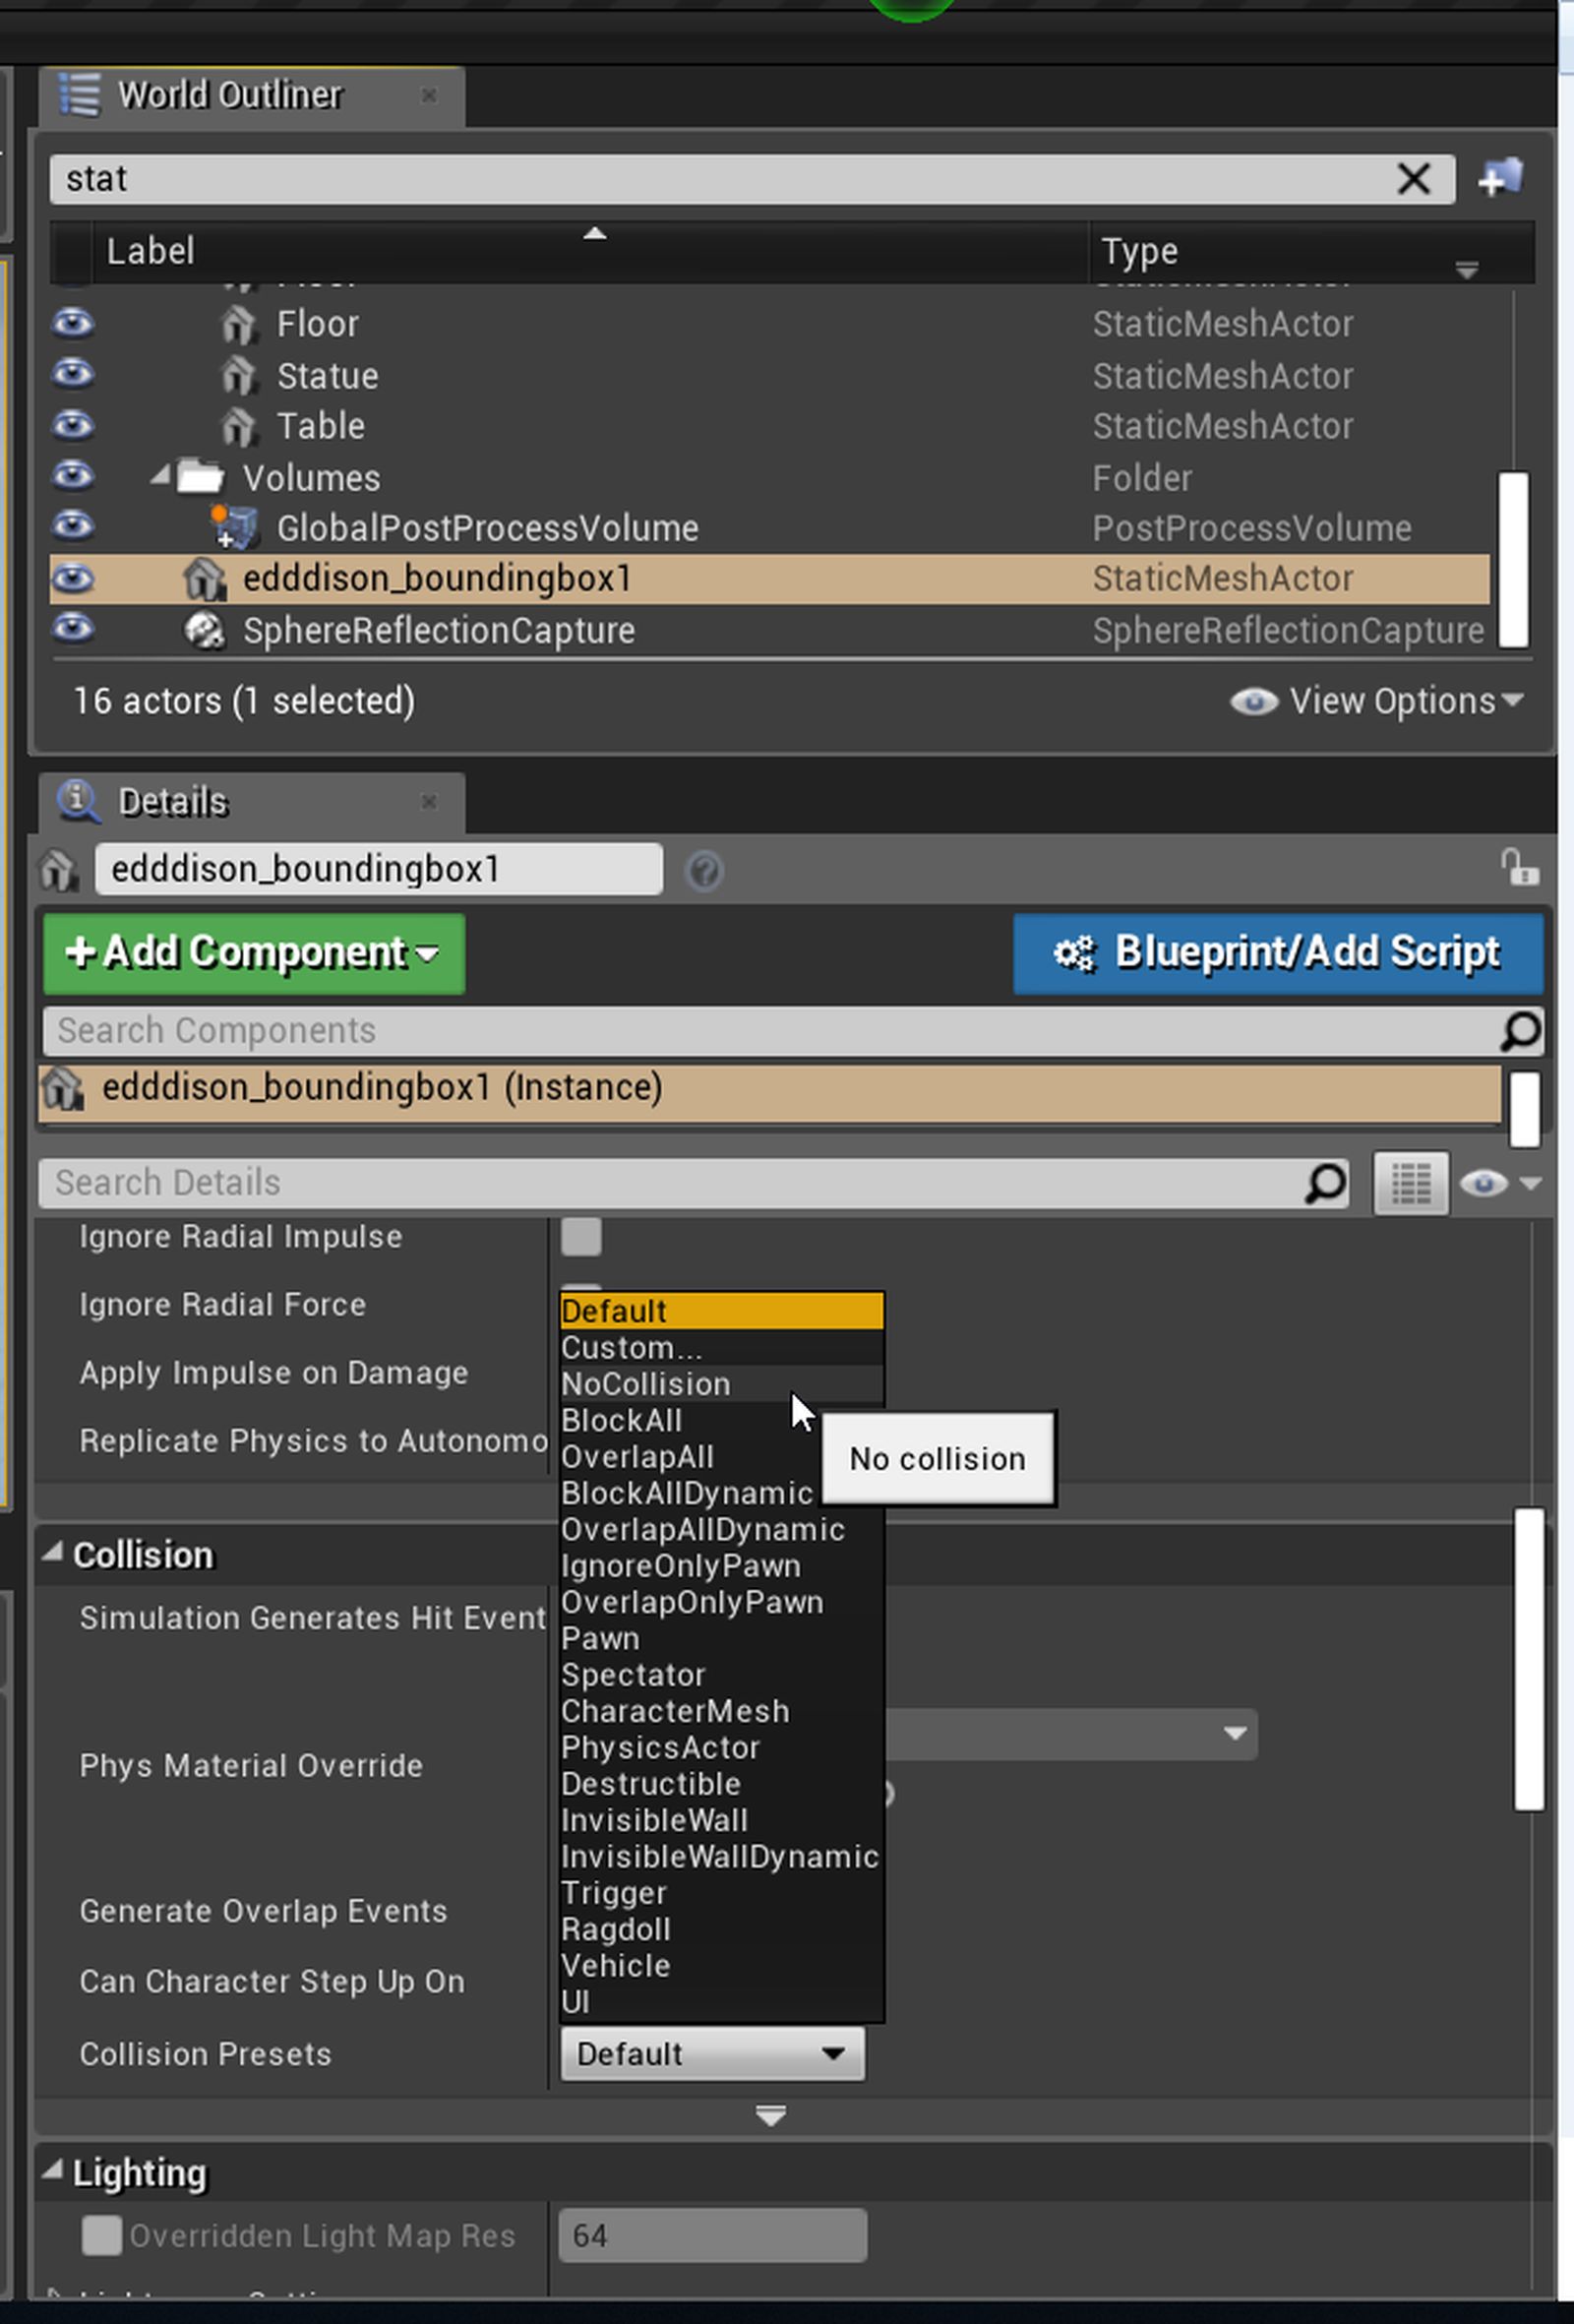
Disable collision by setting NoCollision in the Collision-Tab of the objects details. (See Image)
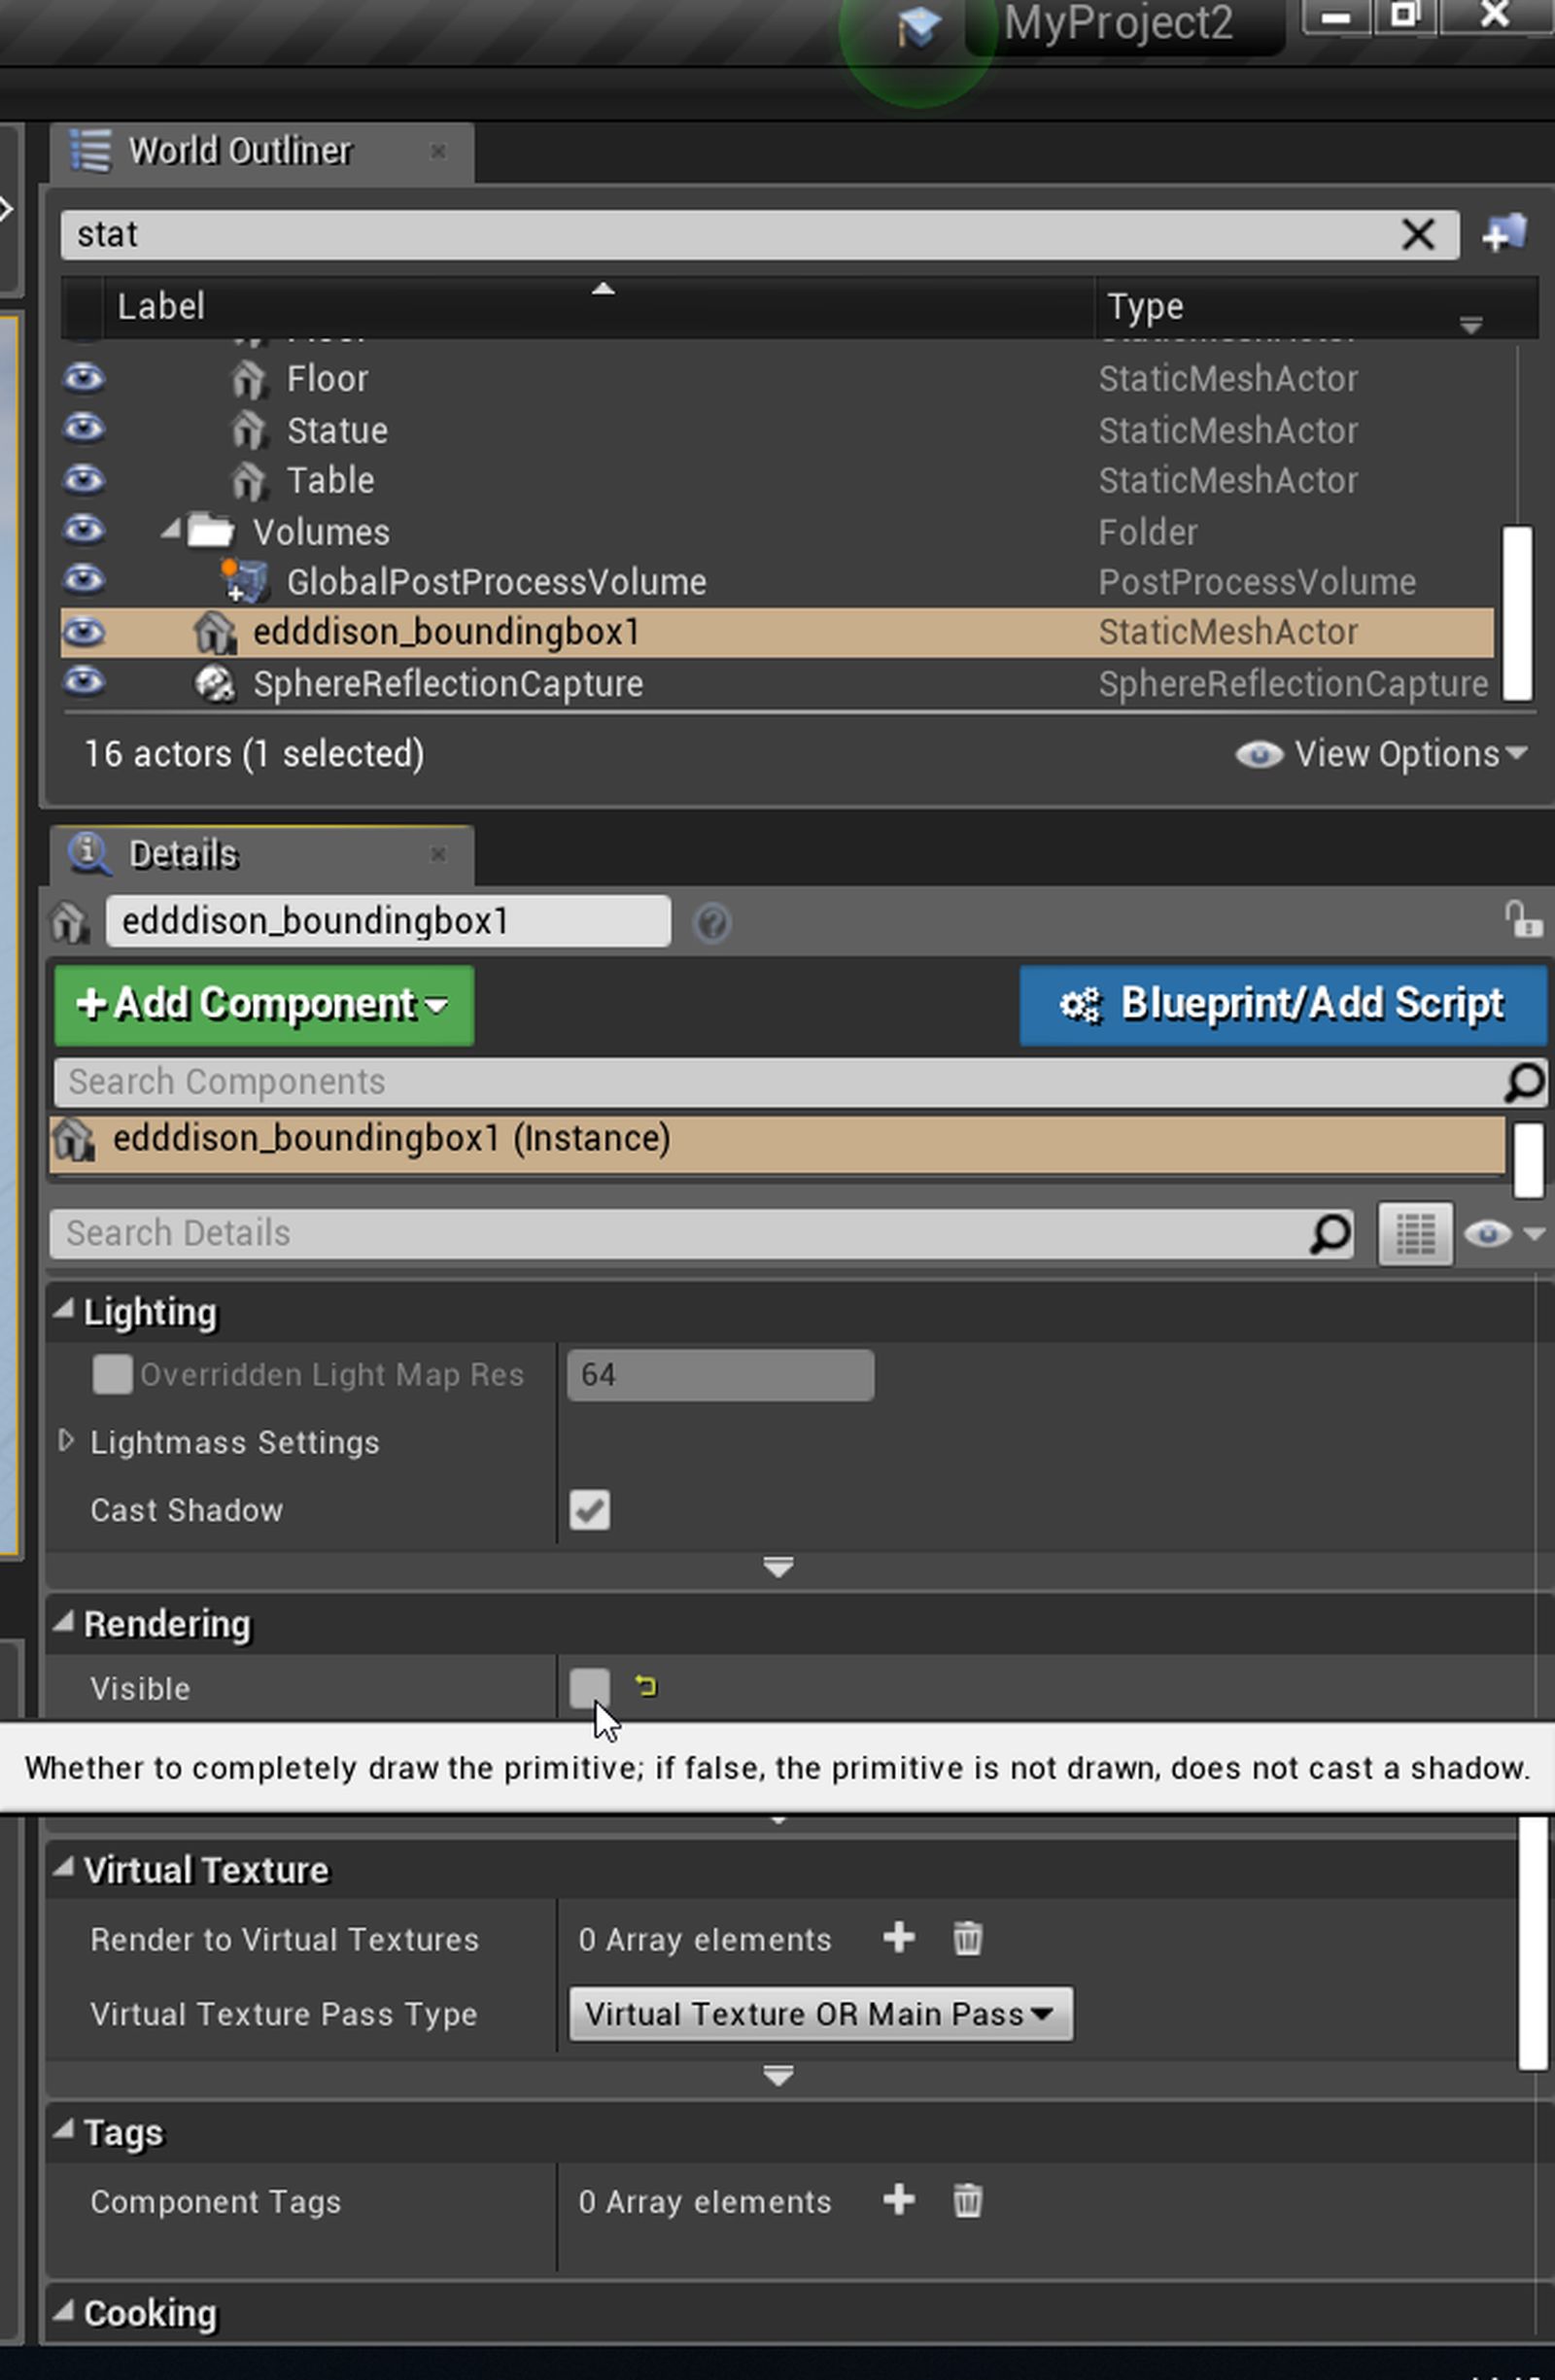
- Set the cube invisible by unchecking Visible. in the Rendering-Tab of the objects details. (See Image)
- Select the cube in the outliner.
- Select the edddison plugin in the Modes-Window.
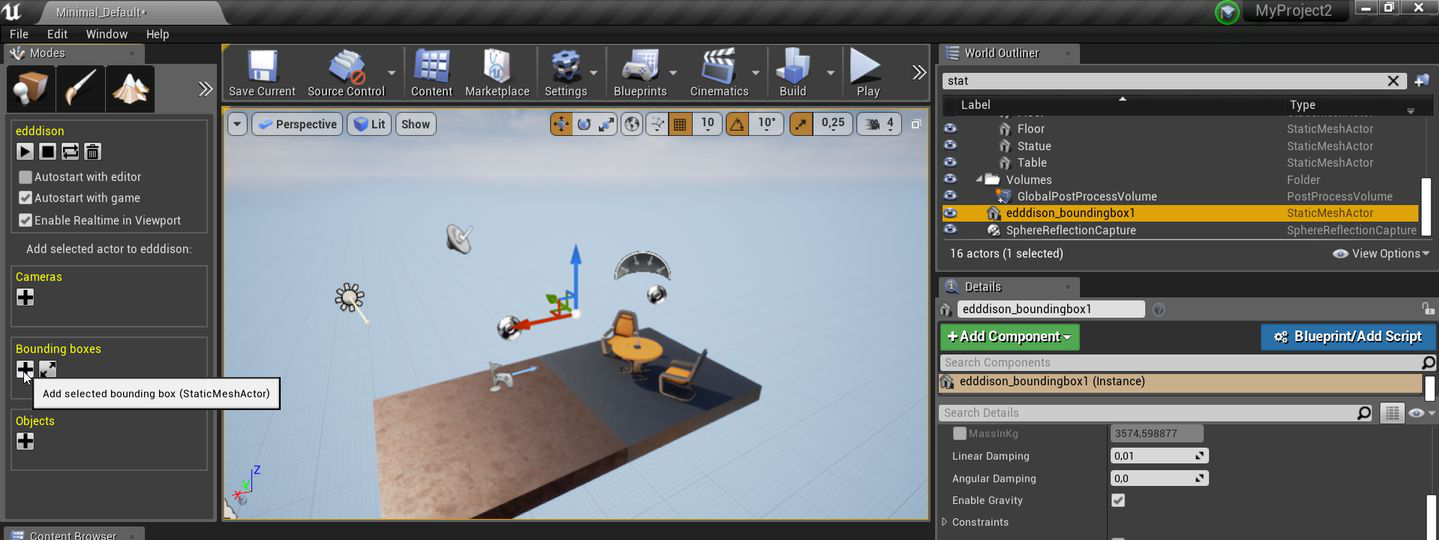
- Click on the plus icon in the Bounding boxes-Section to add it to the edddison plug-in. (See Image)
The Cube (Static Mesh Actor) should now be visible in the section Bounding Boxes like in this image:

Position the bounding box#
edddison calculates its camera position and movement from the currently active bounding box. Which means it can only move inside this box.
To resize and position your bounding box to fit as best as possible to your desired walkable model area, do the following:
While having the bounding box selected:
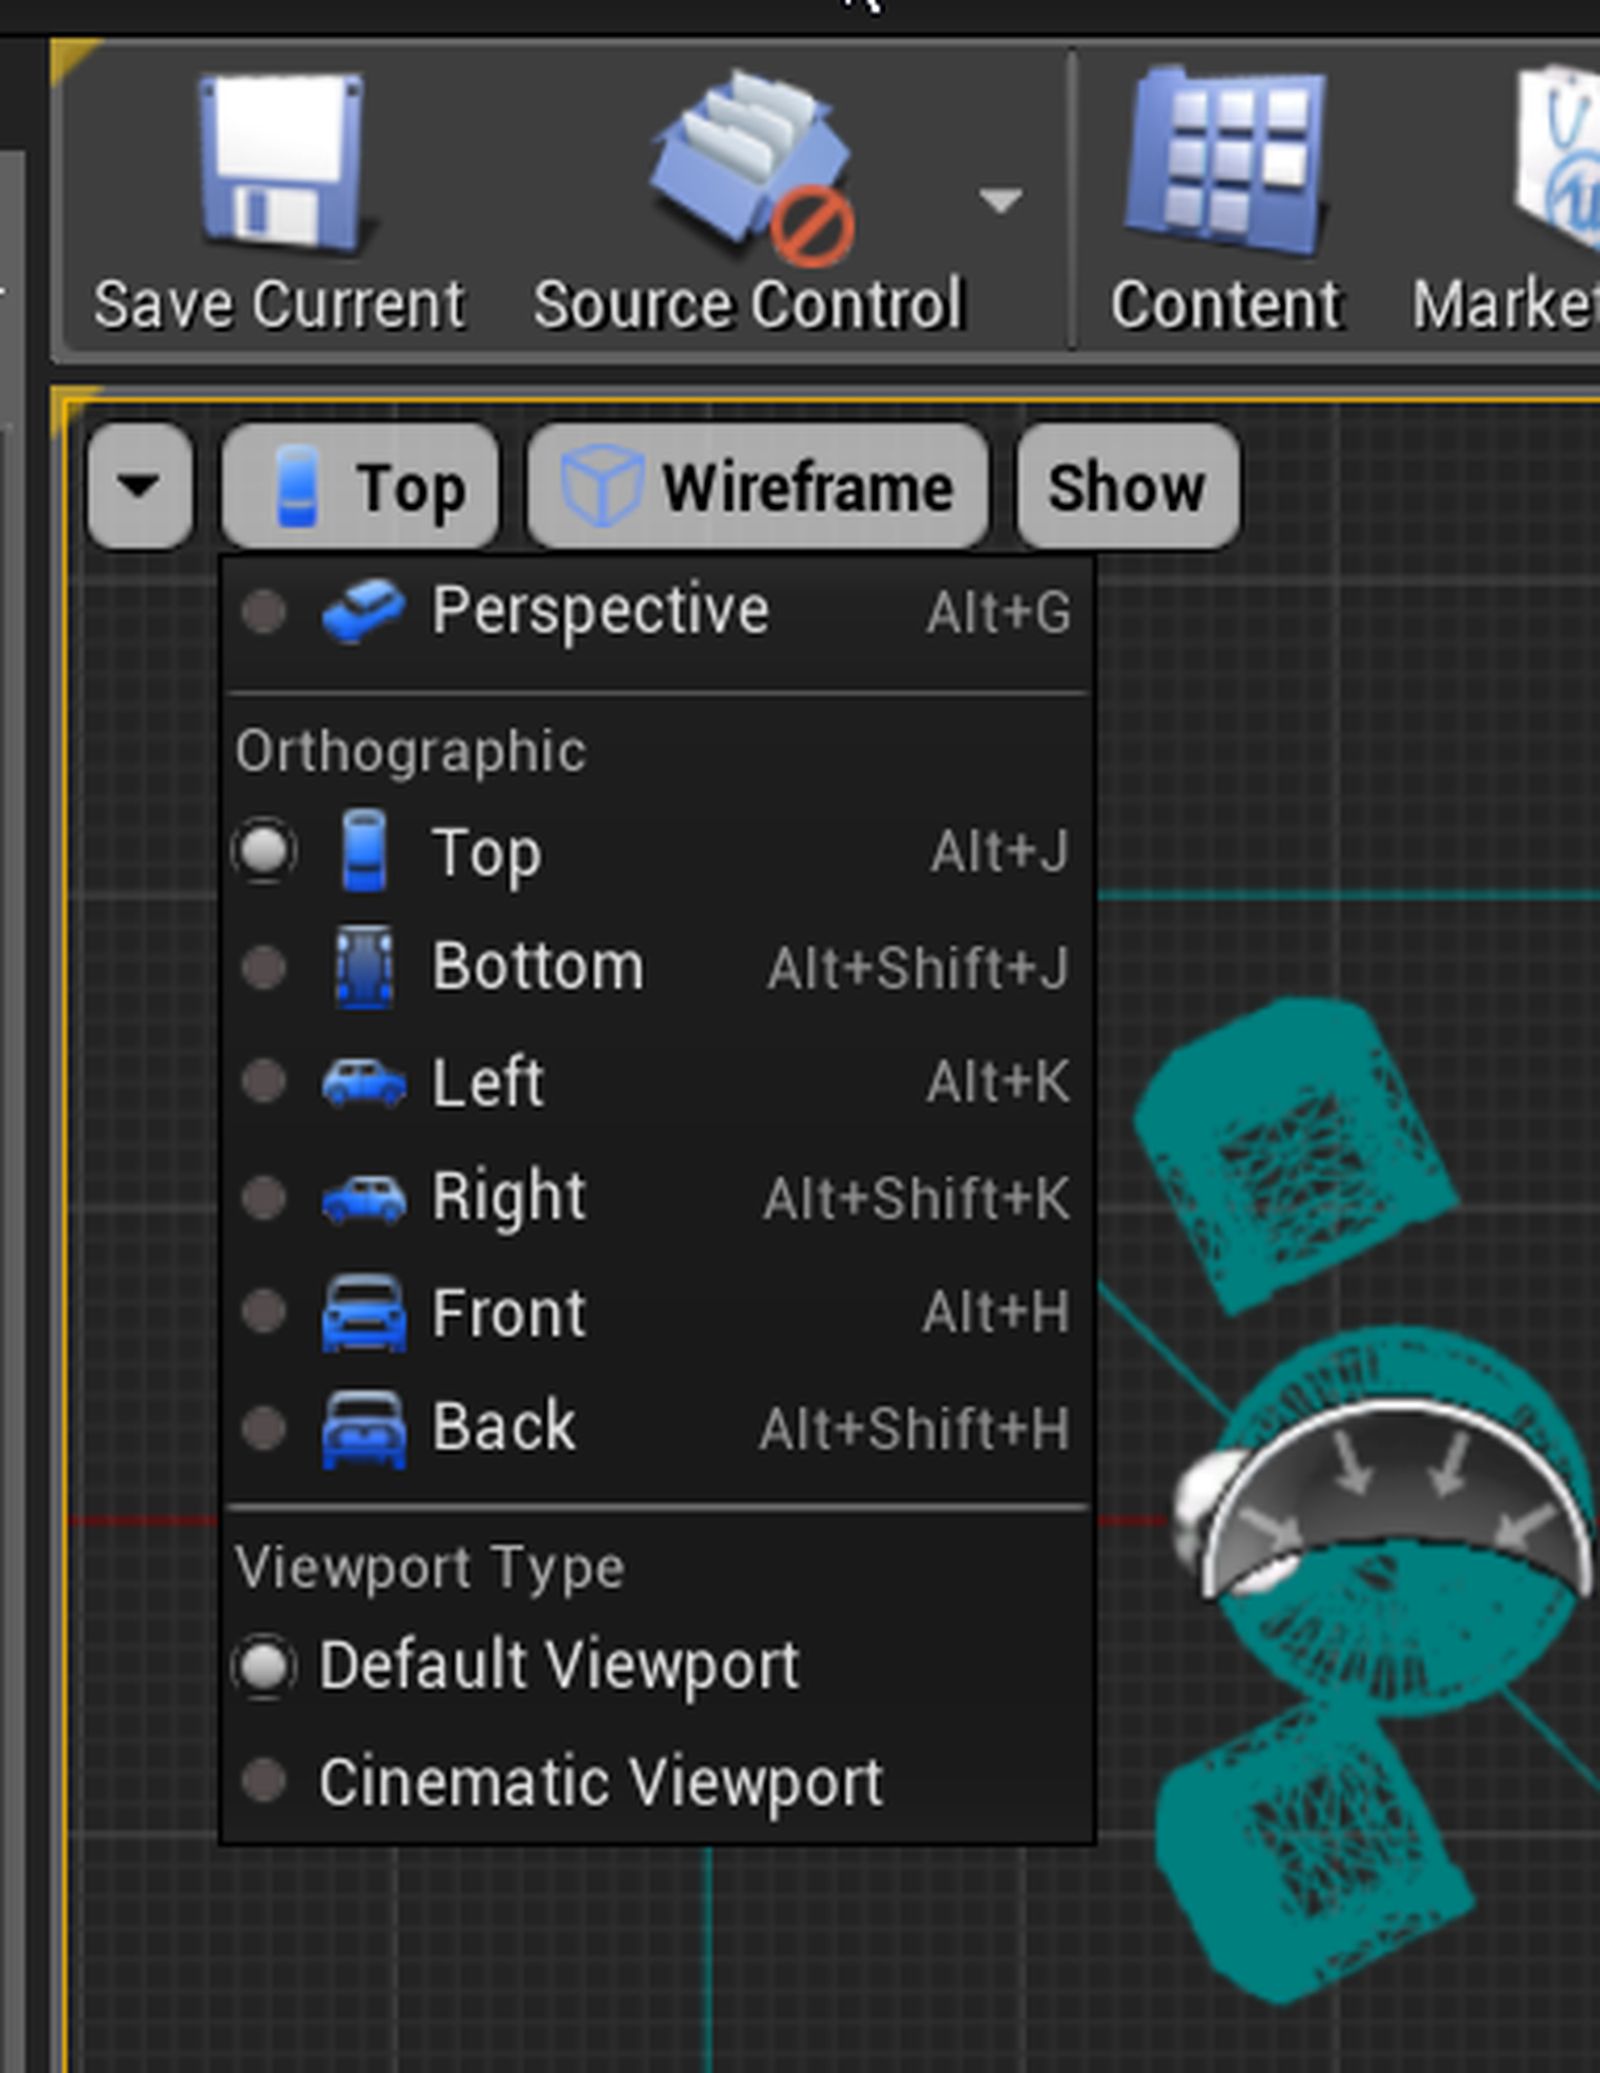
Switch to local (object) space in your viewport.
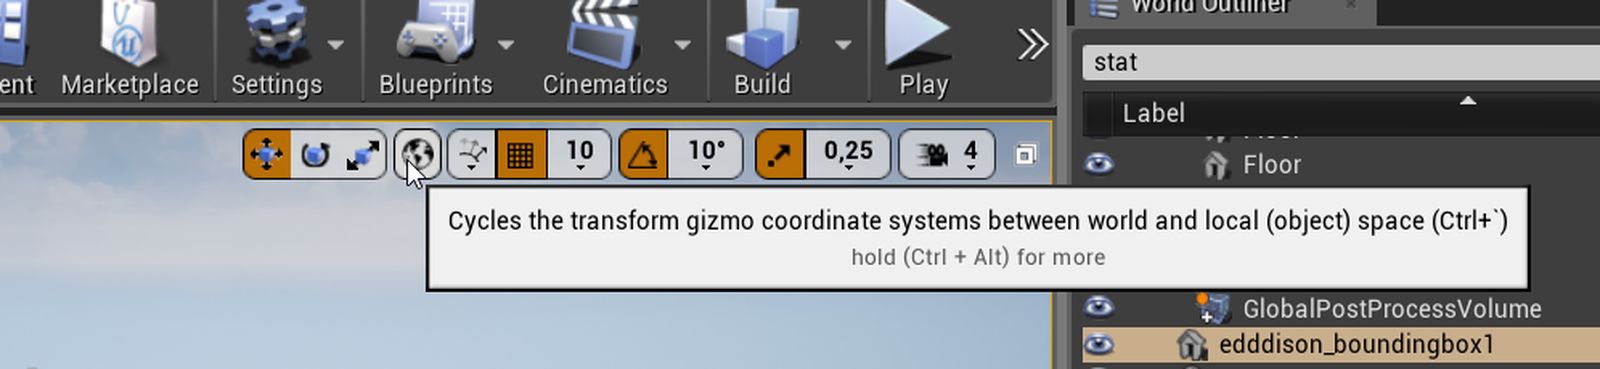

Switch to top view and wireframe in your viewport options.
Use F on your keyboard to focus the camera on the bounding box.
In your viewport:
The red arrow of the objects gizmo always points in the vertical dimension (up, north) of the edddison 2D floor plan (in the edddison editor) . (See Images)
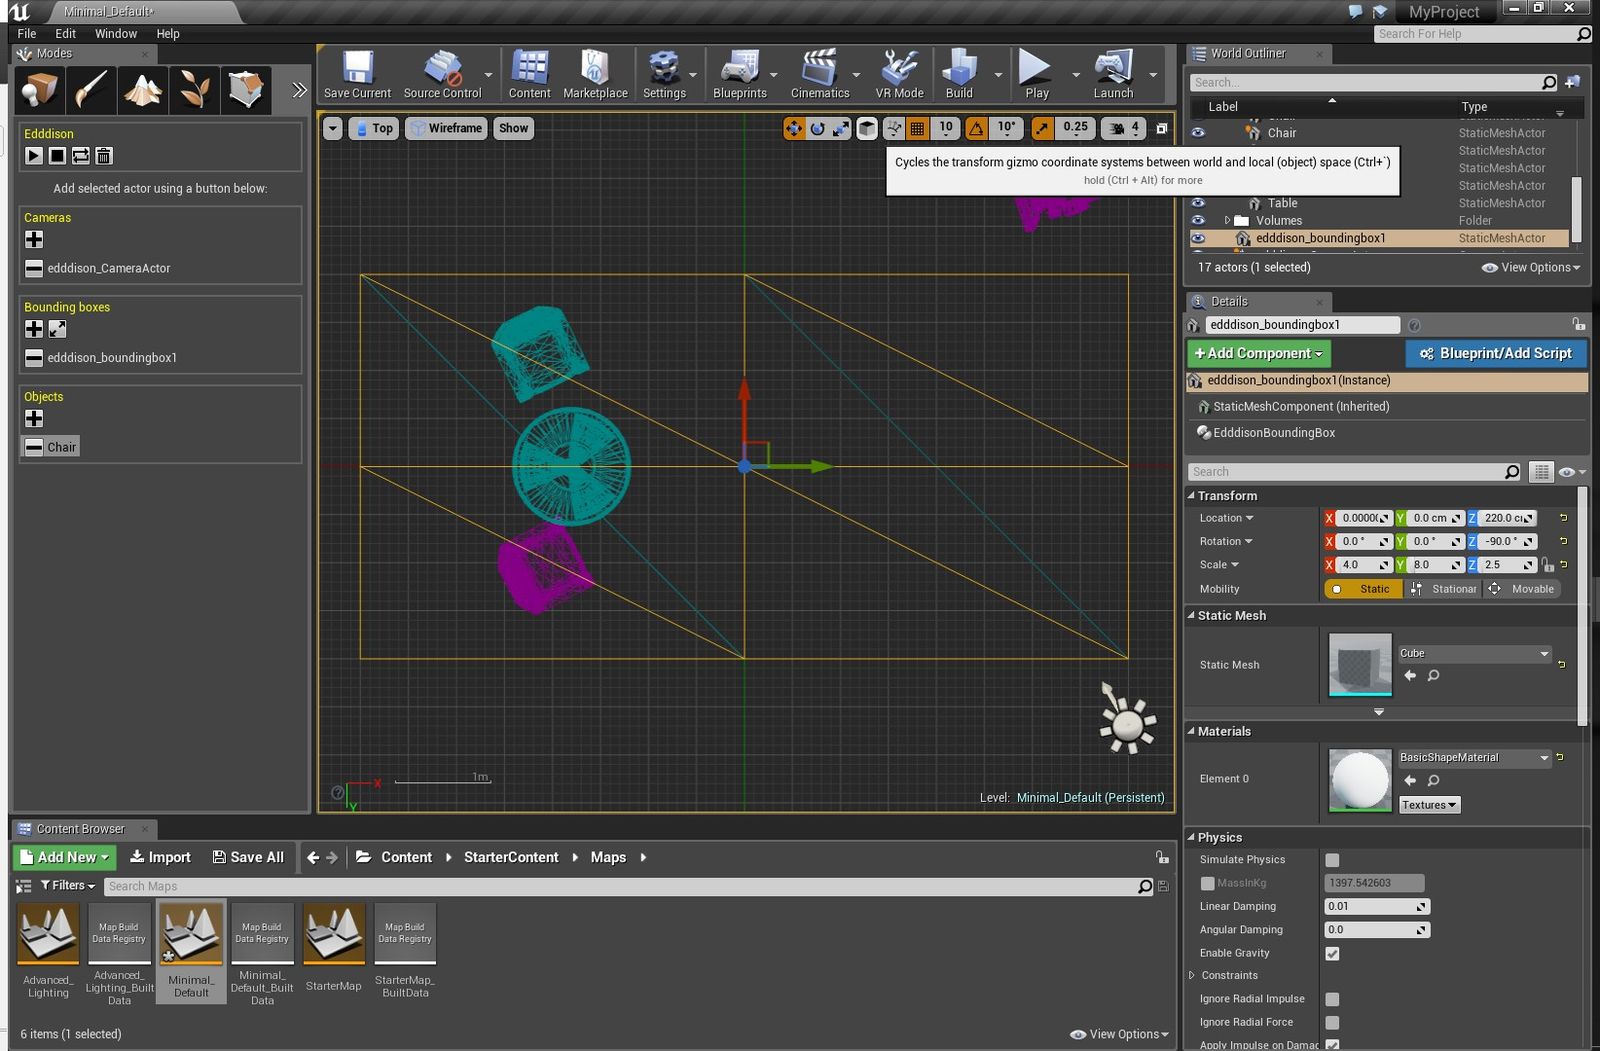
Bounding Box in Unreal Editor
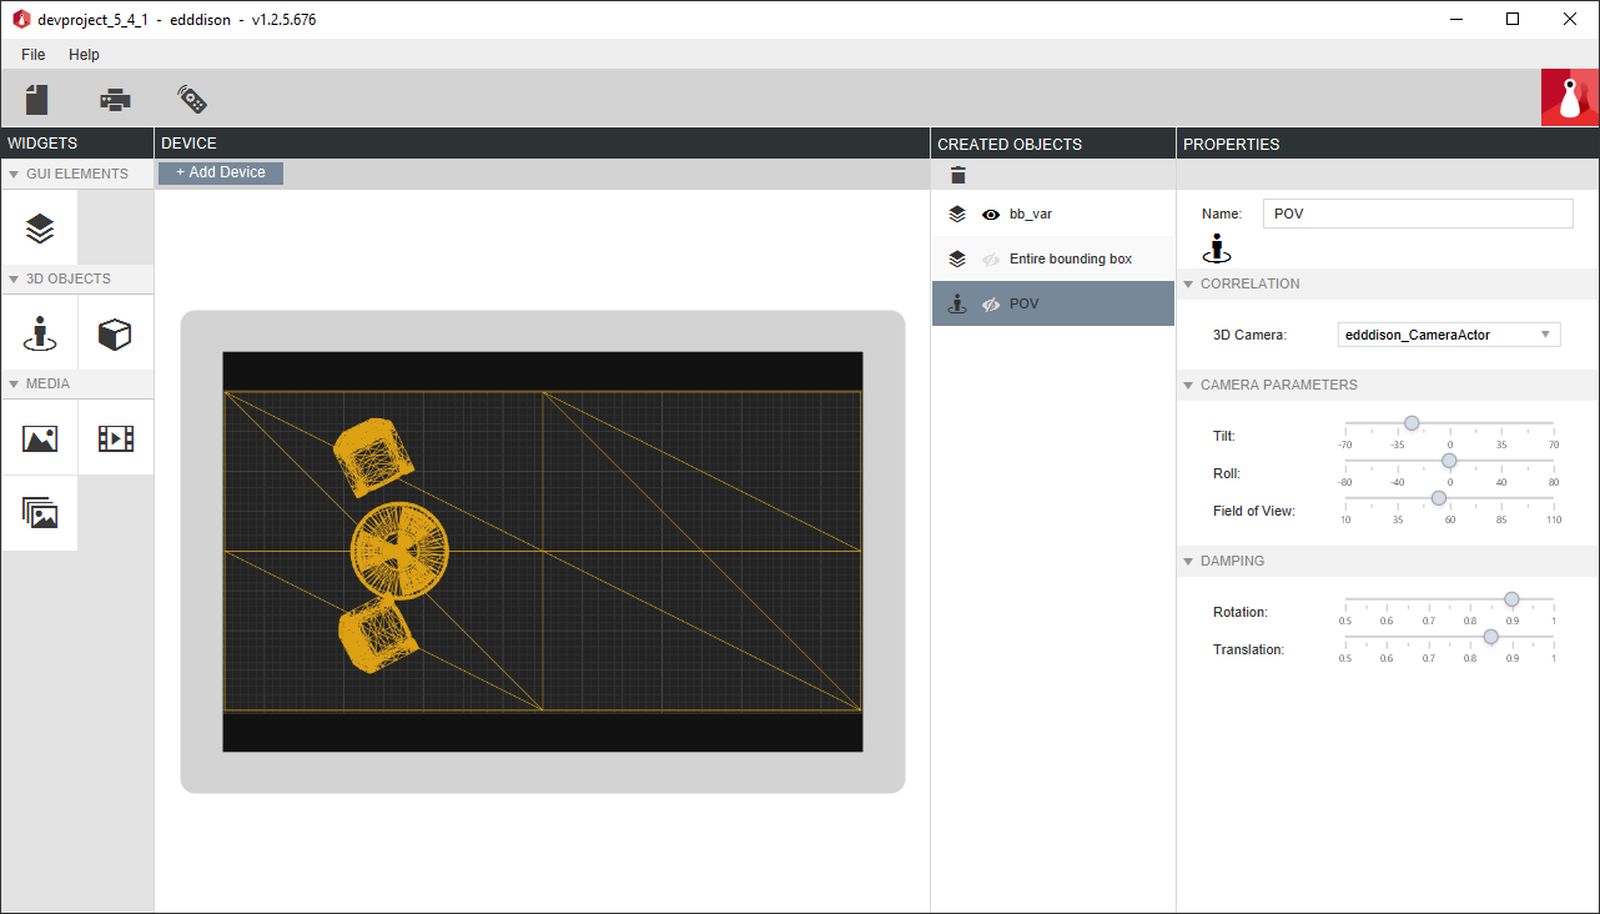 Bounding Box(Floor plan) in edddison editor
Make sure, that the red arrow is pointing up (north) by rotating your bounding box accordingly
This will be the "shorter side" of your bounding boxes floor plan.
The green arrow always points in the horizontal dimension of the edddison 2D floor plan (in the edddison editor). (See Images)
This will be the "longer side" of your bounding boxes floor plan.
Resize your bounding box according to your walk-able area in your 3D Model and make sure you got the red arrow pointing "north" and the green arrow pointing "east"
Create a floor plan#
A floor plan (2D top view) is needed for easy and precise orientation in the 3D view.
- Create an image (.jpg, .jpeg or .jpg) and use it as a floor plan.
In Unreal Editor this is really easy:
- Switch to local (object) space (see chapter "position bounding box")
- Use Top view, select the bounding box, make it visible and focus on it.
- Set all things invisible which you dont wish to see on your floor plan. (Object Details > Rendering > Visible "uncheck")
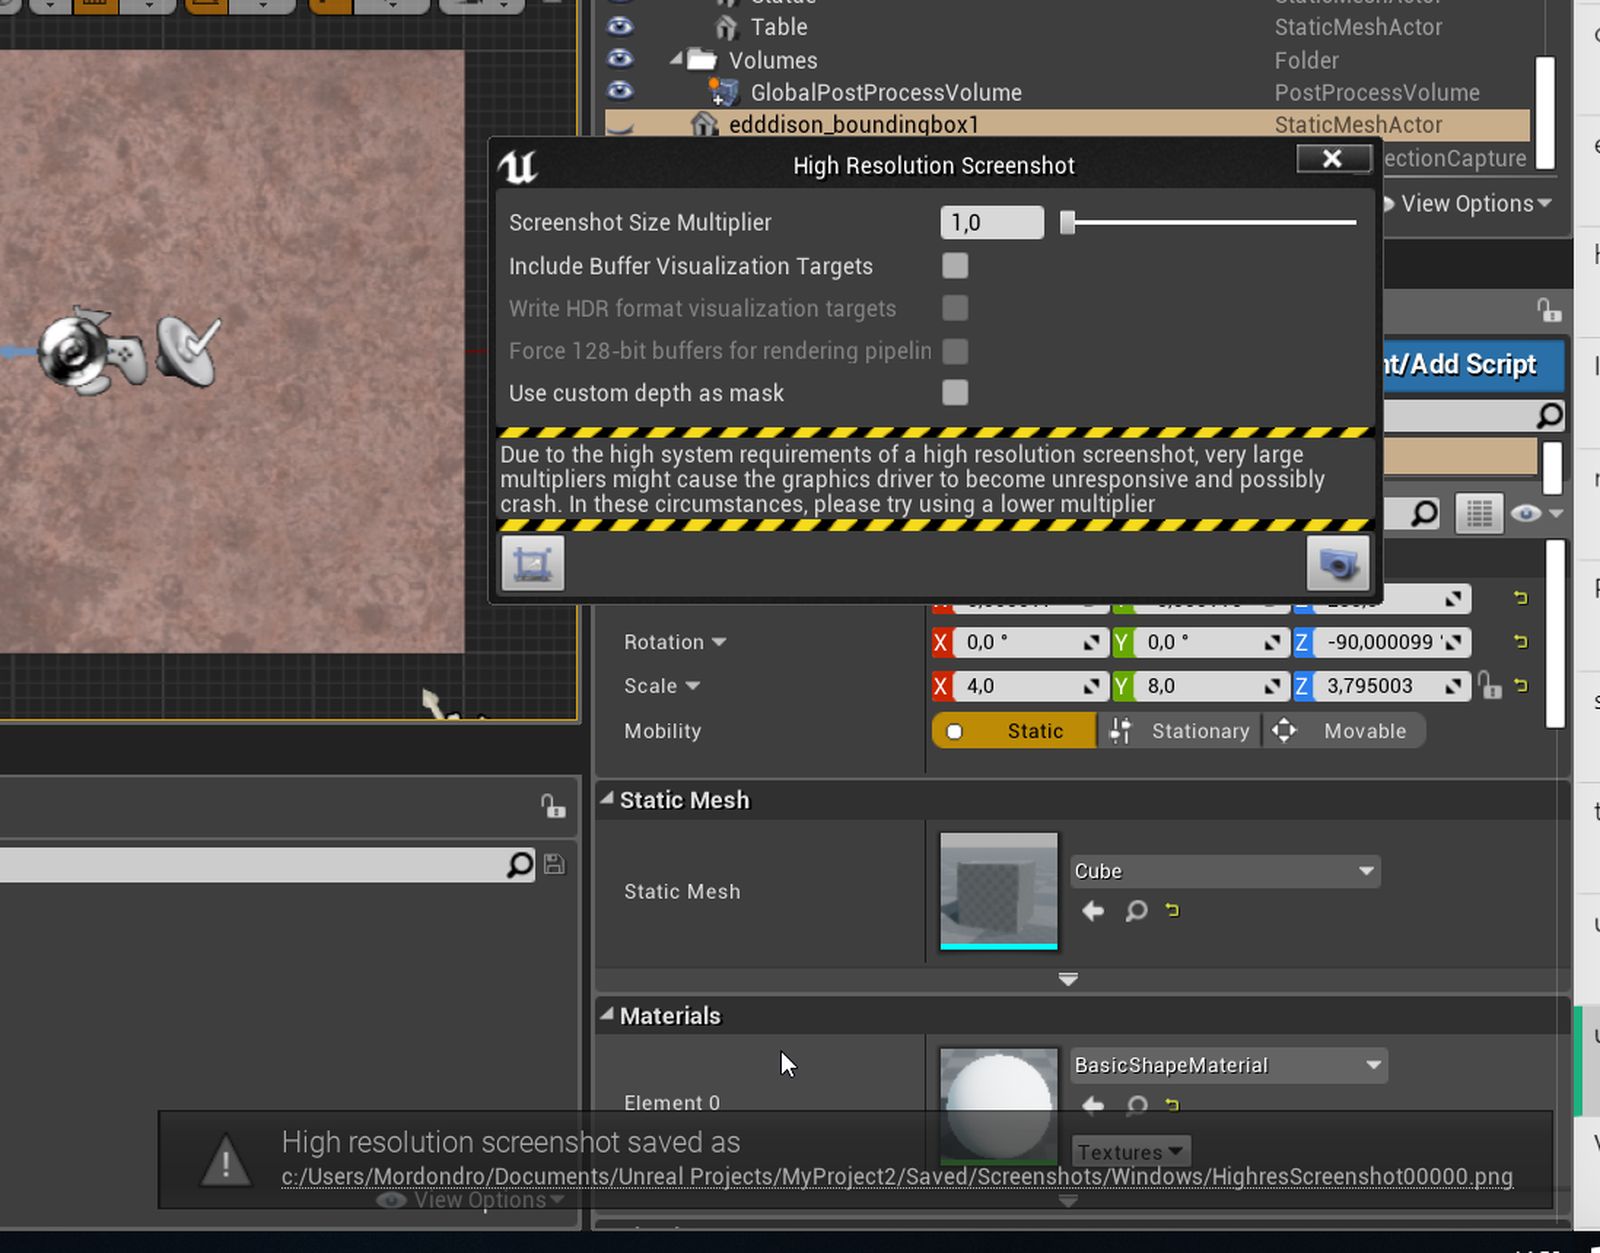
- Open the High resolution screenshot tool from the arrow on the top left menu in your viewport. (See Image)
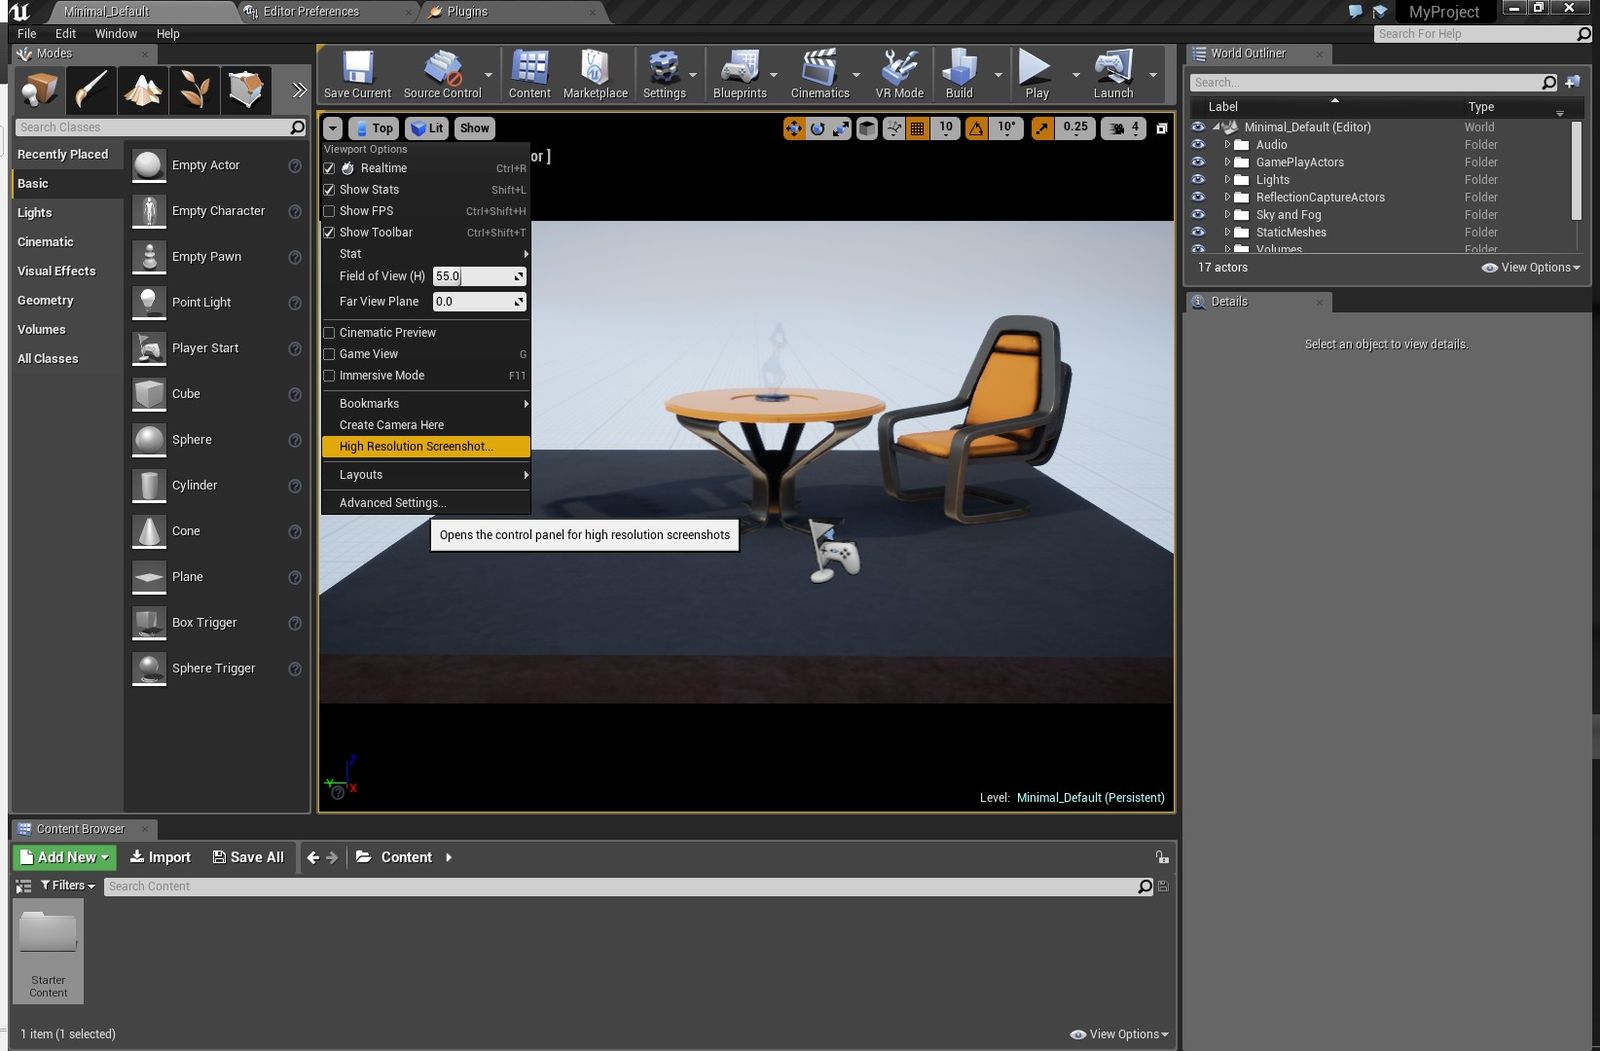
- Span the capture rectangle exactly on the cube.
- Set the bounding box invisible (Select Bounding Box Object > Object Details > Rendering > Visible "uncheck") .
- Activate one of the possible viewport visibility options from the menu on the top left in your viewport. We suggest "Lit". (See Image)

- Make the screenshot by clicking the Save-Icon. On the bottom a popup will show you where the screenshot has been saved. Click it to open the File Explorer at that location.(See Image)
If you are statisfied with the image move on, otherwise repeat steps.
Manage cameras#
Create Camera (mandatory)#
The definition of the camera works the same as the definition of the bounding boxes.
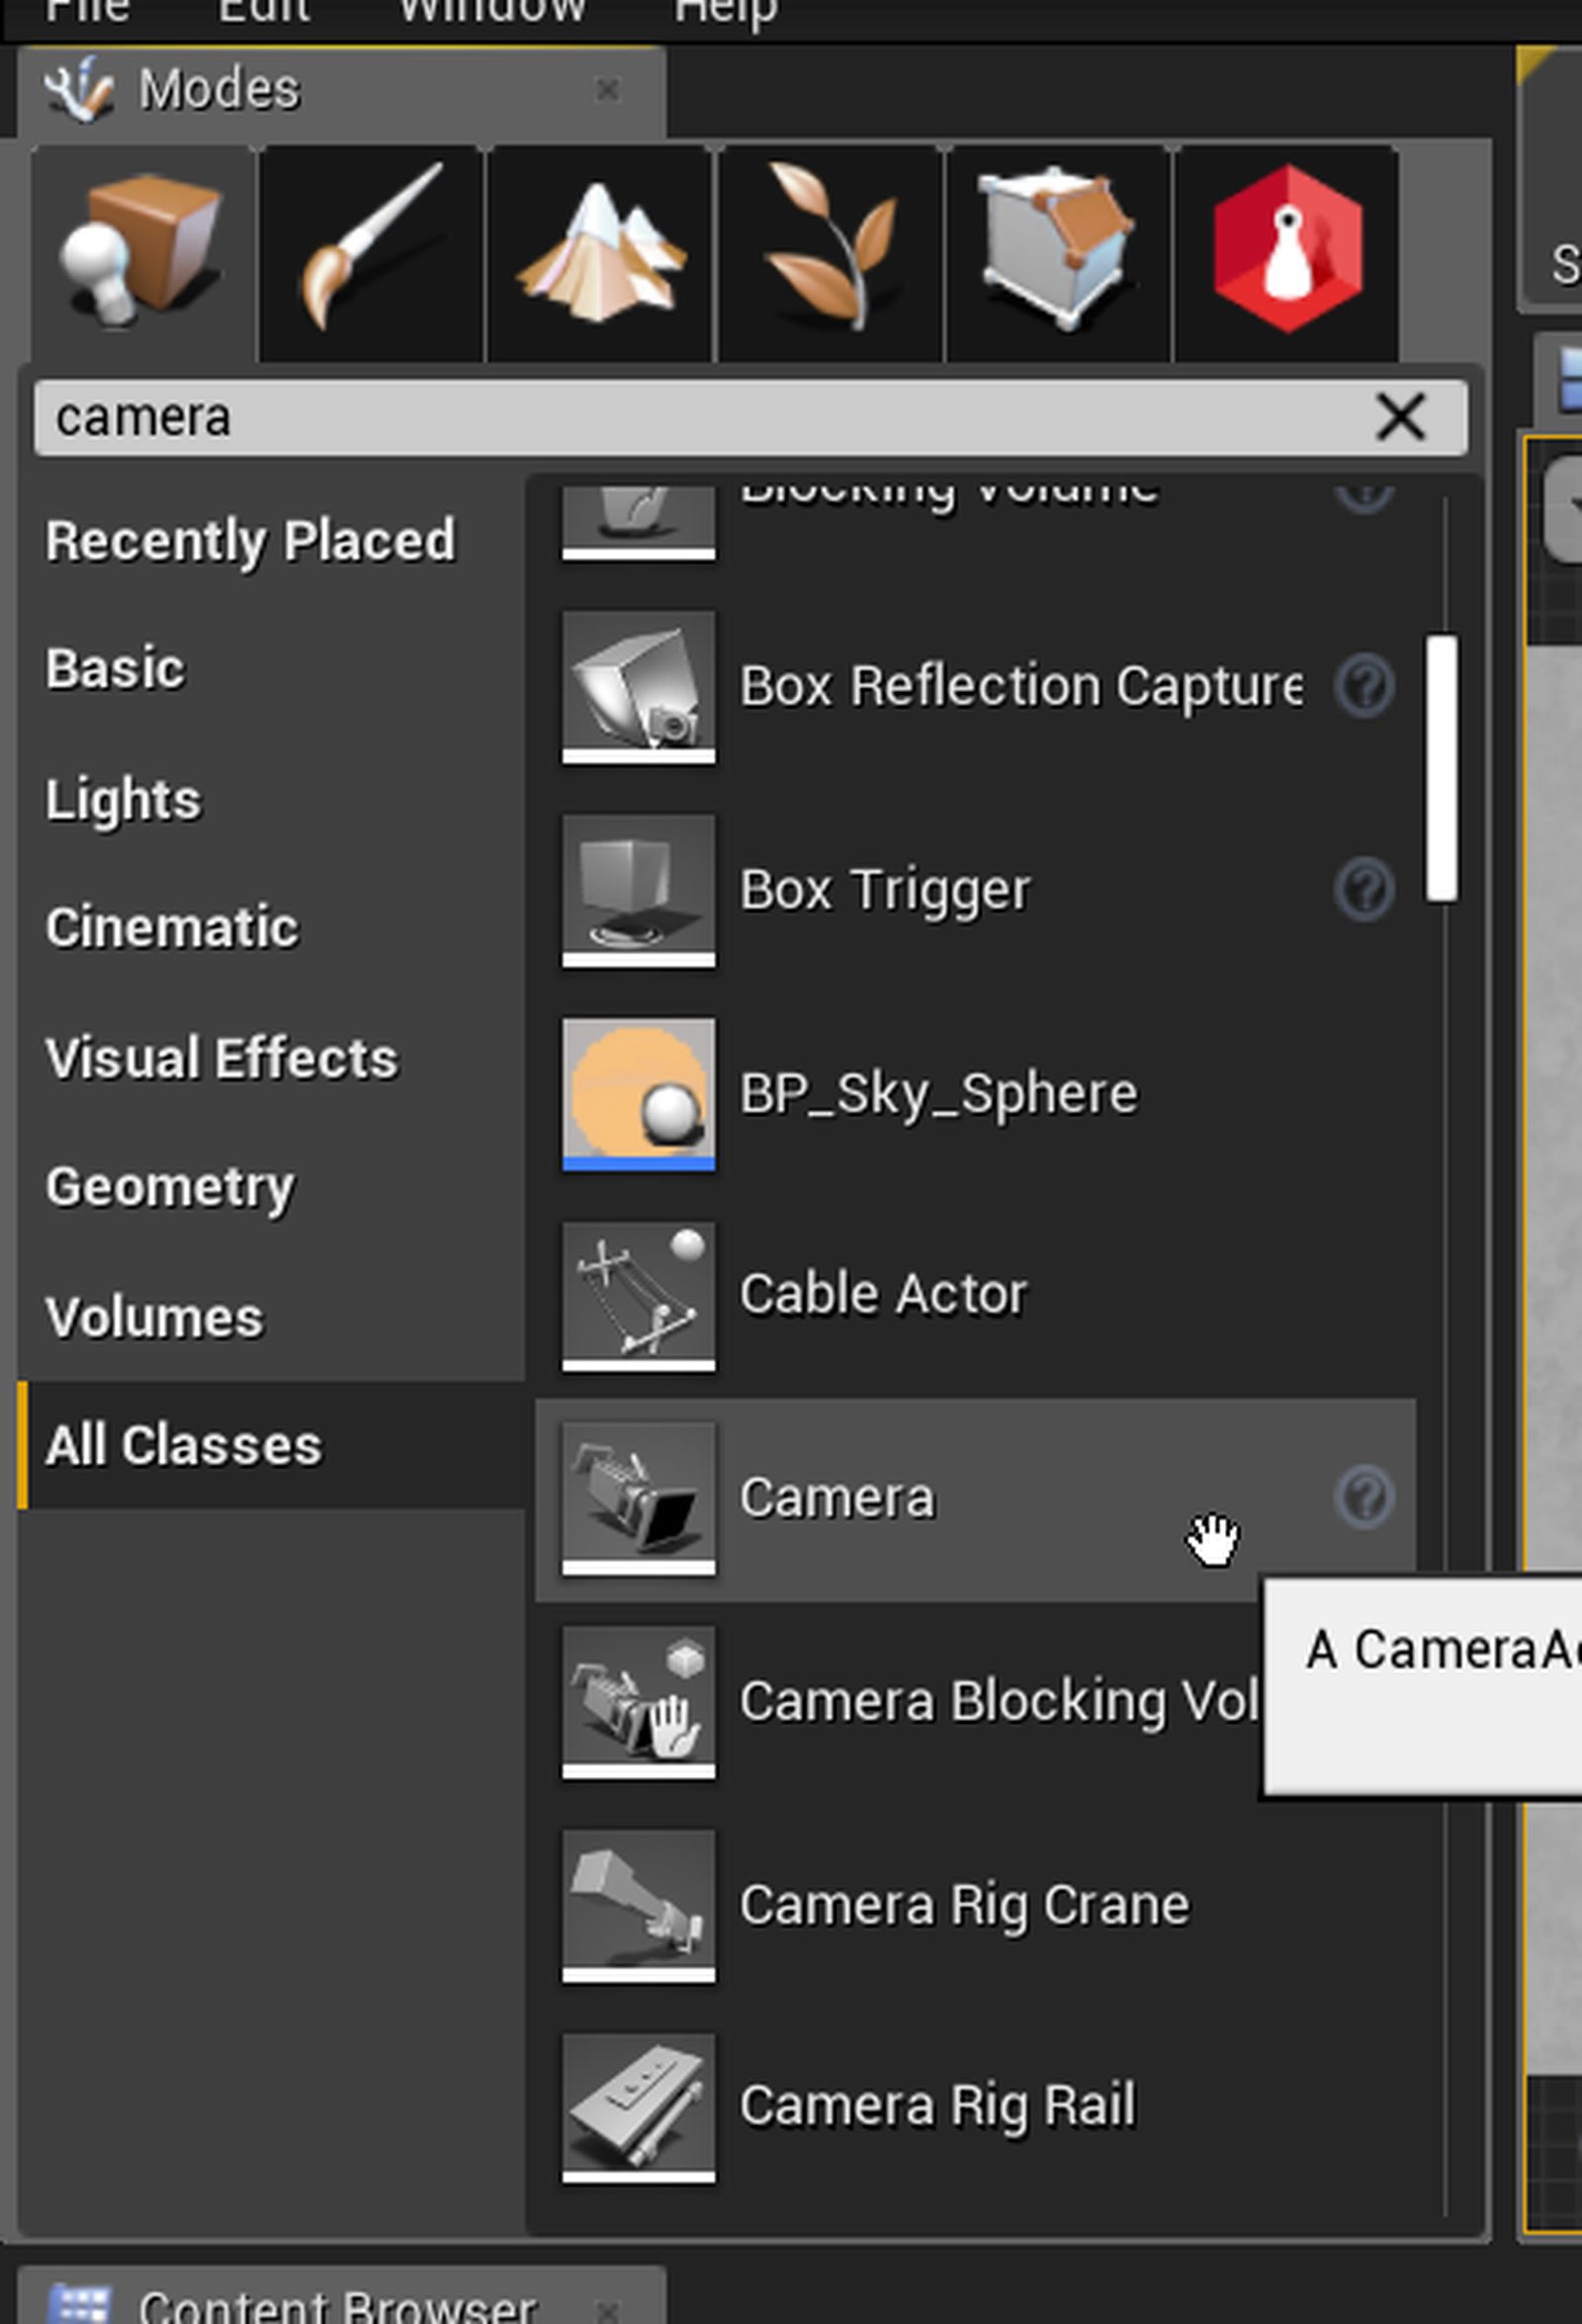
- Place a CameraActor (Modes > Place > All Classes > Camera -> Drag to scene) to define the camera for edddison. (See Image). Rename if needed.
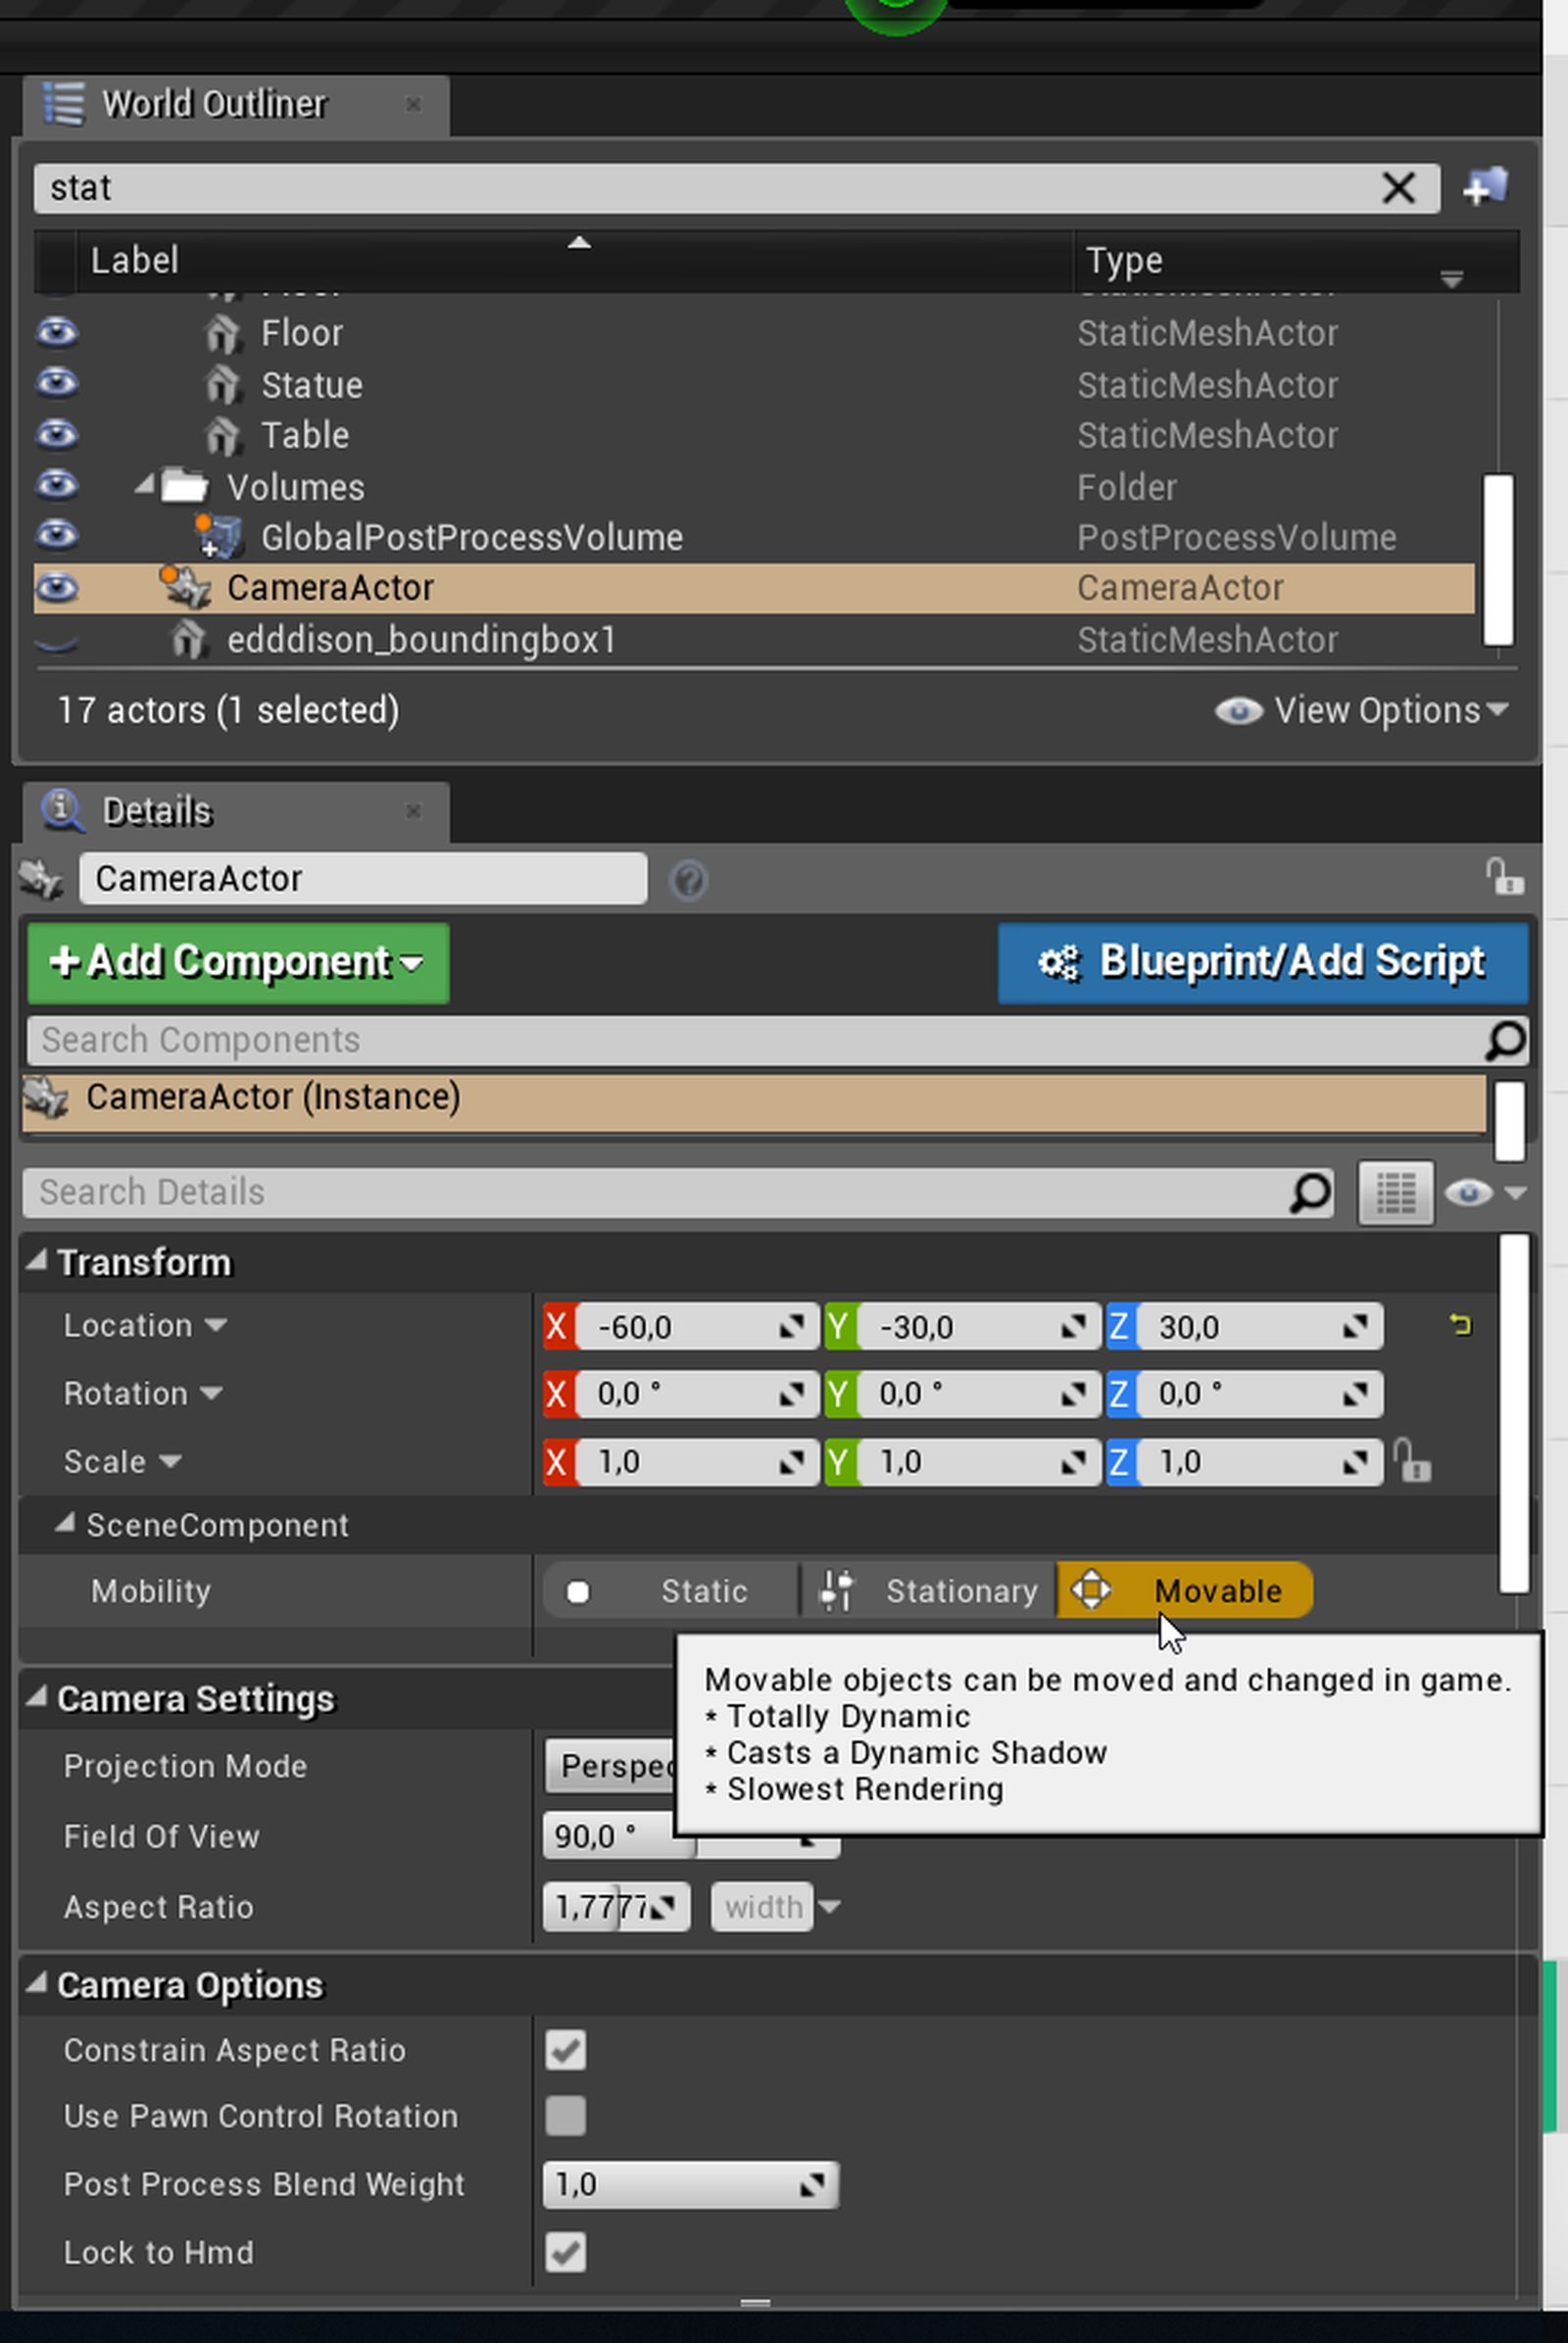
- The camera should always be Movable to prevent any failure in Packaging. You can set this in the cameras details. (See Image)
- Select the camera in the outliner.
- Select the edddison plugin in the Modes-Window.
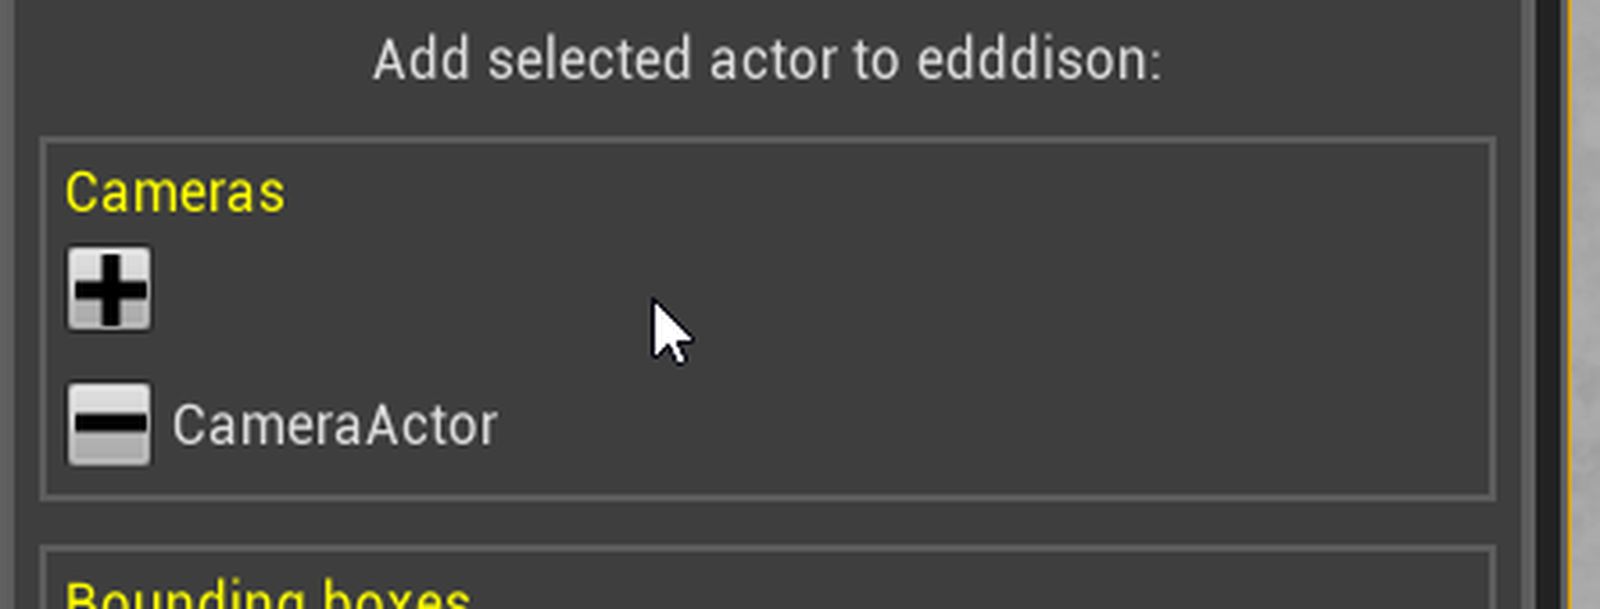
- Click on the plus icon in the Cameras-Section to add it to the edddison plug-in. (See Image)
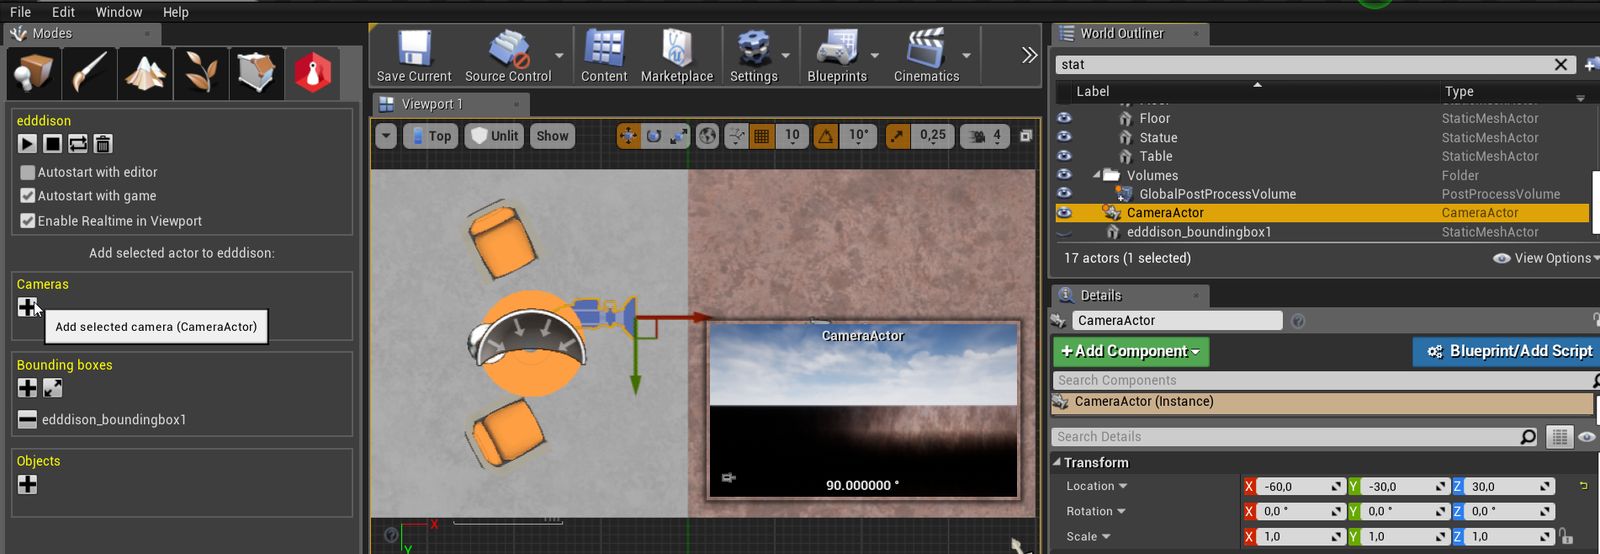
The CameraActor should now be visible in the section Cameras like in this image:
Note: You can add as many cameras as you like to e.g. add different camera effects, but typically only one camera is necessary.
Set initial camera position (optional)#
edddison sets the cameras position right after activating the edddison camera. To define the cameras position before edddison is active use a Player Start object.
Without this option, the camera starts at world origin (0,0,0).
- Add a Player Start at the intended position in scene. (If there is not already a PlayerStart placed in the Scene.) (See Image)
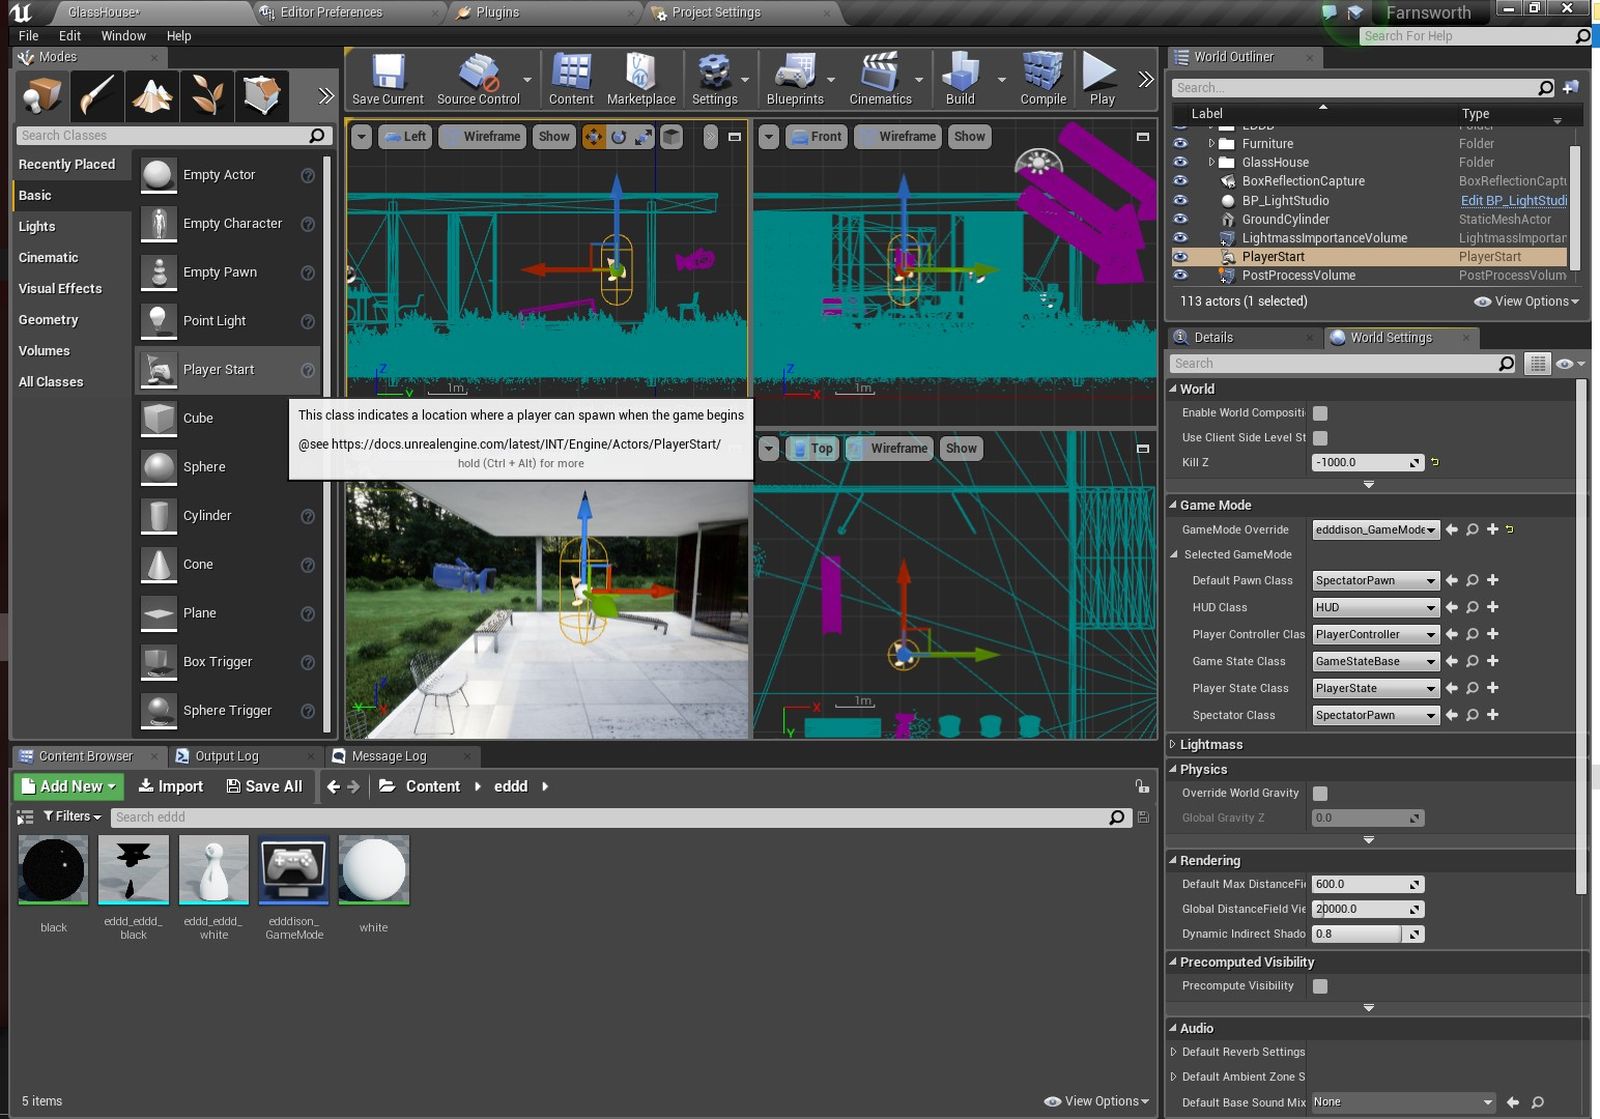
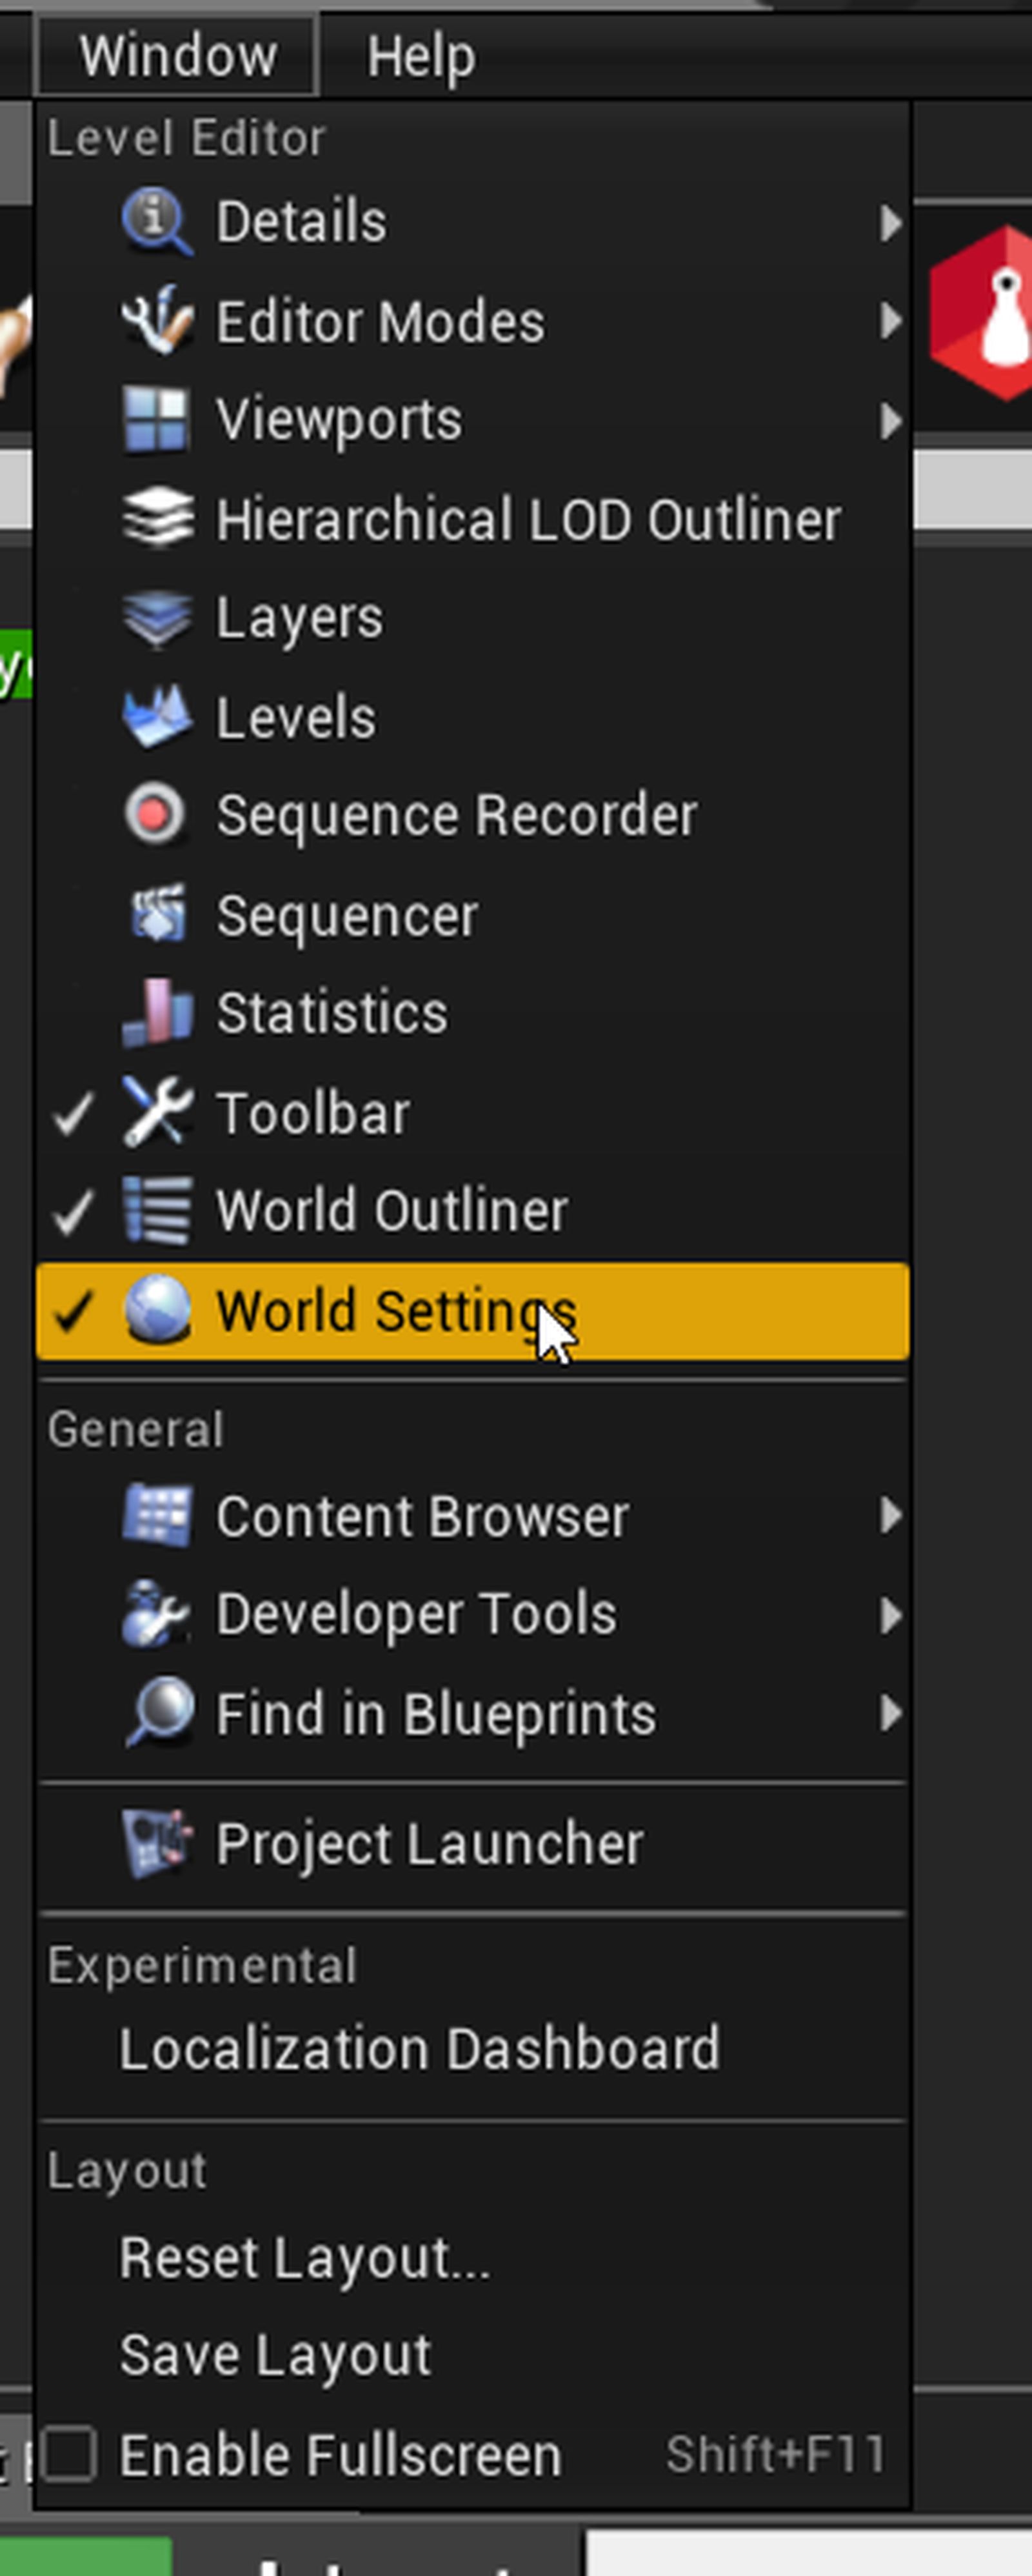
- Open Window World Settings (Window > "check" World Settings) (See Image)
- Set the GameMode_edddison_Base as GameMode of your project. (See Image)
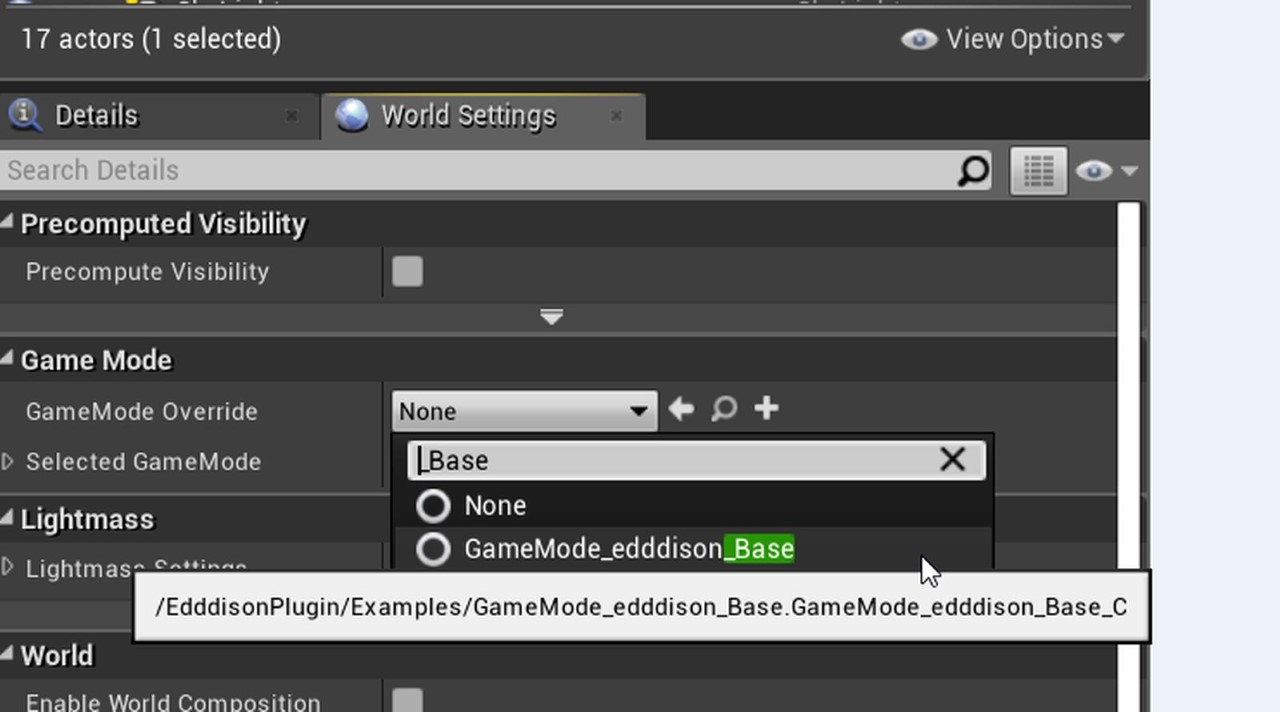
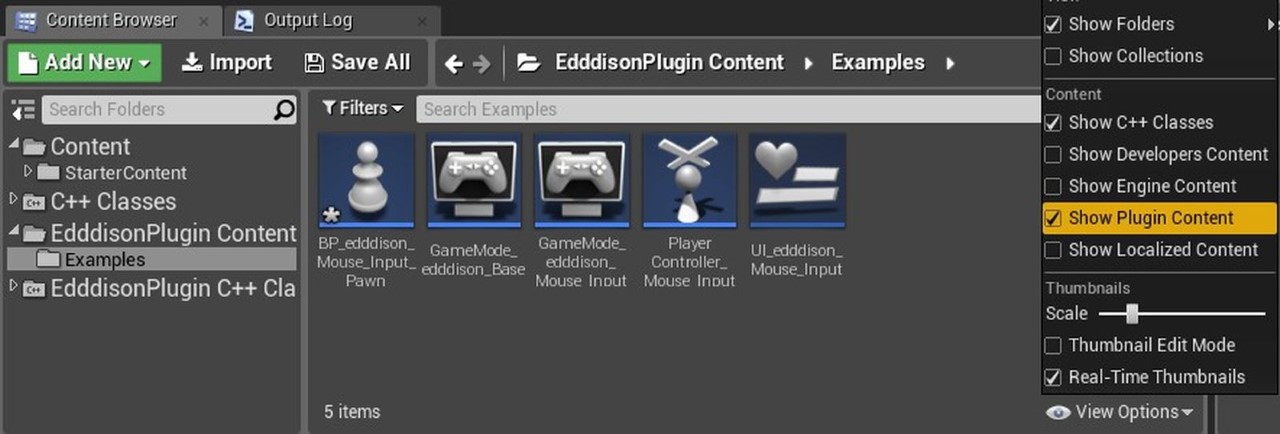
Note: The GameMode asset is in the EdddisonPlugin Content → Examples folder of the EdddisonPlugin.
Manage 3D objects (optional)#
A 3D object linked with edddison can:
- be moved around in edddison
- switched on or off
- be a target for the POV-Camera.
All Unreal game objects (Actors) can be used as movable or stationary objects.
Note: If you want multiple objects to act as a group (e.g. move and be switched on/off together), you can create an actor as the parent object and link this parent to edddison.
Link the edddison 3D object#
- Create a new Object (Actor) or select an existing object.
- Select the edddison plugin in the Modes-Window.
- Click on the plus icon in the Objects-Section to add it to the edddison plug-in. (See Image)
Run/Deploy project with edddison#
in Play Mode#
You can test your projet directly in the Unreal Editor:
- Hit the Play-Button of the Unreal Editor.
- Hit the Play Button in the edddison plugin (Modes > edddison plugin > Play Button)
Unreal will now start your game in the Viewport and at the same time you will see the edddison editor-software starting in a separate window.
Please continue to set up your project in the edddison editor-software. Follow the Tutorial Editor
Note: edddison has to be always started inside Unreal, there will not be a shortcut on your desktop.
You can always stop the edddison editor interaction with the Unreal model by clicking the Stop-Button (Modes > edddison plugin > Stop Button).
Other options are: * Update edddison: If you made changes to the model while the edddison editor was active you need to click here to apply those changes. * Clear: Clear all edddison plugin configuration.

Switch to the edddison camera view#
To see and use the edddison interaction in the Unreal editor view, you have to switch to the view of the edddison camera.
Click on the view selector button and select the camera form the list.

Move the camera with edddison.
Build & Deploy Project#
To configure your presentation, please continue to set up your project in the edddison editor-software. Follow the Tutorial Editor
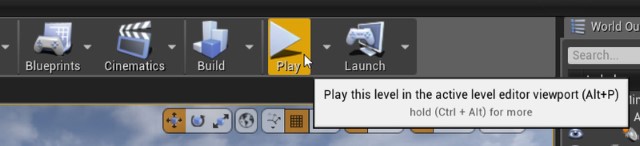
- Start the game via the .exe or the "Launch"-Option in the Unreal Engine. It launches edddison automatically in a separate window.
- Import and load the edddison configuration (*.edddison).
- Work with edddison.
- Closing the game closes edddison too.
Note: edddison has to be always started inside Unreal, there will not be a shortcut on your desktop.
If you packed your game and want to use it:
- as a stand-alone .exe: Just build and package your project like any other unreal game. Be sure to have to option Autostart with game in the edddison plugin as well as the plugin itself activated before packaging.
- on another computer: Either copy your Unreal project or build a stand-alone game and transfer it to the other computer. You will have to install edddison editor and an edddison license on the other computer.
- Export the edddison configuration (*.edddison) and ship it with the game files, if you want to use the game with edddison on another computer.
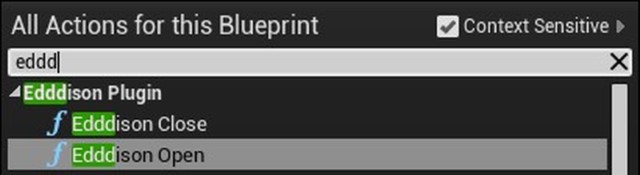
Use Blueprint functions to start/stop edddison (optional)#
To start edddison in a game manually:
Uncheck Autostart with game in the edddison plugin options.
Note: An enabled autostart option overrides the Blueprint functions.
Use the edddison Blueprint functions.

Use a mouse input to start/stop edddison manually (optional)#
How it works: Have a look into the UI_edddison_Mouse_Input widget.
You can display two buttons in the viewport to start and stop edddison in your game.
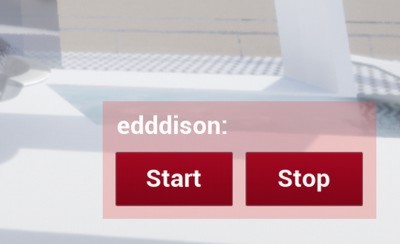
Use the UI_edddison_Mouse_Input.
To show the widget drop the BP_edddison_Mouse_Input_Pawn widget into your scene.
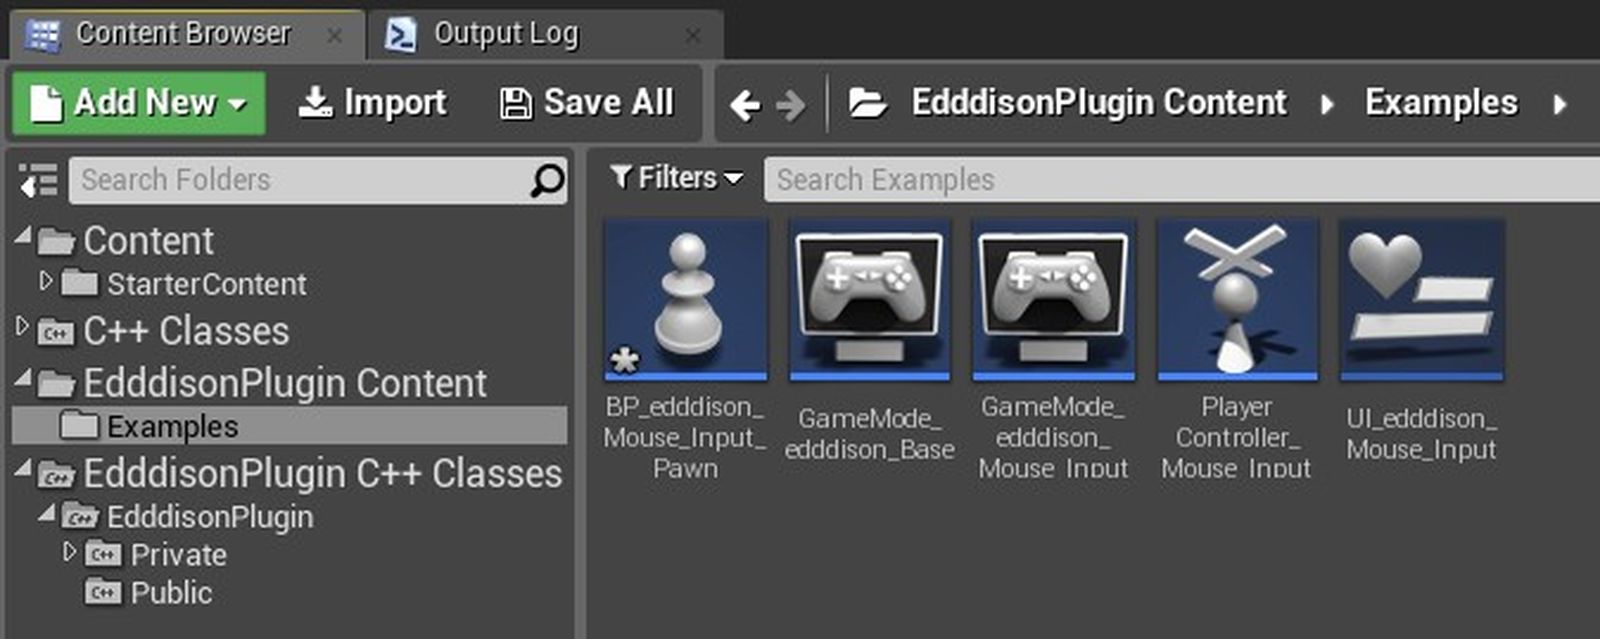
In the World Settings of the Game set GameMode_edddison_Mouse_Input to override the Game Mode.
View in VR (optional)#
With edddison you can walk through the scene in VR without adding complex modifications for VR navigation.
You can move the camera in the edddison editor while another person watches through a VR device (HMD). If the VR device supports head tracking (position, orientation), the VR user can control the view additionally.
Setup for VR device#
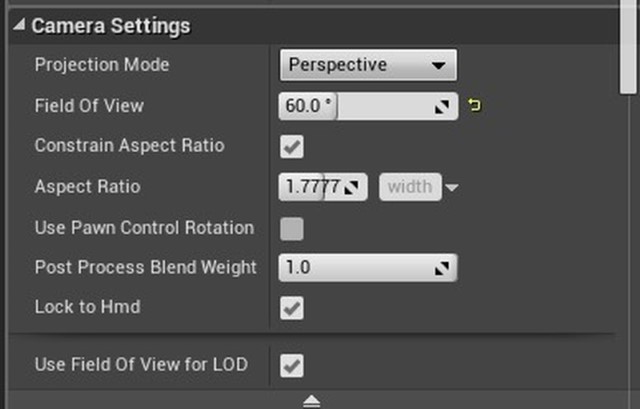
- Use the same camera as added to the edddison plugin. No special VR camera is necessary.
- Uncheck the camera setting Use Pawn Control Rotation.
- Check the camera setting Lock to HMD.
Blueprints to enable/disable stereo view (optional)#
Create this blueprint for the camera (CameraActor) to switch VR/stereo mode online.
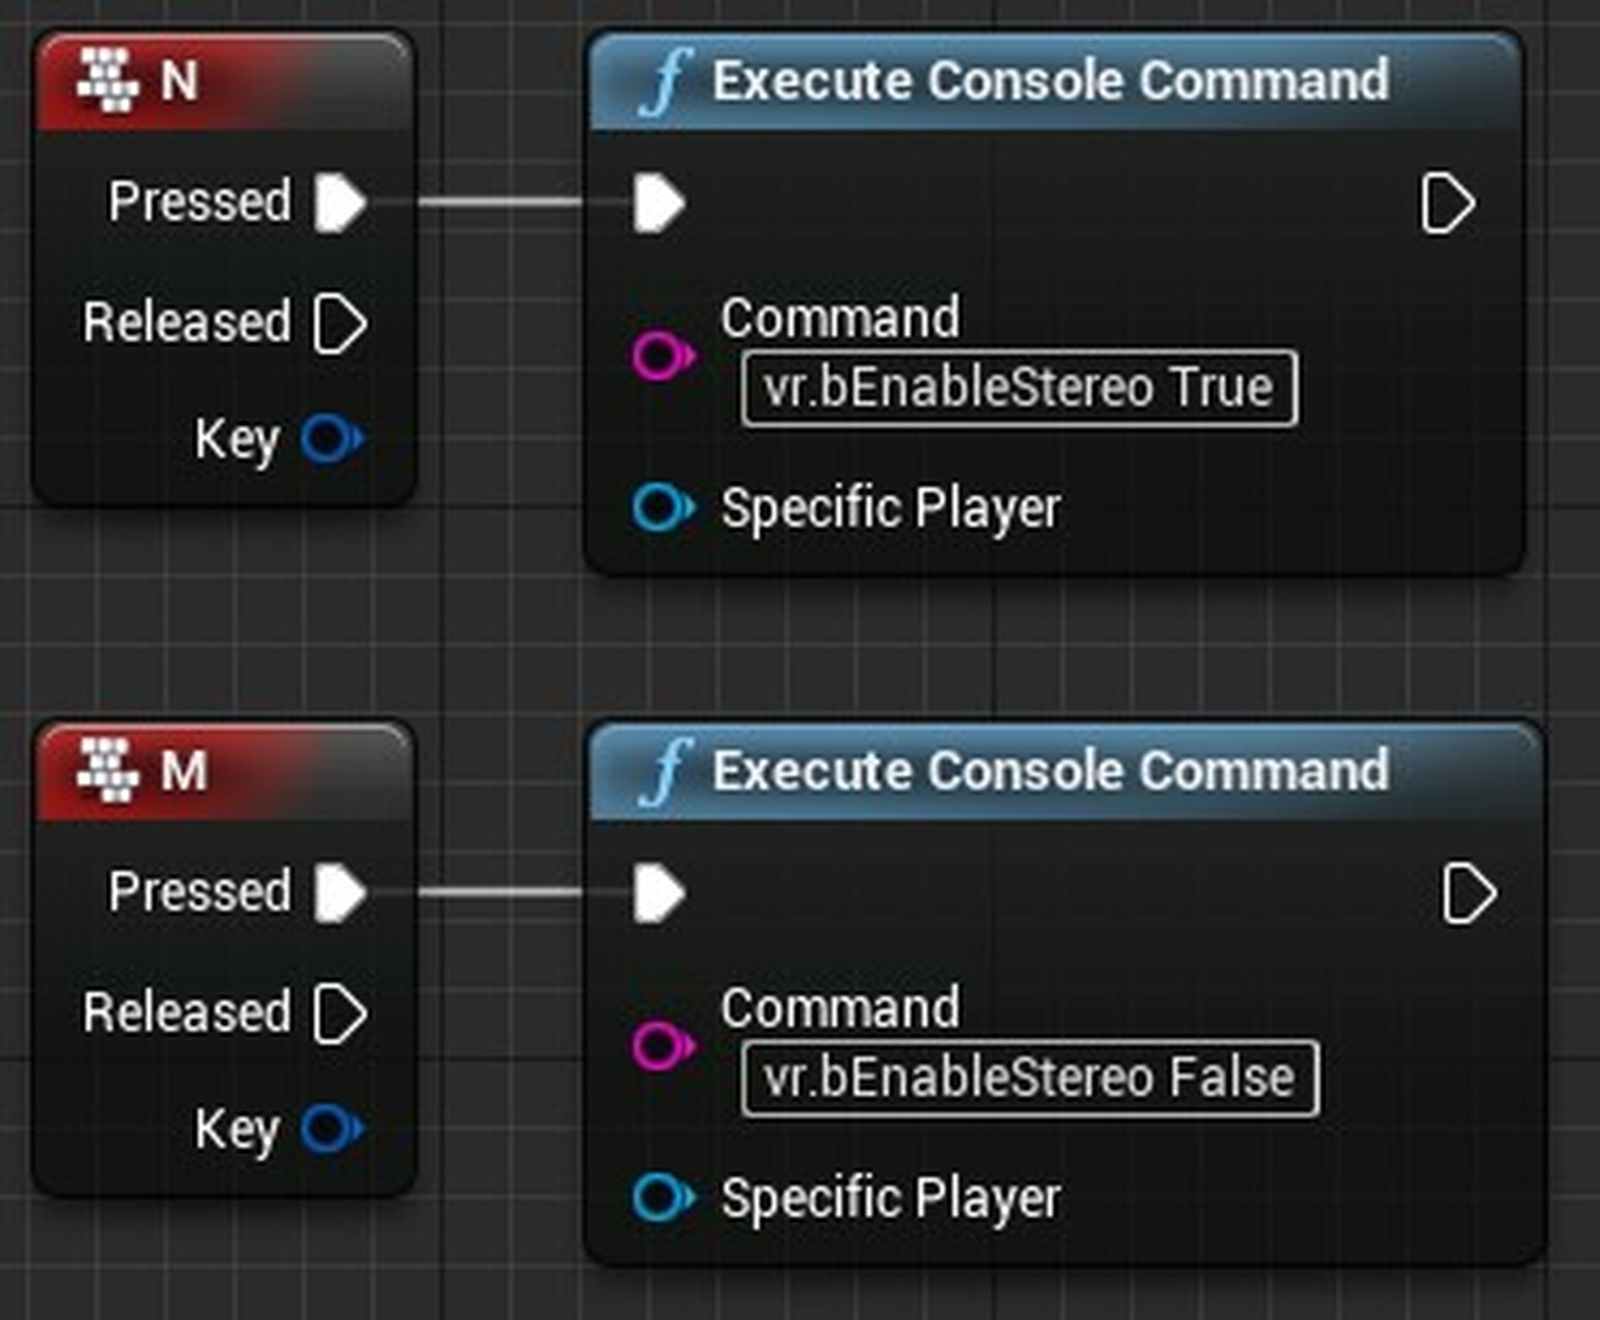
Press 'n' key to enable stereo
Press 'm' key to disable stereo
Enable VR in a packaged project (optional)#
If you have not integrated the blueprints into your project, you can still activate the VR view. Start your packed project with the command line option -vr.