edddison plugin for Unreal Engine 5
Getting Started#
What you need
- Unreal Engine Installation
- Unreal Engine 3D Project Demo Project
- The edddison software - Please login on edddison.com to access this link
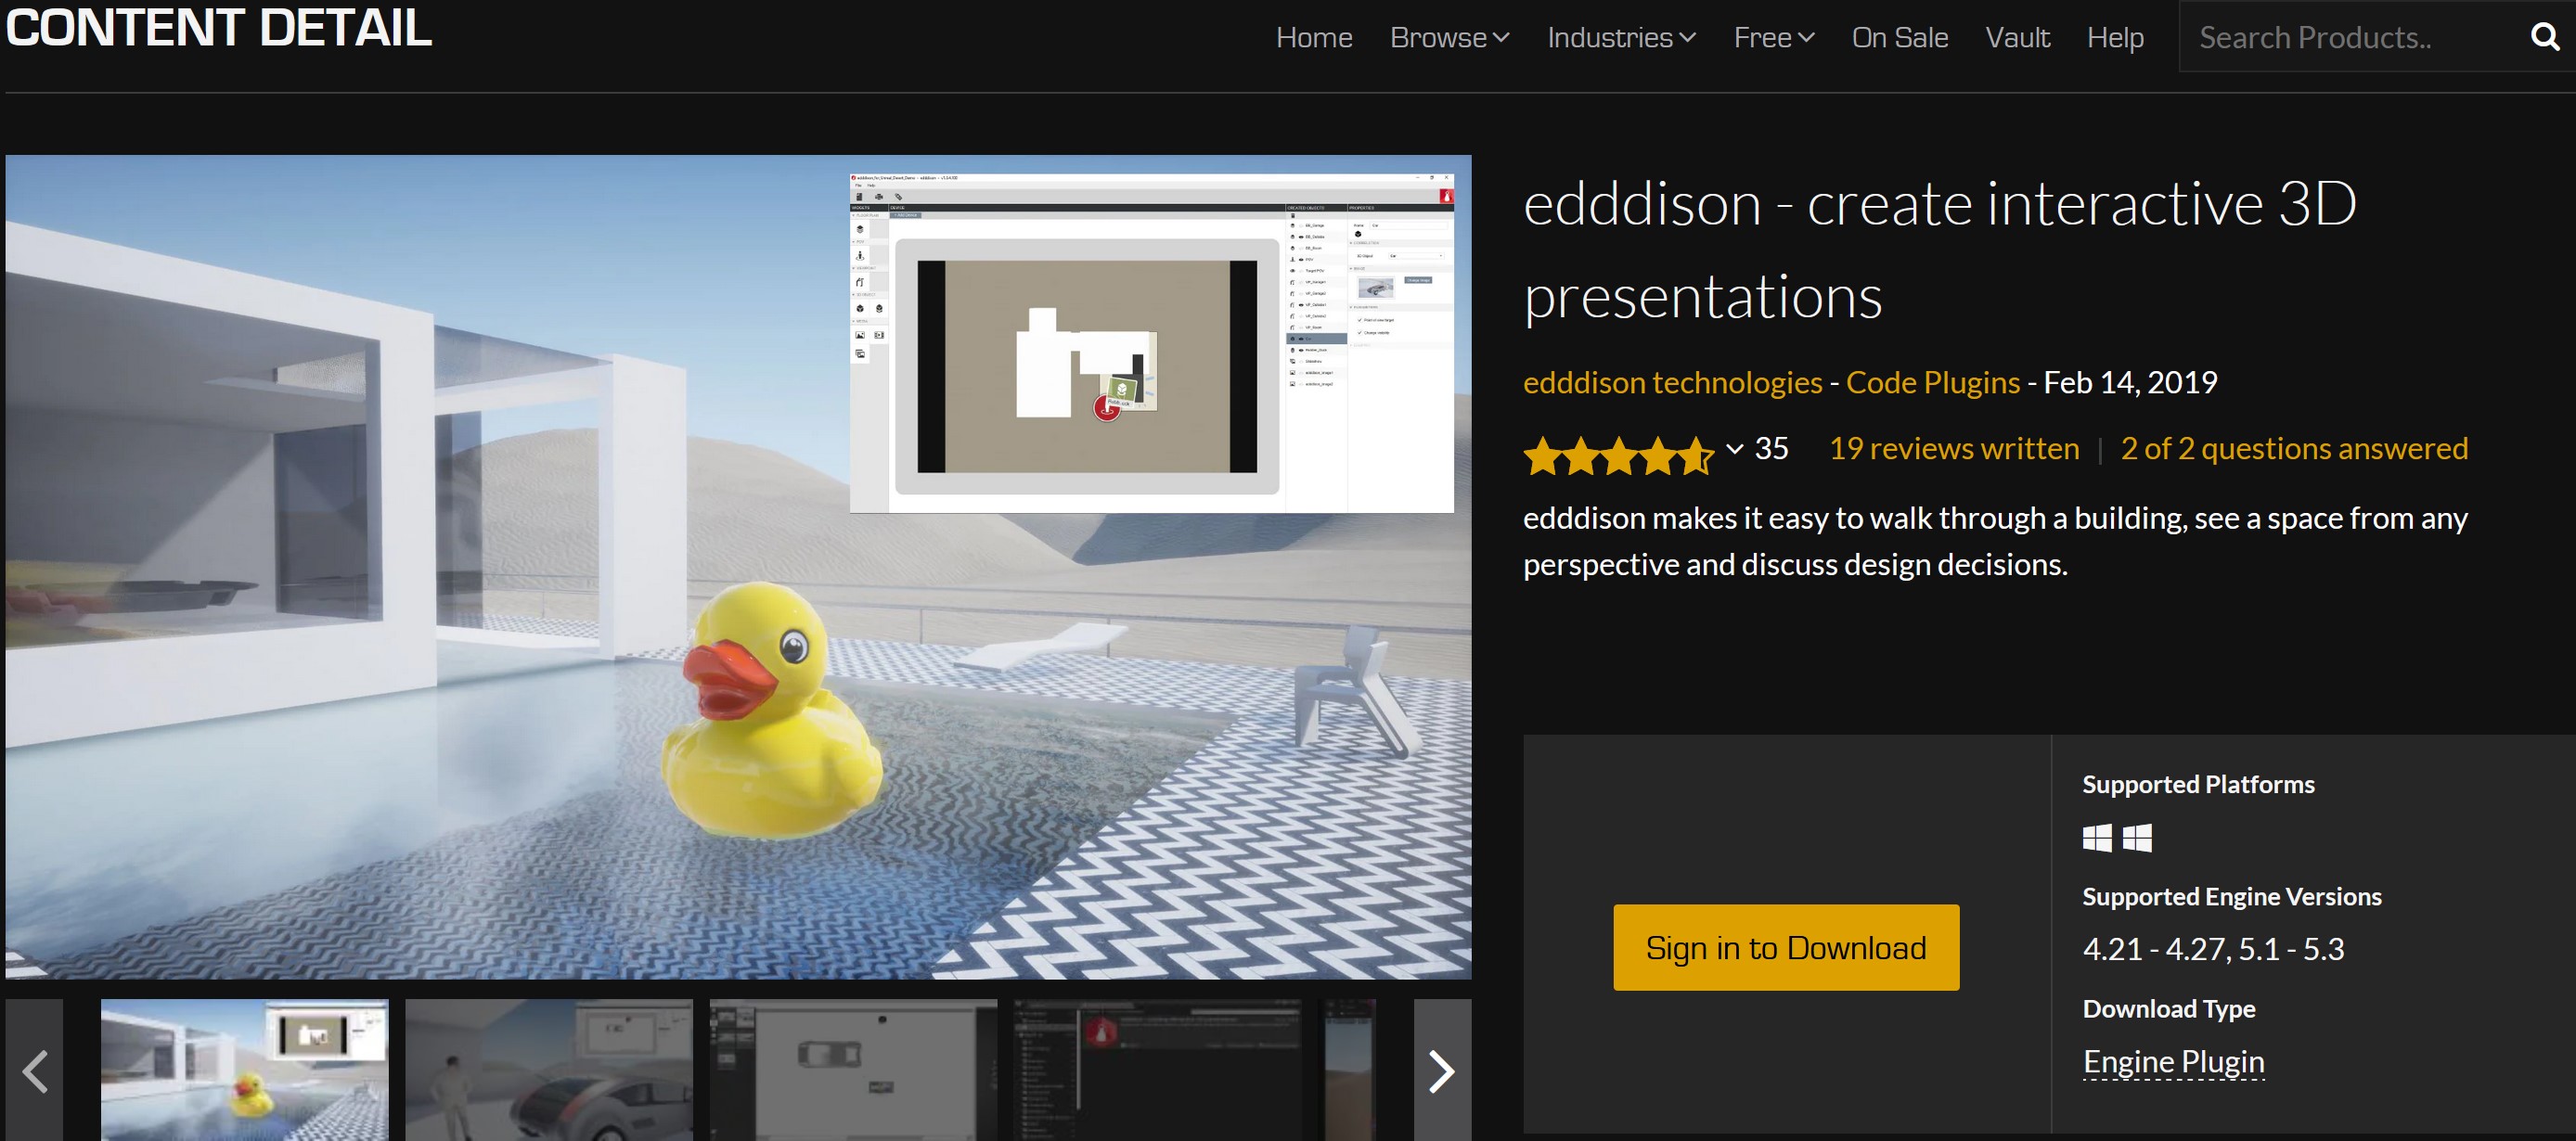
- edddison unreal plugin - UE Marketplace
Install edddison plugin#
You can install the edddison plugin from the UE Marketplace
Create a project in Unreal Engine editor#
Open a new blank or an existing Unreal Engine project, in which you would like to use edddison.
Note: If you don´t want to follow the Tutorial and dive directly into the demo project you can download it on our website
Activate and configure edddison plugin#
Activate the edddison plugin#
Enable the edddison plugin in the Plugins window of the Unreal Engine. You find the Plugins window at Edit → Plugins.
Note: You will maybe ask to restart the Unreal Engine to enable the plugin. Do this by clicking "Restart now".

Troubleshoot: If at the restart of Unreal Engine a message pops up saying "Disable ThrottleCPUWhenNotInForeground", just restart Unreal Engine one time again manually or change to displayed option in the Unreal Engine Settings. Refer to this Chapter
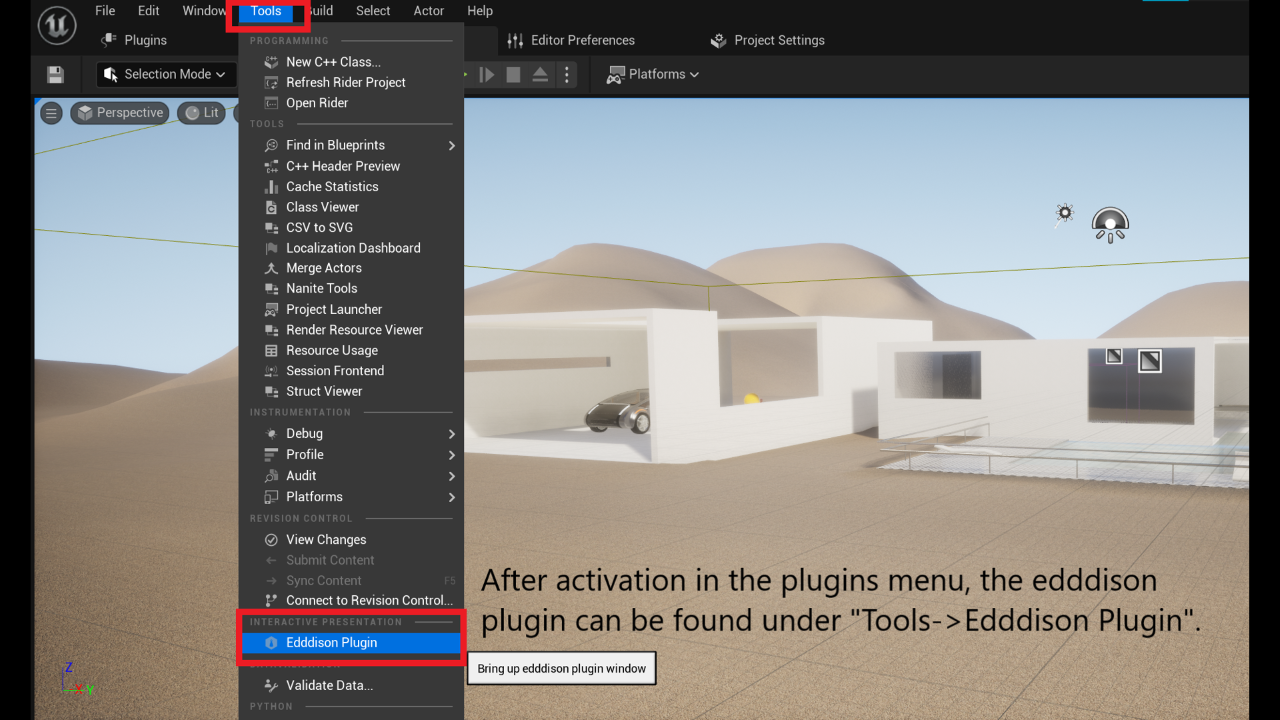
Open the edddison plugin window at Tools → Edddison Plugin.
Configure the edddison plug-in#
This plugin-page works as a retainer for all edddison functions. From here you can set runtime options, add cameras, bounding boxes and 3D objects which will be used by edddison.

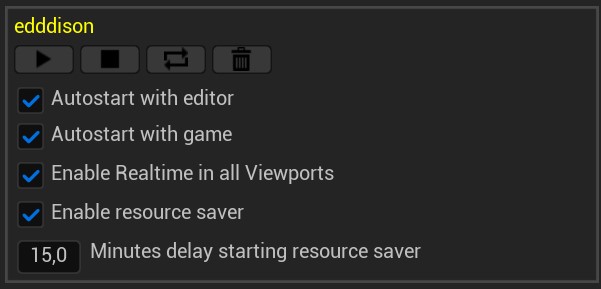
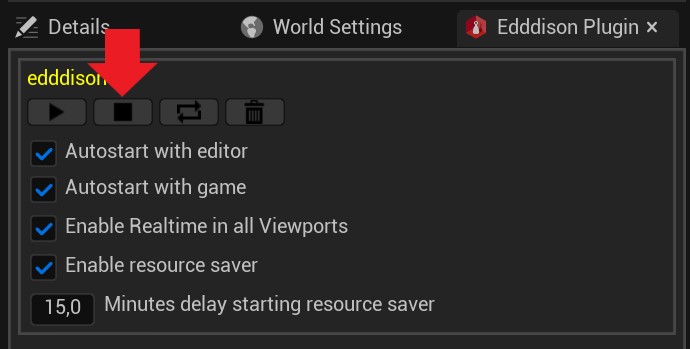
The first section consists of the following general options#
-
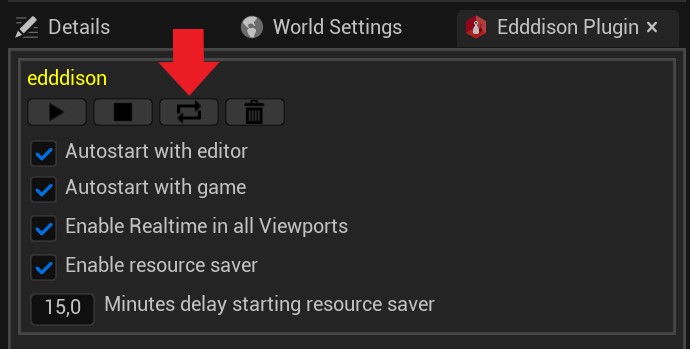
Buttons for Open edddison, Close edddison, Update edddison, Clear edddison settings (These options are covered in the chapter Run edddison)
-
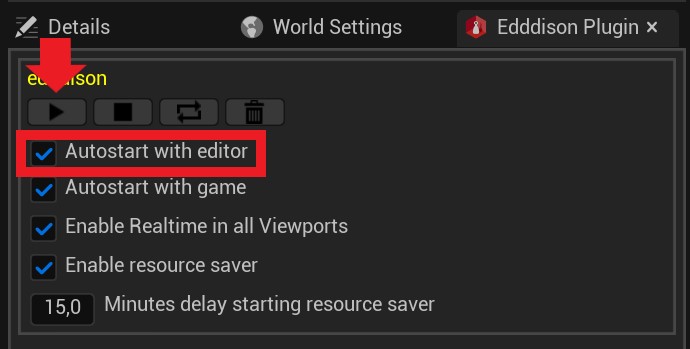
Autostart with editor: Starts edddison when Unreal Engine editor starts. (If plugin is activated)
-
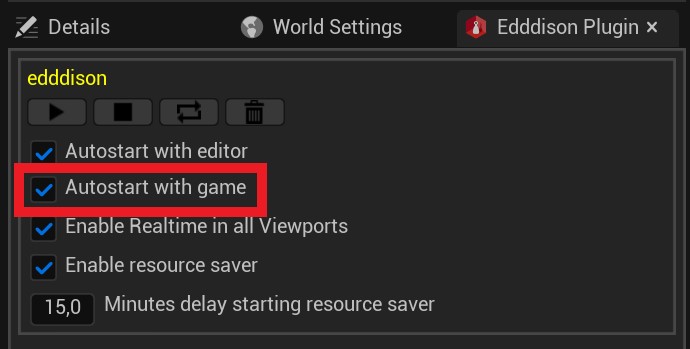
Autostart with game: Starts edddison when Unreal Engine Game starts. This has to be checked if you want to use edddison in your packaged game.
-
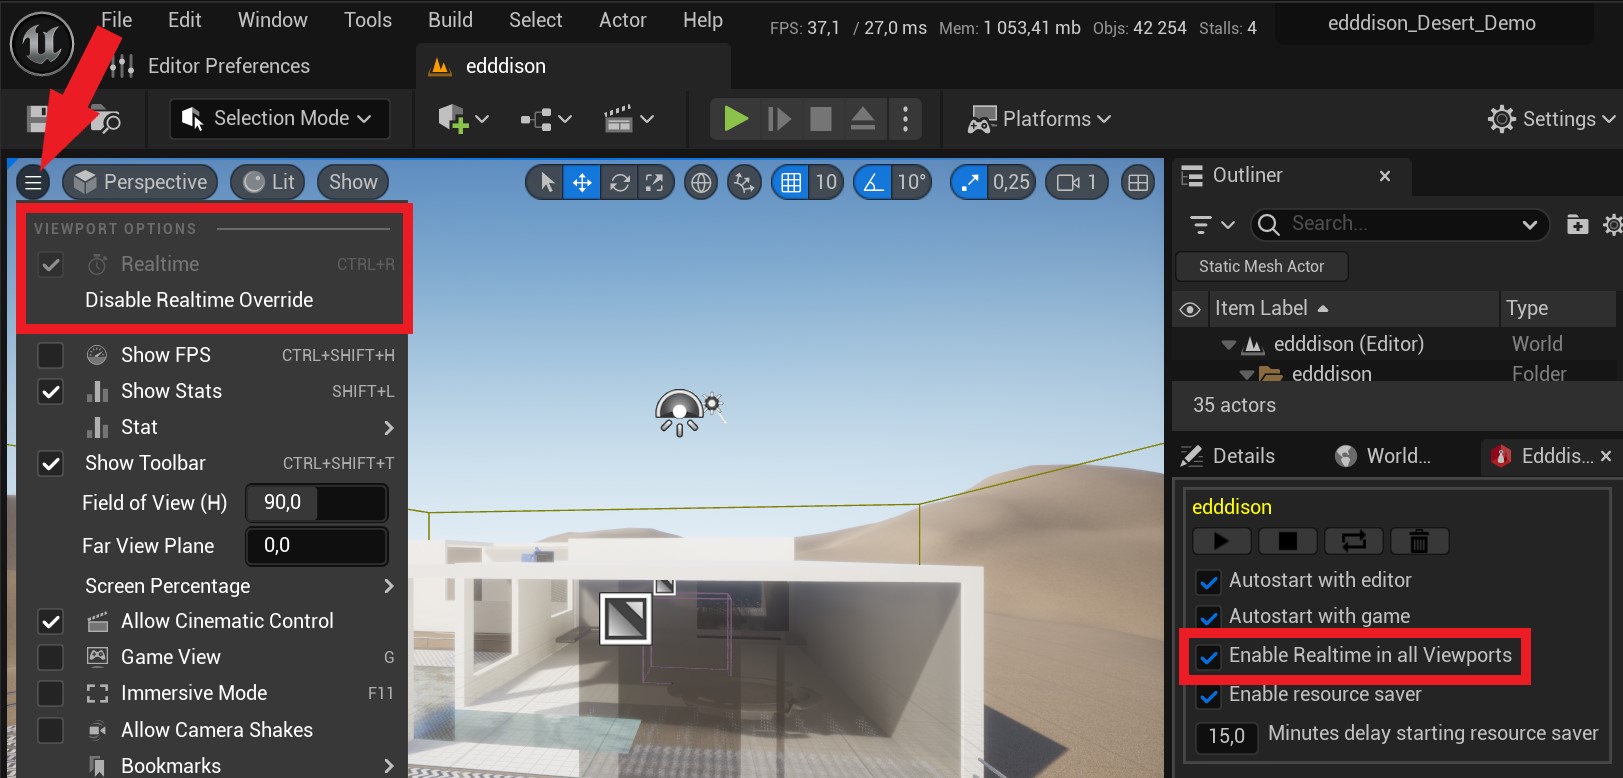
Enable Realtime in Viewport: Equivalent to active "Realtime"-View in Unreal Engine Viewport Options. If you want to see the edddison interaction live in the Unreal Engine editor Viewport, you have to check this option. To see the live preview of the Camera Actor, linked to edddison, select it in the Unreal Engine Viewport Type.
-
Enable resource saver: The edddison resource saver mode reduces the framerate of the game to 1, if no edddison interaction has taken place for a certain period of time. Any new edddison interaction restores the original framerate and the countdown to activate the mode is restarted. The time until activation can be set in the setting below.
-
A screen saver/overlay is displayed while the mode is active. This can be customised. See in the content browser under Plugins → edddison - create interactive 3D presentations Content → UI → WBPEdddisonResourceSaverScreen.
-
NOTE: The edddison resource saver mode is only executed in a packaged game. Not in the editor!
-
Minutes delay starting resource saver: Defines the number of minutes, where no edddison interaction has happened, after which the resource saver mode is started.
Configure Unreal Engine to interact with edddison in real-time#
To be able to interact live with edddison in Unreal Engine editor mode, you must ensure that the Unreal Engine editor setting Use Less CPU when in Background is deactivated. When starting the Unreal Engine, edddison will check this setting and will tell you to change it if necessary.
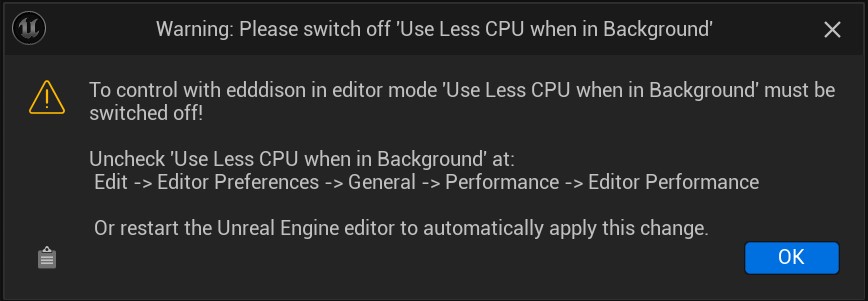
You can change this setting automatically by closing the Unreal Engine editor and starting it again. Or make the setting yourself by deactivating/unchecking the option under Edit → Editor Preferences → General → Performance → Use Less CPU when in Background.
Afterwards click Set as Default to keep the setting for all your future projects.
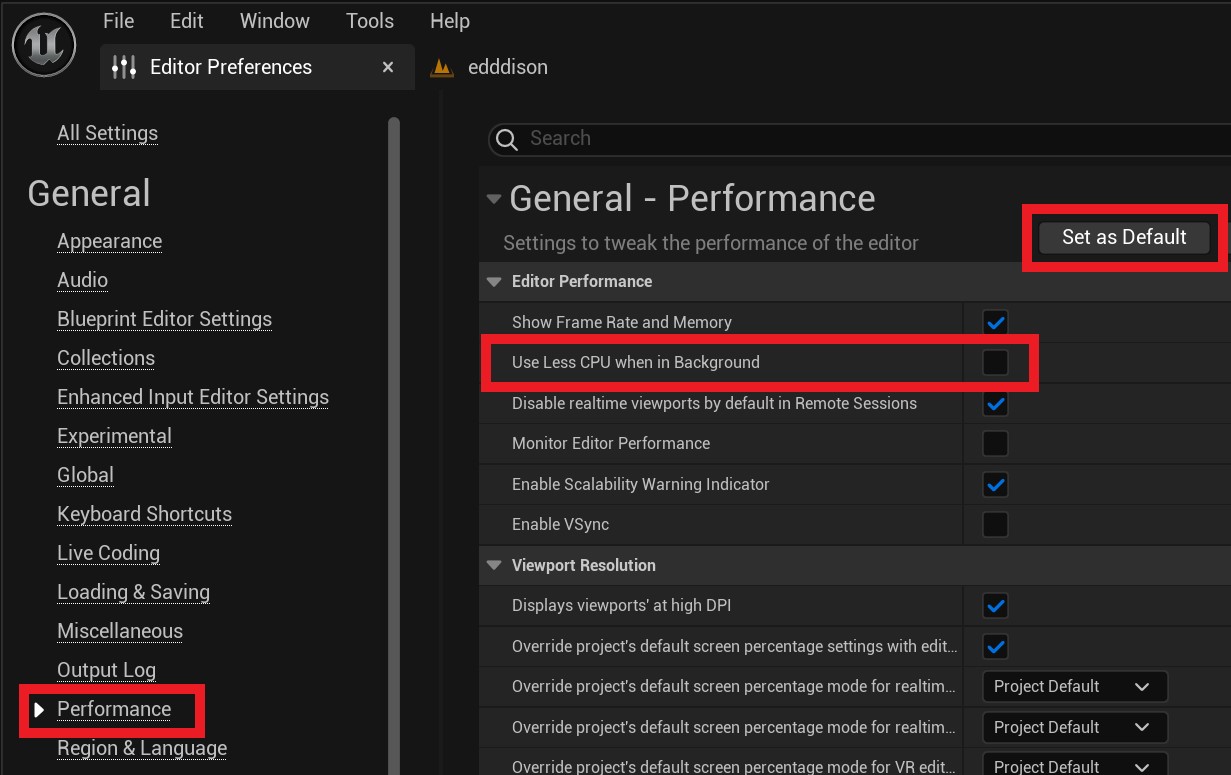
Note: If you do not uncheck this, a fluent camera control with edddison in editor mode is blocked by the Unreal Engine. This setting does not affect the game mode.
The last option you should check is the Realtime in the Unreal Engine Viewport Options. This allows you to use the edddison camera to interact in the editor viewport.
The edddison plugin takes care of this option automatically if you have activated the setting Enable Realtime in all Viewports in the edddison plugin. If you want to control this manually, deactivate the setting in the edddison plugin and set the option in the viewport options yourself.
Perfect! Now let's create our first floor plan!
Configuring your scene#
For edddison to work you need the following:
- Define the walk-able areas in your project with bounding boxes (cubes) and floor plan images.
- Define a camera
- Optional: Define 3D interactive objects
Manage floor plans - (walk-able areas)#
To define the walk-able areas in your project, we will create bounding boxes and floor plans.
Set up one or more bounding boxes#
An edddiosn bounding box defines an area in which you want to move. To do this, a cube must be placed in this area and aligned with its boundaries.
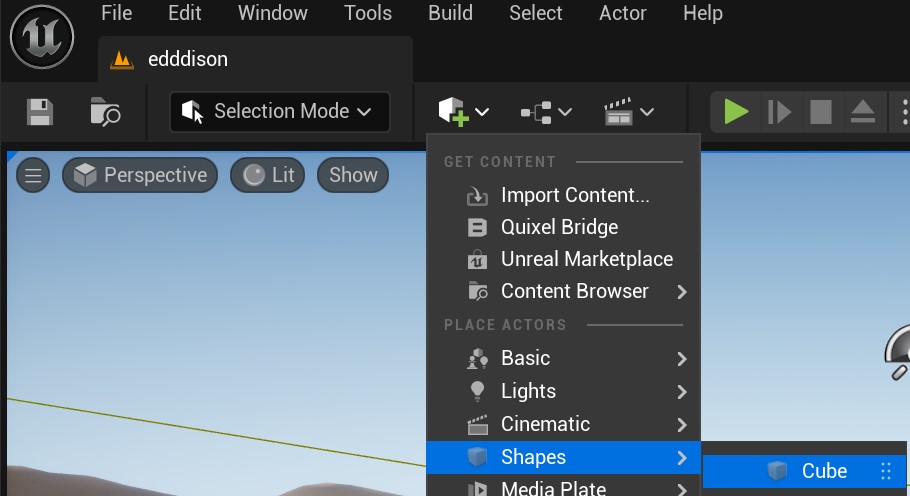
- First, you need to create a cube and position it in the centre of the desired area. (See Image)
-
Then use scaling and orientation to adjust the dimensions of the cube exactly to the desired movable area.
-
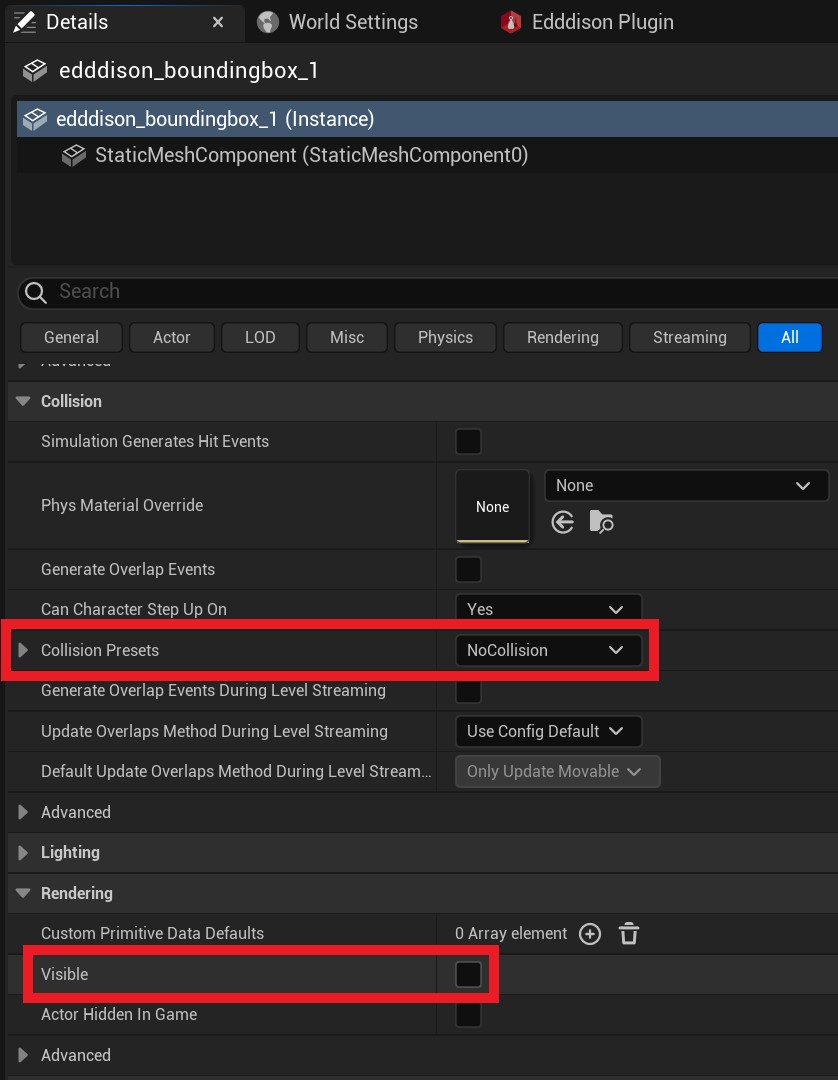
Disable its object collision by setting NoCollision in the Collision-Tab at the Details panel. (See Image)
-
Set the cube invisible by unchecking Visible. in the Rendering-Tab at the Details panel. (See Image). Alternatively, the cube can also be given an invisible material.
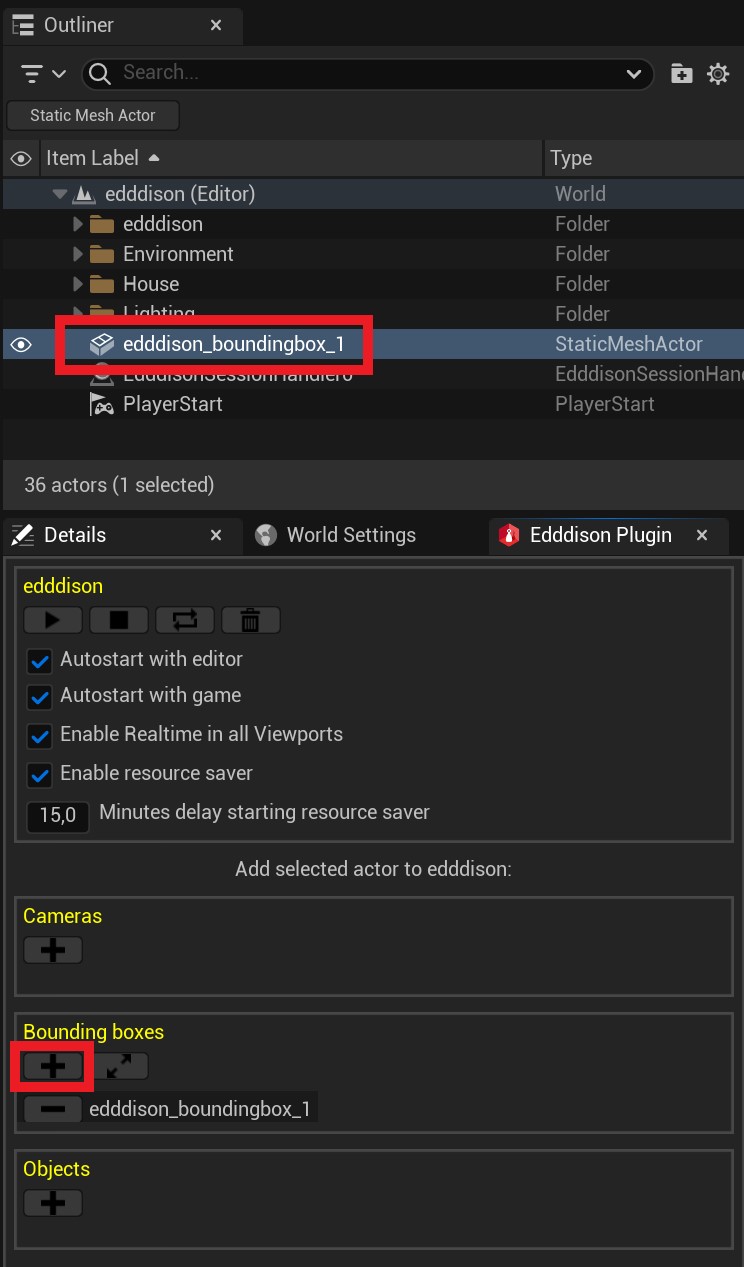
- Select the cube in the outliner.
- Select the edddison plugin panel.
- Click on the plus icon in the Bounding boxes-Section to add it to the edddison plug-in. The prepared bounding box (cube, Static Mesh Actor) should now be listed in the section Bounding Boxes (See Image)
- If you do not need the added bounding box later, you can remove it by pressing the minus button of the edddison plugin. However, the cube will remain in the scene.
Position and scale the bounding box#
edddison calculates the position and movement of objects from the currently active bounding box. The edddison camera and the 3d objects are moved inside this box.
To resize and position your bounding box to fit to your desired walkable area, do the following:
While having the bounding box selected:
Switch to local (object) space in your viewport.

Switch to top view and wireframe in your viewport options.

Select the cube and use F on your keyboard to focus the camera on the bounding box.
In your viewport:
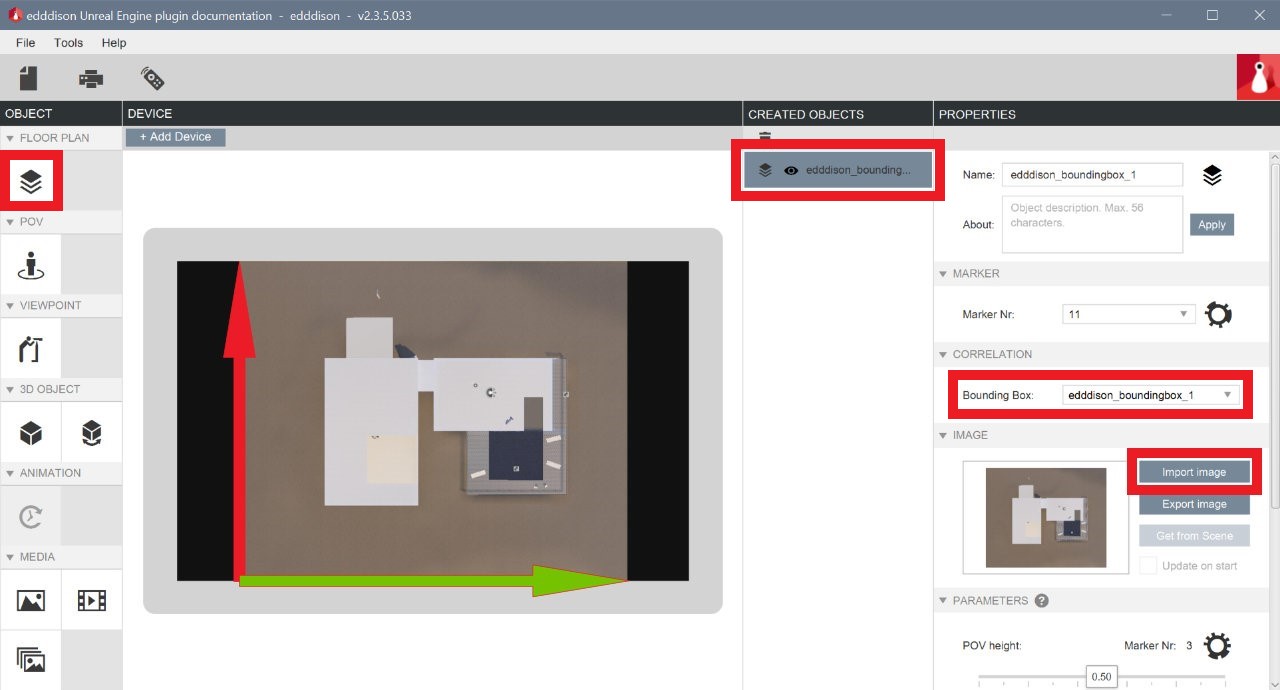
Have a look at the red arrow and the green arrow at the pivot (center) of your cube. These show the local coordinate system. You have to match it with the edddison coordinate system which is drawn into the following image of the edddison editor. The red arrow has to point in the vertical direction of the edddison 2D floor plan. The green arrow in the right direction. (See Images)

In this particular case, the plan image, the creation of which we show below, must be rotated 90° anti-clockwise so that it fits.
Create a floor plan#
A floor plan (2D top view) is useful for easy and precise navigation and orientation in the 3D view. We show you how to make such image directly in the Unreal Engine. You can use it directly or as blueprint to create your own designed floor plan image.
The edddison editor accepts .jpg and .png image file formats.
In Unreal Engine editor:
- Switch to local (object) space (see chapter "Position and scale the bounding box")
- Use Top view, select the bounding box, make it highlighted and focus on it.
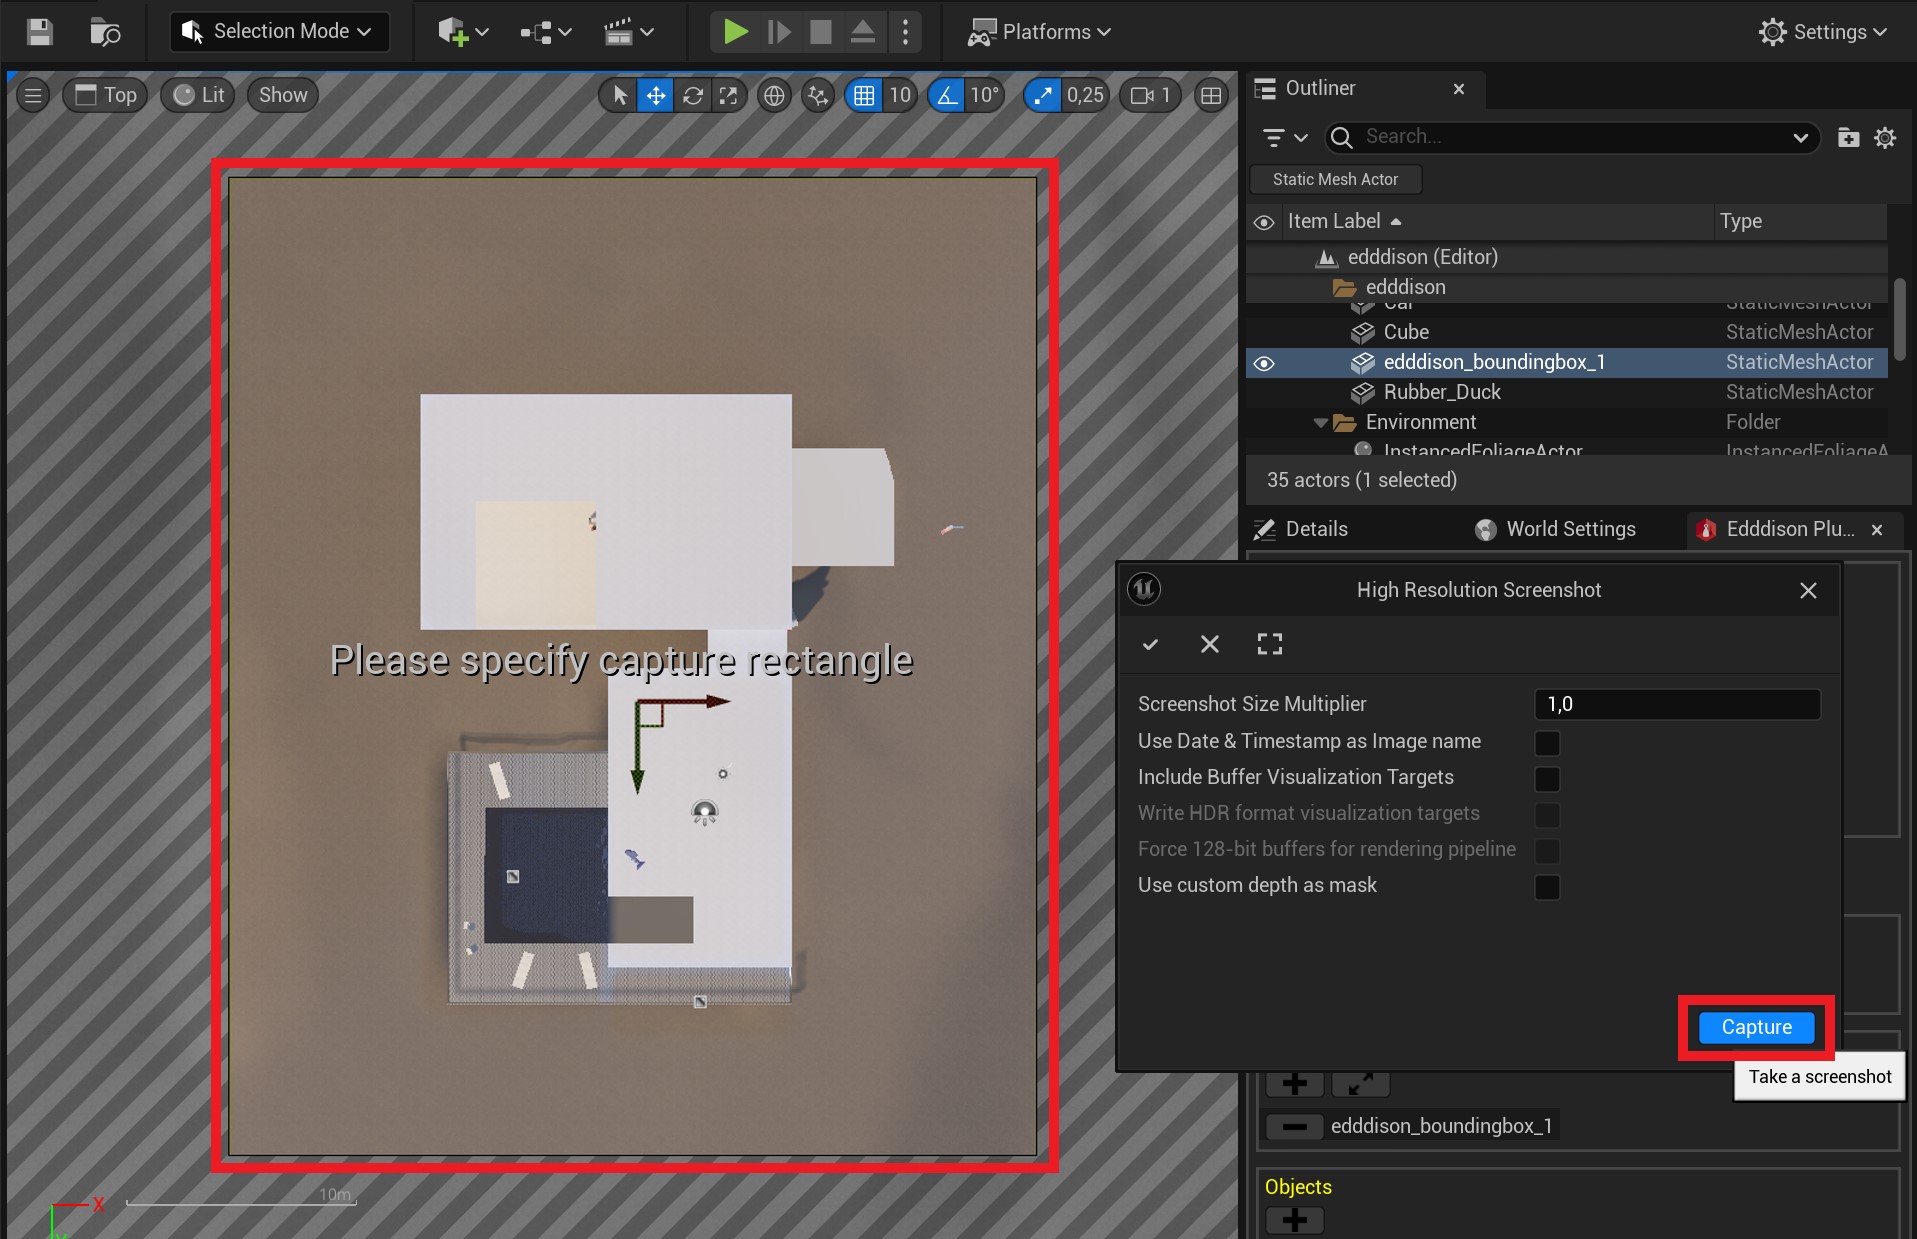
- Open the High resolution screenshot tool from the arrow on the top left menu in your viewport. (See Image)
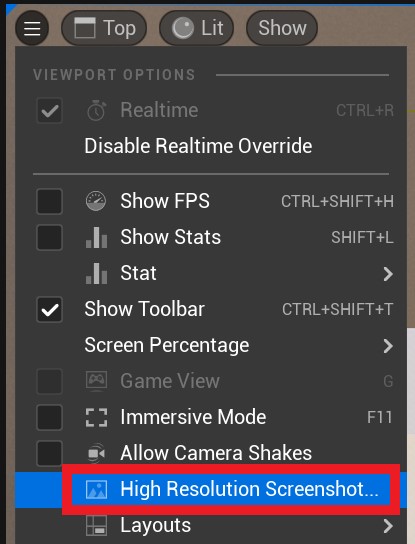
- Click on the top left icon to limit the region to the cubes area by drawing a rectangle on it.
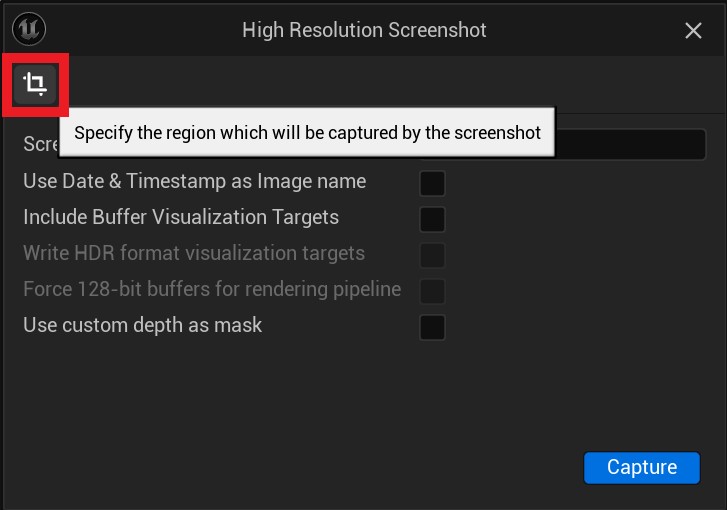
- Span the capture rectangle exactly on the cube.
- If the cube/bounding box hinders the recording into its interior, it can now be set to invisible (Select Bounding Box Object → Object Details → Rendering → Visible "uncheck") .
- Activate one of the possible viewport visibility options from the menu on the top left in your viewport. We suggest "Lit".
- Make the screenshot by clicking the Capture button in the High Resolution Screenshot dialog window. At the bottom of the Unreal Engine editor window a popup will show you where the screenshot has been saved. Click on it to open its location.(See Image)
In the edddison editor:
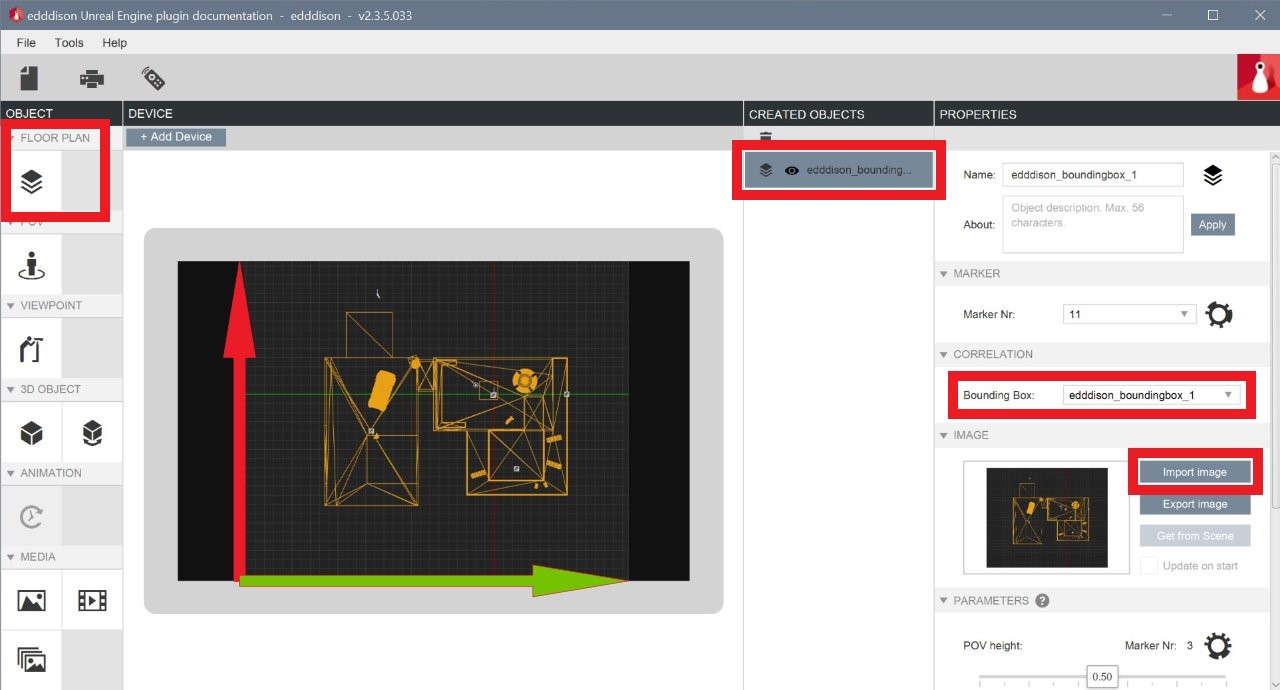
You have to create a floor plan object to link it with the bounding box in the Unreal Engine scene. Please have a look at the Floor plan / bounding box section which describes this process. * In this particular case, the created floor plan image must be rotated 90° anti-clockwise so that it fits into the edddison navigation system. This can be done with any graphics software.
- In the edddison editor select the desired floor plan object and click on the Import Image button of the PROPERTIES section to import the floor plan image.
This image is now also automatically used on tablets running the edddison controller app, in the web interface and as a printed plan.
Manage cameras#
Create Camera (mandatory)#
The definition of the camera works the same as the definition of the bounding boxes.
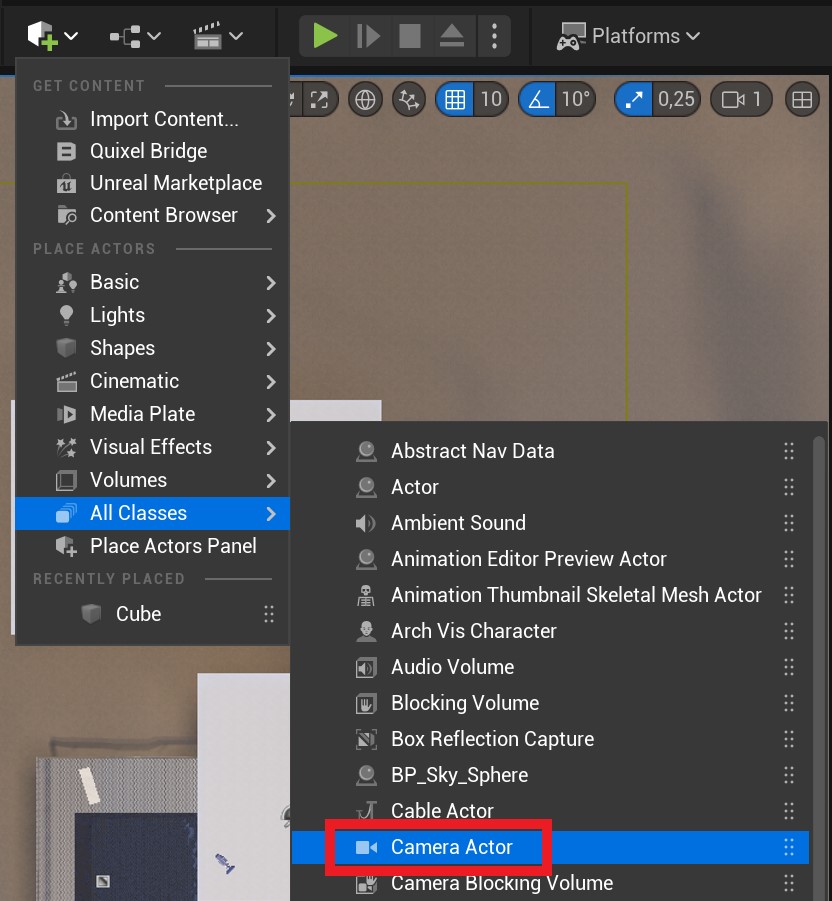
- Place a CameraActor (Place Actors → All Classes → Camera Actor) which you want to control with edddison into the scene. (See Image). We rename it to edddison_camera, this is optional. Other variants of the Camera Actor can also be used, for example the Cine Camera Actor, as long as they are derived from the Camera Actor.
- The mobility of the camera should always be set to Movable. Otherwise, a failure during the Packaging process may happen.

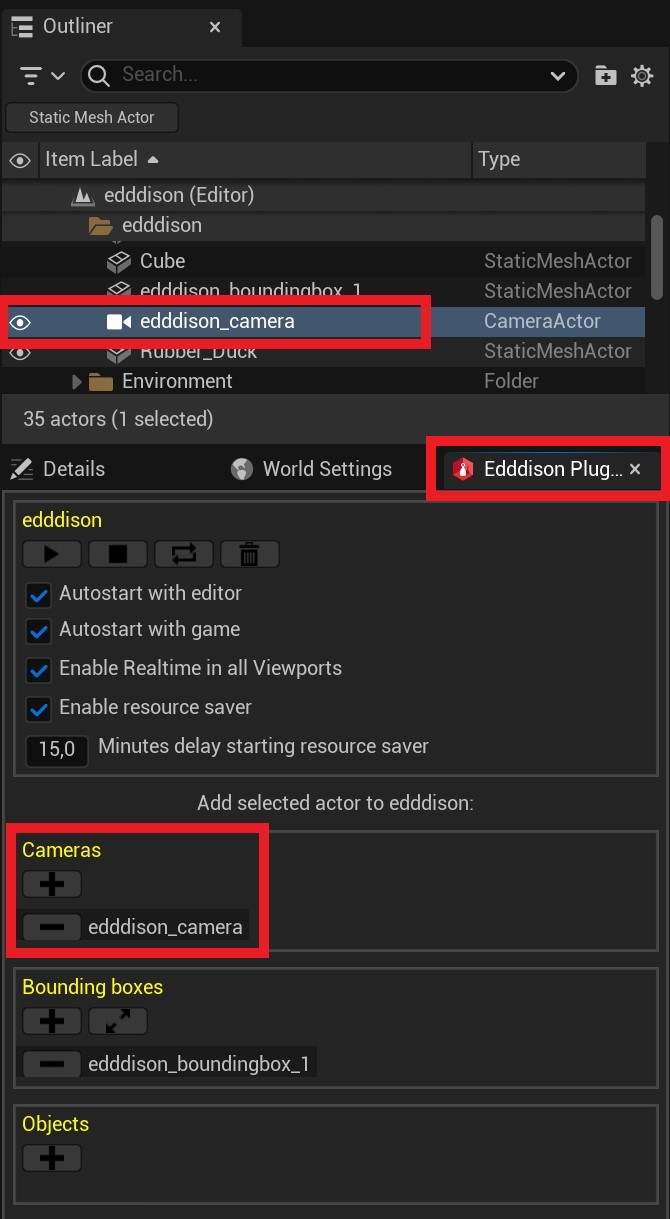
- Select the camera in the outliner.
- Select the edddison plugin window.
- Click on the plus icon in the Cameras-Section to add it to the edddison plug-in.
The CameraActor should now be visible in the section Cameras like in this image:
- In the edddison editor create a POV object and link it with the edddison_camera from the Unreal Engine scene. For details, have a look at the section Point of View - POV (Cameras).
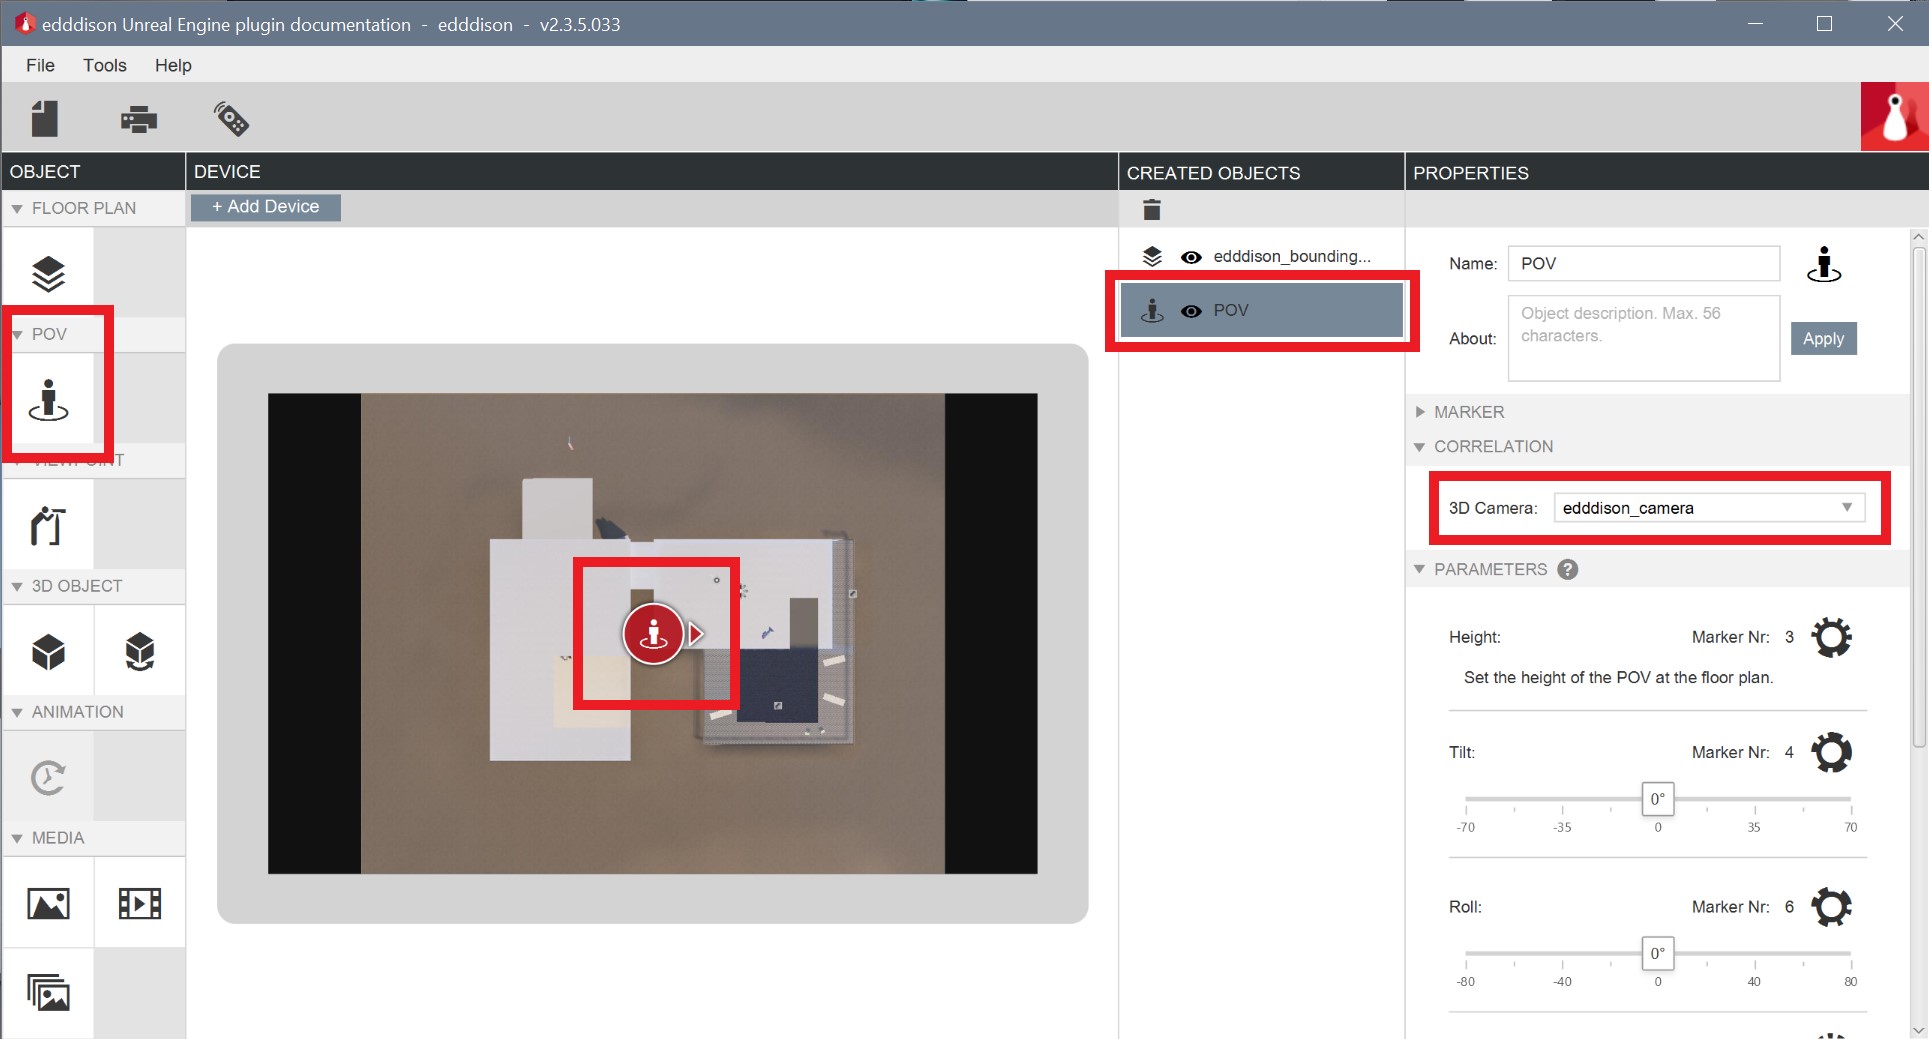
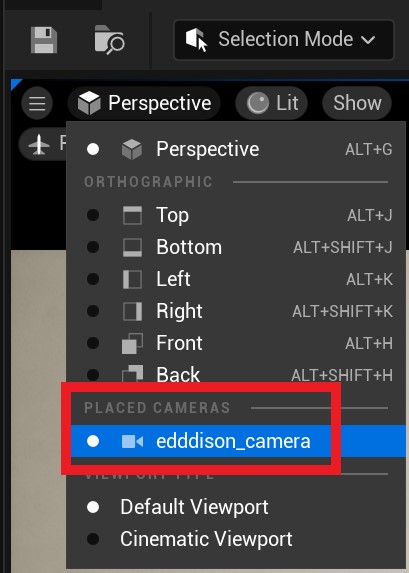
- To see the current live view of the edddison_camera while moving it with edddison, select the camera at the view mode settings.
Set initial camera position (optional)#
edddison sets the cameras position right after it has been started. To define the cameras position before edddison is active use a Player Start object.
Without this option, the camera starts at world origin (0,0,0).
- Add a Player Start at the intended position in scene. (If there is not already a PlayerStart placed in the Scene.) (See Image)
Set GameMode to edddison GameMode (optional)#
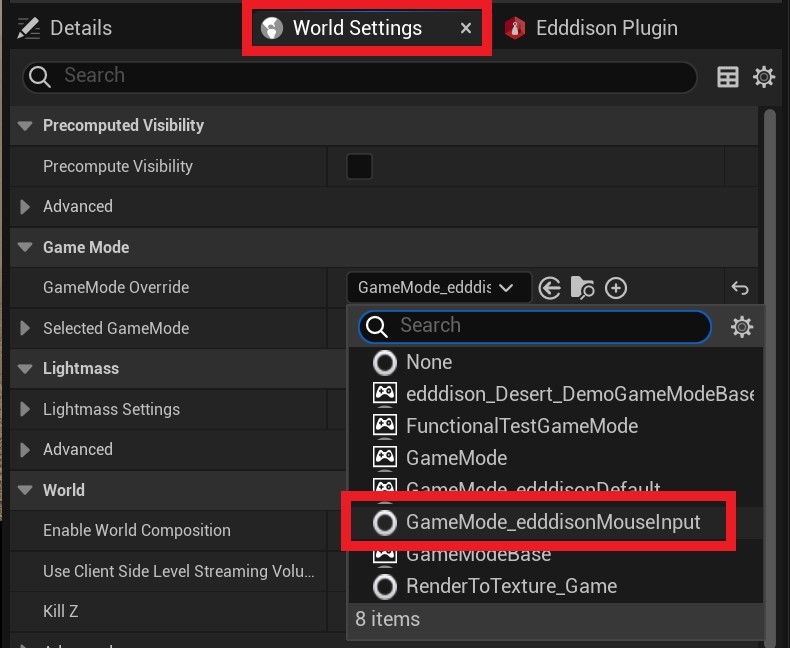
- Select the window World Settings
- Set the GameMode_edddisonDefault as GameMode of your project. (See Image)
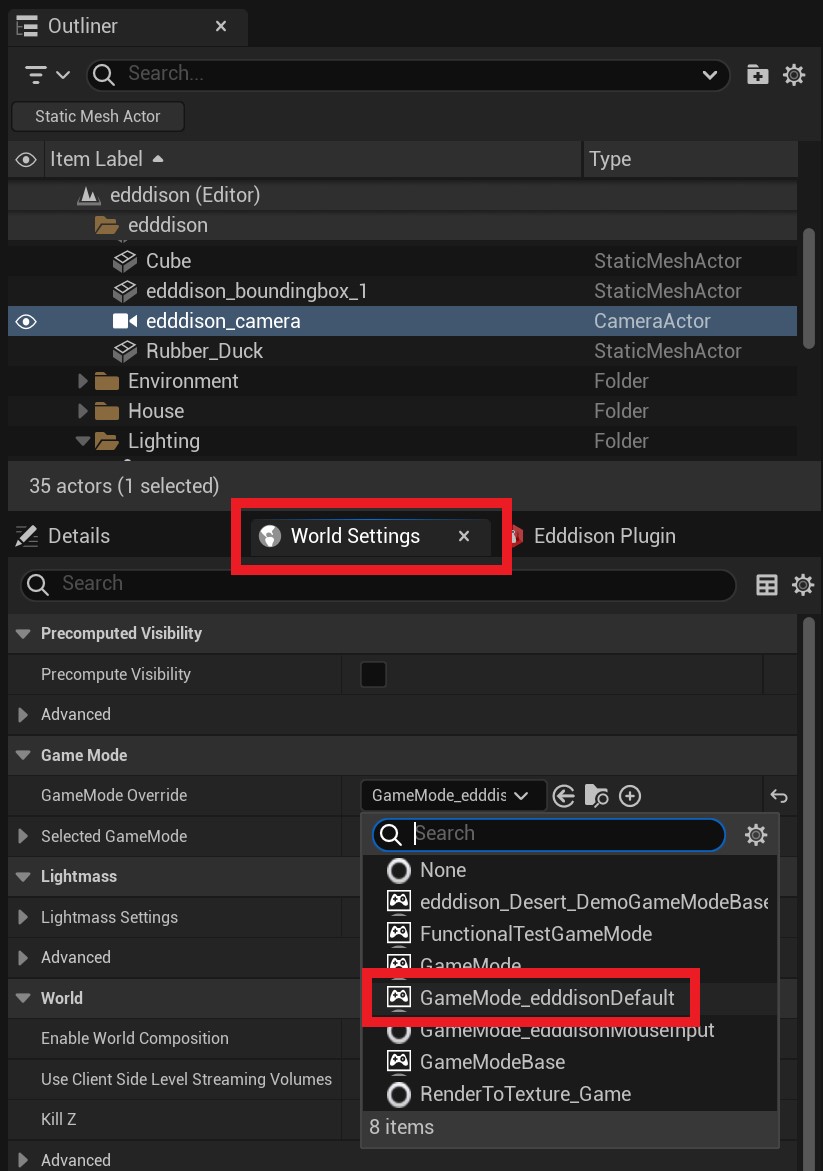
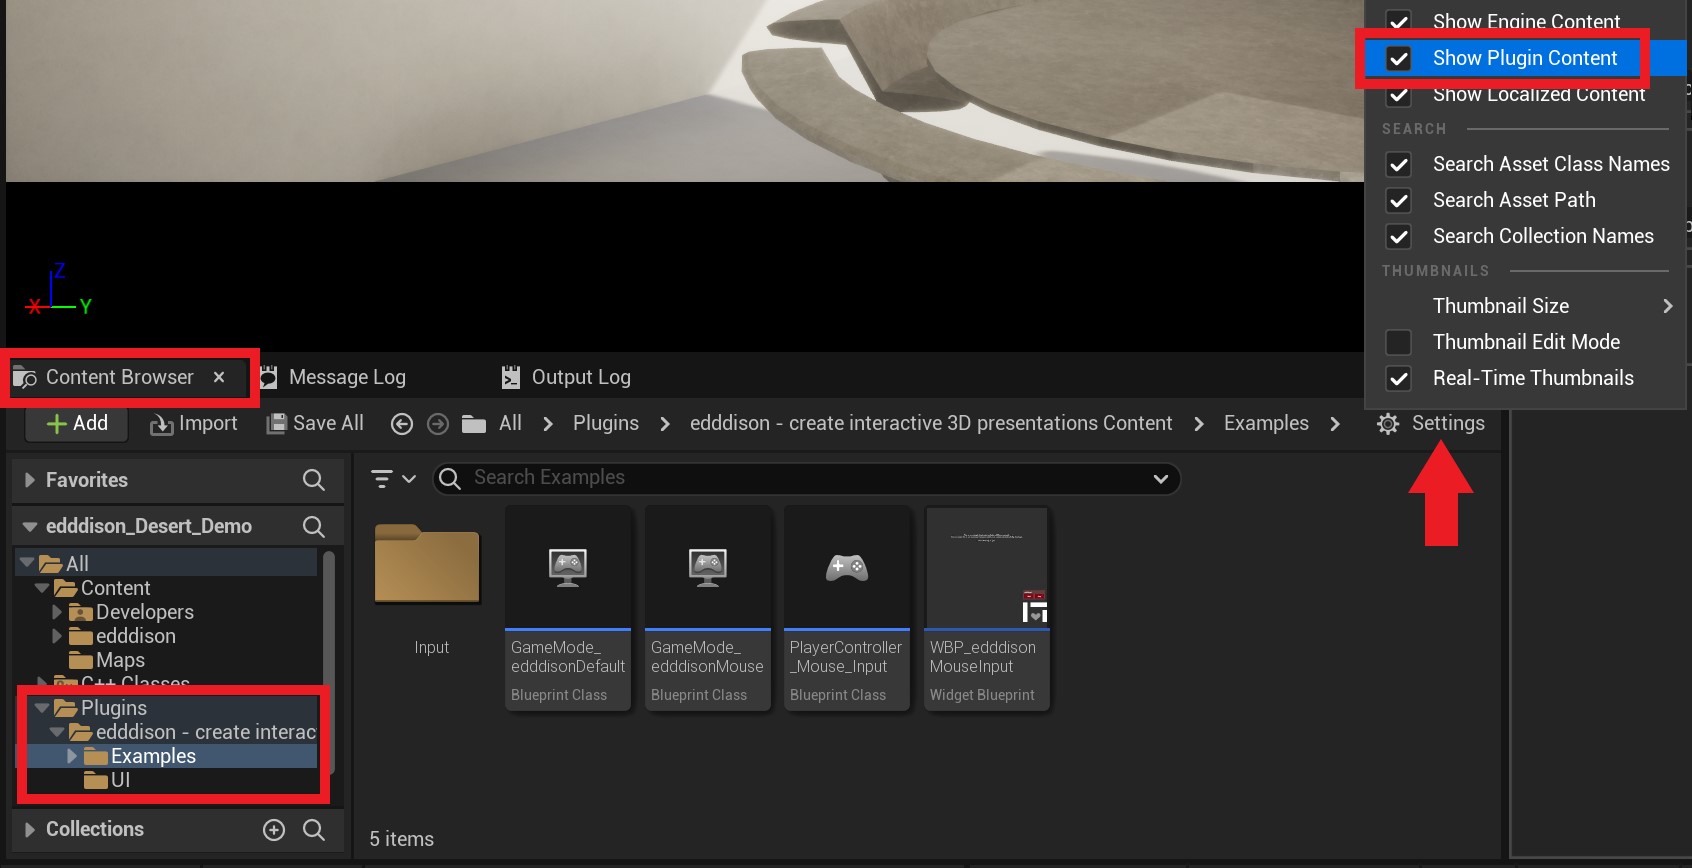
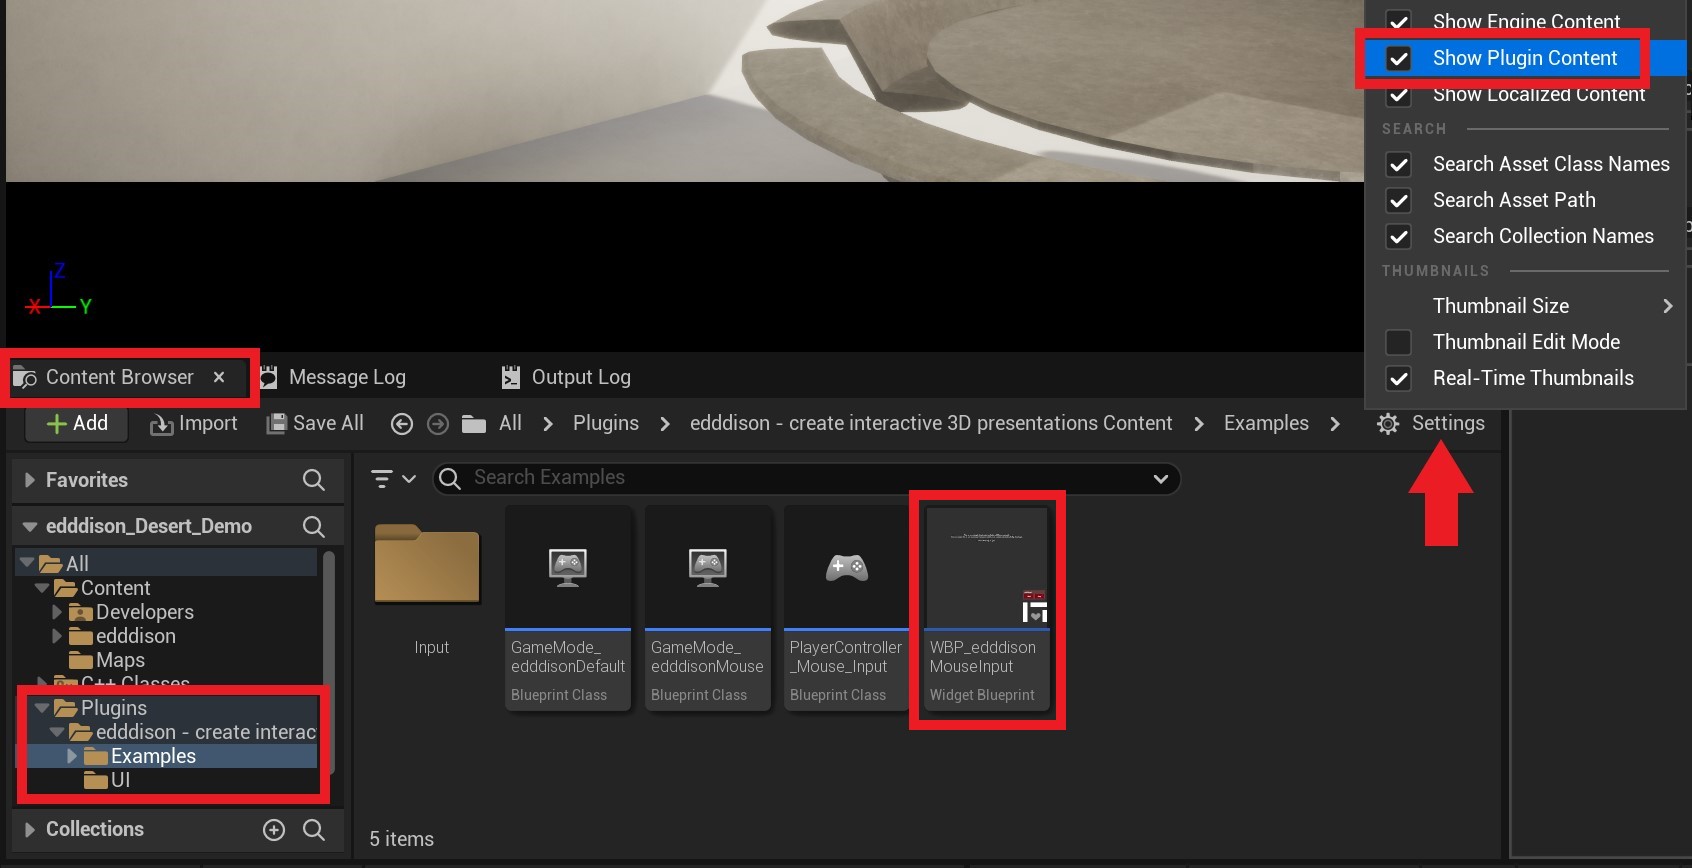
Note: The GameMode asset itself can be found at Plugins → edddison - create interactive 3D presentations Content → Examples folder.
Note: If the plugin content is not displayed in the Unreal Engine Content Browser, then its display must be activated in the Content Browser settings.
Manage 3D objects (optional)#
A 3D object linked with edddison can:
- be moved around
- be switched on or off
- be a target for the POV-Camera
- be a deputy who forwards events to a blueprint
All Unreal Engine game objects (Actors) can be used as movable or stationary objects.
Note: If you want multiple objects to act as a group (e.g. move and be switched on/off together), you can create an actor as the parent object and link this parent to edddison.
Link the edddison 3D object#
- Create a new Object (Actor) or select an existing object.
- Select the edddison plugin window.
- Click on the plus icon in the Objects-Section to add it to the edddison plug-in. (See Image)
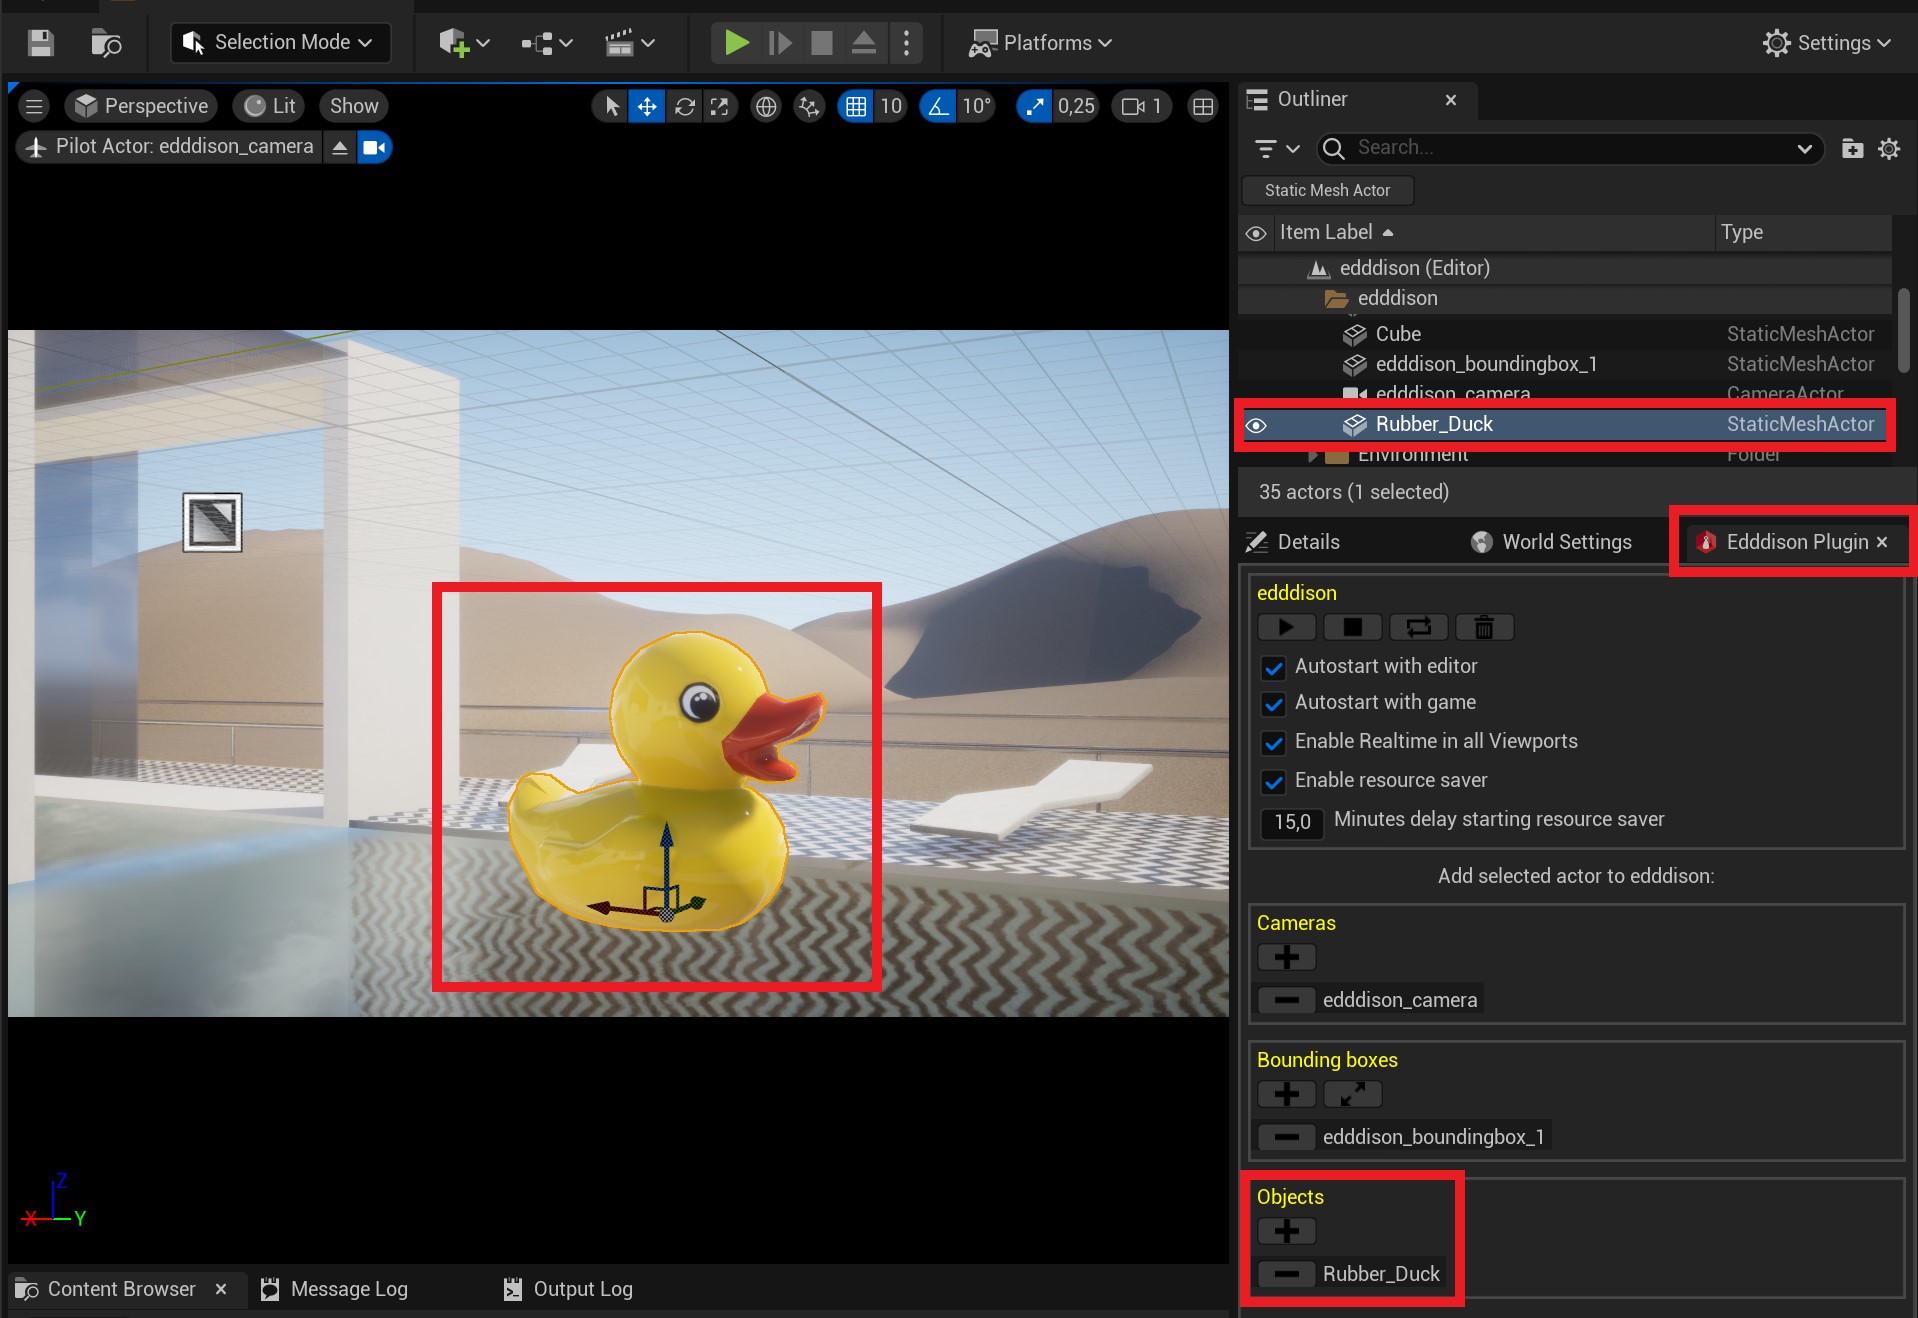
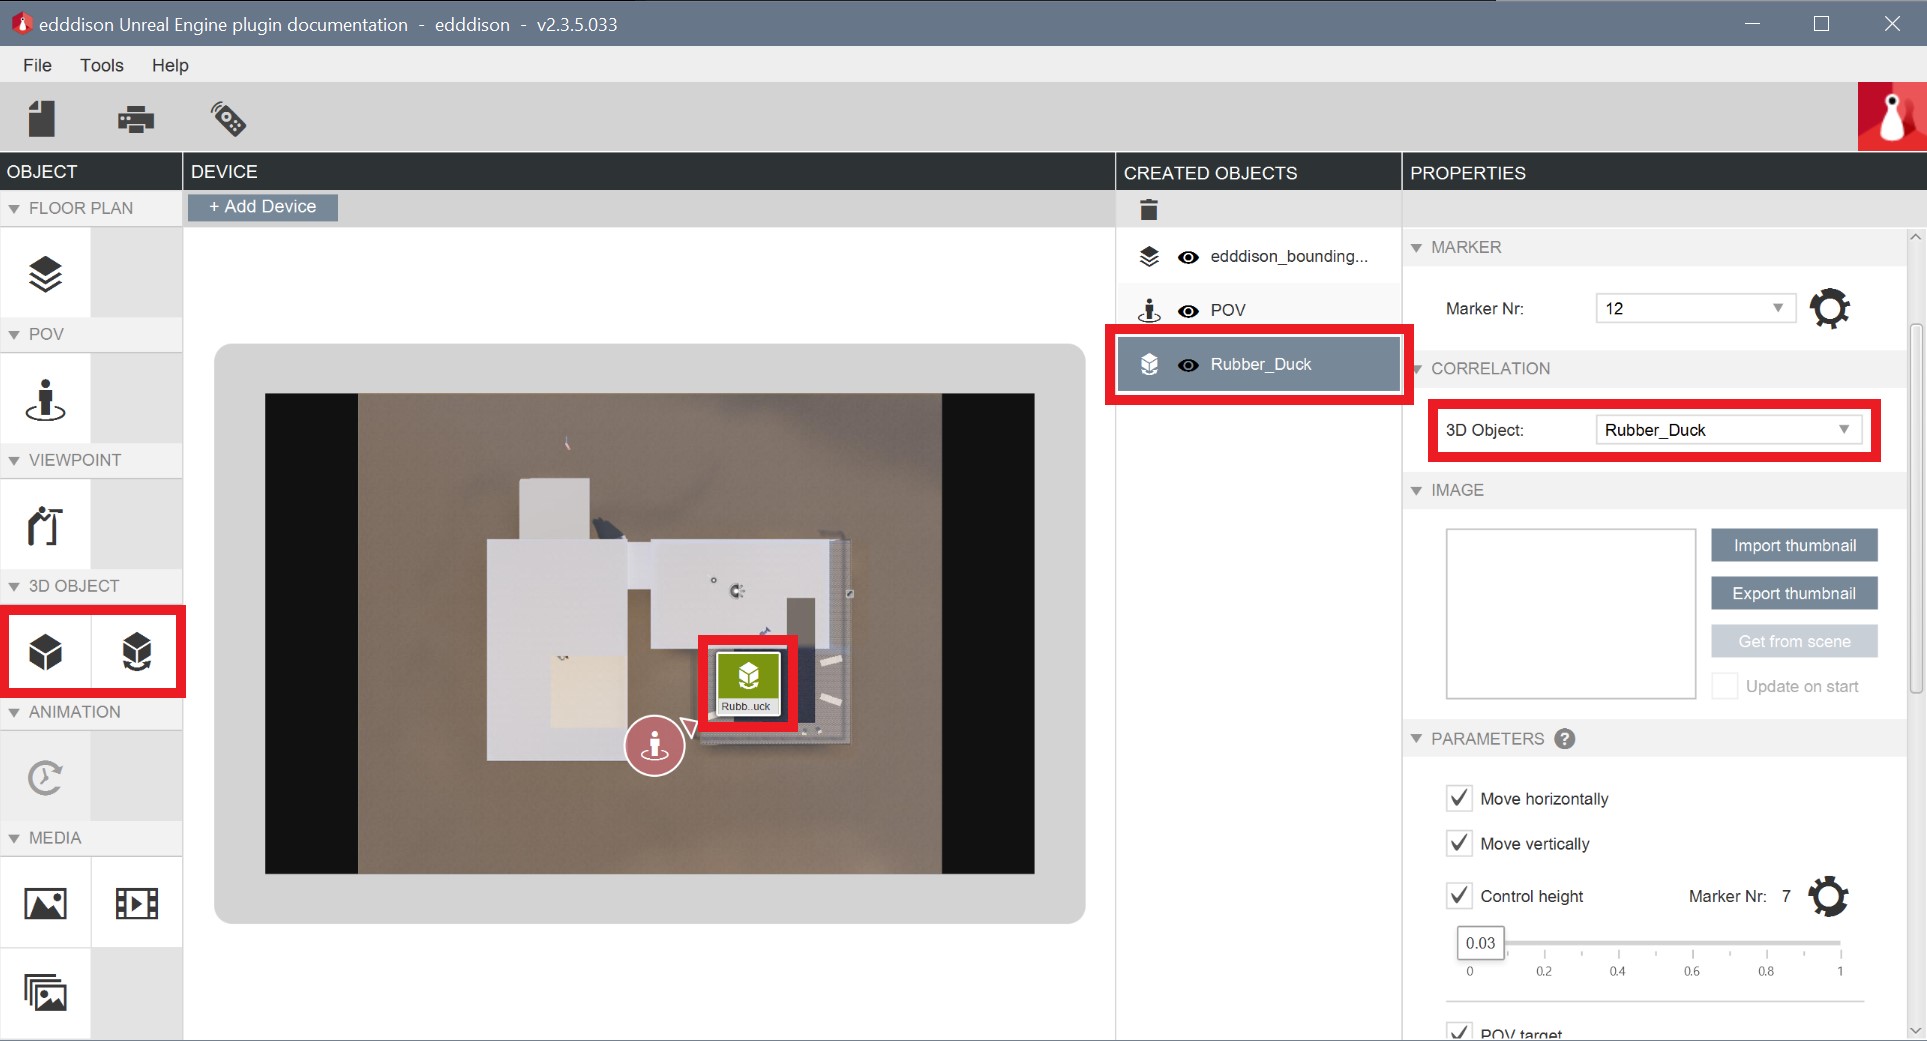
- In the edddison editor create a 3D OBJECT and link it with the object you have set up in the Unreal Engine. In our case the Rubber_Duck. For details, have a look at the section Movable 3D objects or Stationary 3D objects.
Run/Deploy project with edddison#
Controlling the scene by edddison can be done in the Unreal Engine editor Mode, in the Unreal Engine editor Game Mode and in packaged games.
Editor Mode#
- If the edddison editor is not running, you can start it by pressing the Open edddison button in the edddison plugin window. Further details see Configure the edddison plug-in.
Play Mode#
To start edddison automatically with the game the edddison plugin setting Autostart with game has to be selected.
- Hit the Play-Button of the Unreal Engine editor.
Unreal Engine will now start your game in the Viewport and at the same time you will see the edddison editor-software starting in a separate window.
Please continue to set up your project in the edddison editor-software. Follow the Tutorial Editor
Note: edddison has to be always started from edddison plugin inside the Unreal Engine or the Unreal Engine game itself; there will not be a shortcut on your desktop!
You can always stop the edddison editor interaction with the Unreal Engine model by clicking the Stop-Button (Modes → edddison plugin → Stop Button).
Other options are: * Update edddison: Most of the time edddison keeps in sync with changes in the Unreal Engine scene. If you change the properties of a bounding box in the Unreal Engine, you may have to click on the Update edddison button to deliver these changes to edddison.
- Clear: Clear all edddison plugin configuration.
![]()
Switch to the edddison camera view#
To see and use the edddison interaction in the Unreal Engine editor view, you have to switch to the view of the edddison camera.
Click on the view selector button and select the camera form the list.
Move the camera with edddison.
Build & Deploy Project#
To configure your presentation, please continue to set up your project in the edddison editor-software. Follow the Tutorial Editor
- Start the game via the .exe or the "Launch"-Option in the Unreal Engine. It launches edddison automatically in a separate window.
- Import and load the edddison configuration (*.edddison).
- Work with edddison.
- Closing the game closes edddison too.
Note: edddison is started automatically by the Unreal Engine. There will not be a shortcut on your desktop!
If you packed your game and want to use it:
- as a stand-alone .exe: Just build and package your project like any other Unreal Engine game. Be sure to have to option Autostart with game in the edddison plugin as well as the plugin itself activated before packaging.
- on another computer: Copy your packaged Unreal Engine game to the other computer. You will have to install edddison editor and an edddison license on the other computer.
- Export the edddison configuration (*.edddison) and ship it with the game files, if you want to use the game with edddison on another computer.
Use Blueprint functions to start/stop edddison (optional)#
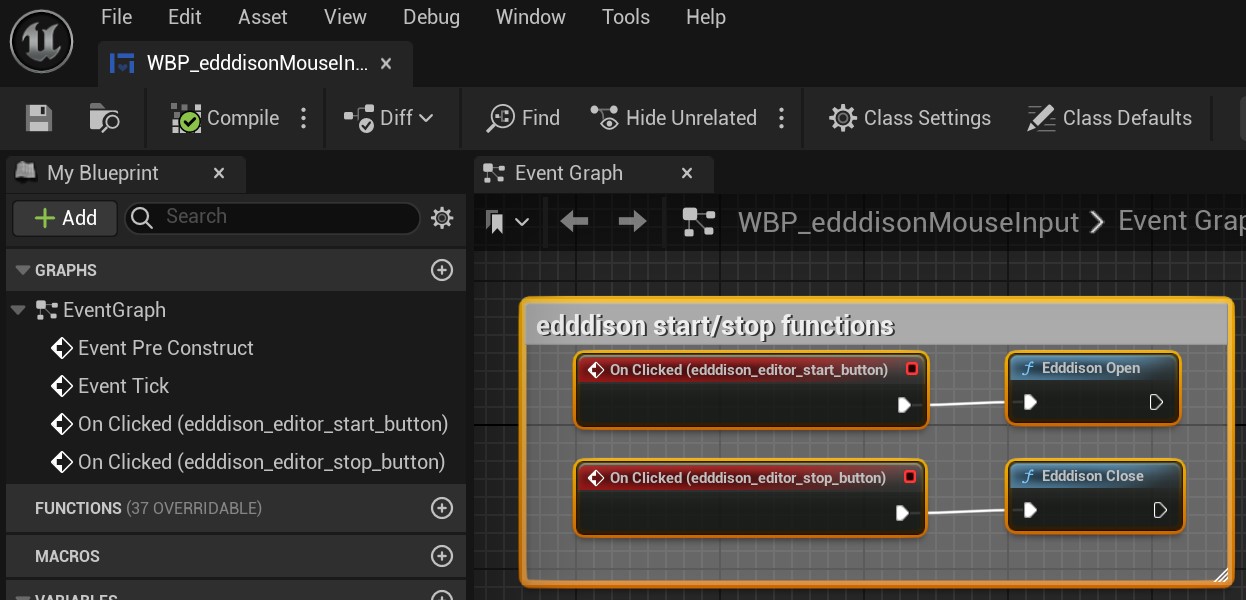
To start edddison in a game manually we provide an example UI. Have a look at the Unreal Engine Content Browser Plugins → edddison - create interactive 3D presentations Content → Examples → WBP_edddisonMouseInput.
If you use it you have to uncheck Autostart with game in the edddison plugin options.
Note: An enabled autostart option overrides the Blueprint functions.
In this example we have two buttons to start and stop edddison in your game.
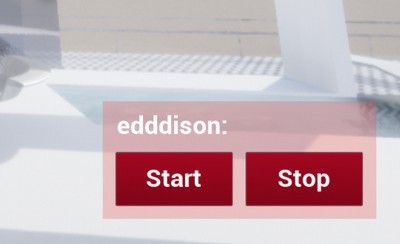
The click event of the buttons are bound to the edddison functions Edddison Open and Edddison Close. If you like to have additional edddison functions to be accessible by blueprints, just ask us.
To easily try out you only have to change the GameMode of your project. Set the GameMode to GameMode_edddisonMouseInput.
View in VR (optional)#
You can use edddison and VR together. For example, you can integrate and use the edddison controller through the Unreal Engine embedded web browser into your VR menu.
You can move the camera in the edddison editor while another person watches through a VR device (HMD). If the VR device supports head tracking (position, orientation), the VR user can control the view additionally.